
Crochet Pumpkin-Shaped Doll Pattern is a charming way to combine the rounded, ribbed appearance of a pumpkin with the sweet personality of a handmade crochet doll. Inspired by the ornament style shown in the photo, this project uses alternating sections of red and white yarn outlined with green details, a small round head, a festive hat, and a hanging loop.
Although the colors create a Christmas feeling, the same construction can easily be adapted to autumn by using orange, cream, brown, mustard, or sage yarn. The finished piece works beautifully as a tree ornament, seasonal decoration, handmade gift, or small hanging doll.
One of the most attractive features of this Crochet Pumpkin-Shaped Doll Pattern is its dimensional body. Instead of making a simple flat circle, the body is constructed so that distinct raised sections form around the center, creating the recognizable grooves of a pumpkin. Green crochet lines emphasize those divisions and add definition to the finished shape. A lightweight wooden bead can be used for the head, as suggested by the photographed design, or crocheters who prefer an entirely yarn-based project can make a small stuffed crochet sphere instead. Both options create an adorable result while allowing plenty of room for personalization.
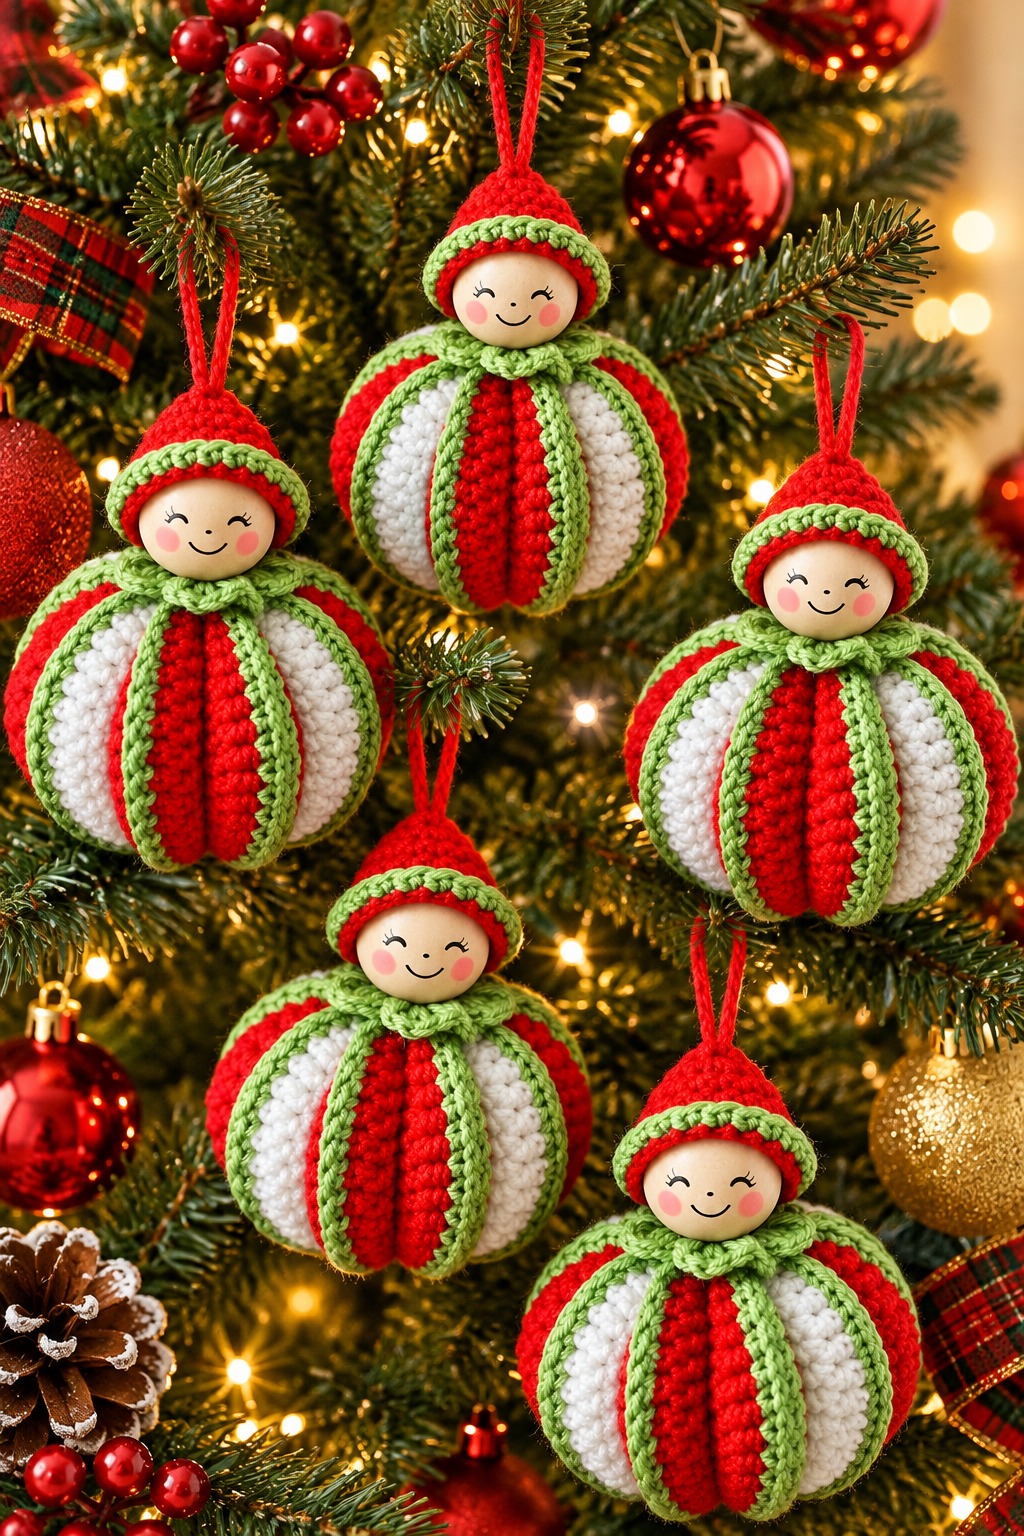
This tutorial is written using US crochet terminology and is designed to explain the construction from beginning to end. Because yarn thickness, hook size, stuffing amount, and individual tension can change the finished measurements, consider the stitch counts below a practical starting point rather than a rigid commercial pattern. The most important techniques are single crochet, half double crochet, slip stitch, increasing, decreasing, working in continuous rounds, and creating decorative surface lines. Once these techniques are understood, the pumpkin doll becomes a manageable project that can be repeated in many different color combinations.
Materials, Crochet Abbreviations, and Preparation
For one Crochet Pumpkin-Shaped Doll Pattern, gather medium-weight yarn in red, white, and green, plus a small amount of yarn for sewing. You will also need an appropriately sized crochet hook, polyester fiberfill, a yarn needle, scissors, stitch markers, and either a lightweight wooden bead or yarn and stuffing for the head. A 3.5–4 mm hook is a useful starting range for many medium-weight yarns, although the ideal hook depends on the yarn. For ornaments, the stitches should be firm enough that the stuffing does not show through.
Here are the main US crochet abbreviations used throughout the project: ch = chain, sl st = slip stitch, sc = single crochet, hdc = half double crochet, inc = increase, and dec = decrease. An increase means working two stitches into the same stitch. A decrease combines two stitches into one. The abbreviation st/sts means stitch or stitches, and FO means fasten off. These basic terms make the instructions easier to read as you progress.
Begin with the pumpkin-shaped body. With red yarn, make a magic ring and work 6 sc into the ring. Pull the center closed. On Round 2, work 2 sc in every stitch around for 12 stitches. On Round 3, repeat [sc in next st, inc in next st] six times for 18 stitches. On Round 4, repeat [sc in next 2 sts, inc] six times for 24 stitches. Place a stitch marker into the first stitch of each round so you always know where the round begins.
Continue increasing the body gradually. Round 5 can be [sc in next 3 sts, inc] repeated six times for 30 stitches, followed by Round 6 as [sc in next 4 sts, inc] repeated six times for 36 stitches. Depending on the desired ornament size, you can stop here or make another increase round. A body approximately 9–12 cm across is a convenient size for a substantial hanging ornament, although your exact measurement will depend on yarn, hook, tension, and stuffing.
To imitate the striped appearance in the reference design, introduce white yarn in planned sections. A simple method is to divide the circumference visually into alternating red and white areas while continuing the shaping. Another beginner-friendly method is to crochet separate slightly curved panels and sew them together. The continuous-round approach is faster, while the panel method makes the pumpkin grooves more pronounced. Whichever technique you choose, keep the color changes neat by completing the final yarn-over of the previous stitch with the new color.
Once the widest point is established, work one or two rounds without increasing. Then begin decreasing in the reverse sequence. Work [sc in next 4 sts, dec] around, followed by [sc in next 3 sts, dec], gradually reducing the body. Before the opening becomes too small, fill the pumpkin firmly but not excessively with polyester fiberfill. Overstuffing can flatten the decorative grooves, so add small amounts of filling and shape the body with your hands as you work.
Creating the Pumpkin Ribs and Decorative Green Edging
The characteristic feature of the Crochet Pumpkin-Shaped Doll Pattern is the ribbed construction. After stuffing and closing the body, thread a long strand of strong matching yarn through a yarn needle. Insert the needle through the center bottom and bring it out through the center top. Take the yarn down around the outside of the pumpkin and pass through the centers again. Pull gently until a groove forms. Do not pull so tightly that the stitches become distorted.
Repeat this process around the body at evenly spaced intervals. Six or eight divisions usually create a pleasing pumpkin shape. Each strand compresses the stuffing slightly and produces the rounded lobes that distinguish the body from an ordinary crochet ball. Rotate the piece after each pass and compare the sections. Consistent spacing is more important than making every groove mathematically perfect because the soft handmade appearance is part of the design.
The green outlines visible in the inspiration image can be recreated with surface crochet. Attach green yarn close to the top of one pumpkin groove. Insert the hook through the surface stitches, pull up a loop, and make slip stitches along the groove toward the bottom. Continue carefully without pulling the green yarn too tightly. Surface slip stitches should rest neatly on the fabric rather than compressing it.
If surface crochet feels difficult, embroider the green lines instead. Thread green yarn onto a tapestry needle and follow each indentation from top to bottom using long, controlled stitches. Another option is to crochet narrow green chains and sew them over the grooves. This method creates a particularly dimensional border and closely resembles the raised green framing seen around the red and white sections of the photographed ornaments.
After adding all the ribs, inspect the pumpkin from every direction. Gently massage the stuffing toward any areas that look flat. The sections should appear plump, rounded, and approximately balanced. Handmade crochet does not need absolute symmetry, but taking a few minutes to shape the body significantly improves the final appearance. If one division looks much larger than the others, adjust the tension of the shaping strand before securing it permanently.
Finish the body by weaving every loose yarn end securely into the interior. Because the doll may be used as a hanging ornament, its upper attachment area needs to be strong. Leave a clear central point at the top for attaching the head. If the project will be handled frequently, reinforce this point with several passes of yarn through the body so the weight of the ornament is distributed across multiple stitches rather than a single stitch.
Making the Doll Head, Hat, Collar, and Hanging Loop
For the head, the easiest option is a smooth wooden bead approximately 25–35 mm in diameter, adjusted to suit the size of your pumpkin body. Paint or draw a simple face only with materials appropriate for the intended decorative use. A small smile, closed eyes, and rosy cheeks create the cheerful expression shown in the inspiration. If the ornament could be accessible to very young children, avoid loose beads and other detachable pieces and make a fully crocheted head instead.
To crochet the head, begin with skin-tone yarn and make a magic ring with 6 sc. Increase to 12 stitches, then 18 stitches, and continue increasing if necessary until the circle has the desired diameter. Work several rounds evenly to create the middle of the sphere. Then reverse the increases with evenly distributed decreases. Add stuffing before closing. Embroider the facial details with yarn or embroidery thread instead of attaching small plastic pieces.
The red hat begins at its pointed top. Make a magic ring and work 4–6 sc into it. Crochet one round evenly, then gradually increase every few stitches. Continue until the hat is wide enough to fit over the head. The goal is a small tapered cap rather than a flat circle. Try the hat against the head frequently because the exact number of rounds depends heavily on head size, yarn thickness, and tension.
Add the contrasting green brim once the red portion is complete. Join green yarn around the final hat round and work one round of sc. For a slightly decorative edge, work a second round using [sl st, sc, hdc, sc] repeated around, adjusting the repeat as needed to fit the stitch count. This creates the softly scalloped green border that gives the hat extra character while coordinating it with the pumpkin ribs.
For the collar, crochet a short green chain long enough to wrap comfortably around the base of the head. Beginning in the second chain from the hook, work sc or hdc across. For a more decorative collar, work [sc, hdc, sc] groups or tiny shell-like sections along the chain. Wrap the strip around the neck area and sew the ends together. Secure the collar to the body with several discreet stitches so it does not rotate or slide.
Finally, make the hanging loop. Attach red yarn securely to the top of the hat and chain approximately 25–35 stitches, depending on the desired loop length. Join the final chain back near the starting point with a slip stitch. Fasten off and weave in the tail thoroughly. Reinforce the connection by sewing through the hat and into the upper body structure. The loop should support the entire ornament without stretching the hat out of shape.
Assembly, Finishing Details, and Customizing the Pattern
Begin final assembly by positioning the head directly over the center of the pumpkin body. Before sewing, look at the doll from the front, sides, and back to confirm the placement. Thread a yarn needle with a strong matching strand and sew through several body stitches, through or around the head attachment area, and back into the body. Repeat several times. The head should remain upright when the ornament hangs.
Place the hat on the head and angle it slightly forward for the cozy appearance seen in the inspiration. Stitch the hat to the head around several points of its lower edge. Avoid relying only on glue, especially if you expect the ornament to be stored and reused for many seasons. Crochet stitching provides a more integrated handmade finish and makes repairs easier if the ornament is accidentally pulled.
Now check the green collar. It should visually bridge the small head and large pumpkin body while concealing the attachment stitches. If the collar seems too flat, add another round with small decorative loops such as [ch 3, sl st in next st] repeated across. A fuller collar works particularly well when the body is large because it creates a smoother visual transition between the two sections.
The colors are one of the easiest ways to transform the design. Red, white, and green create a clear Christmas crochet ornament, while orange, cream, and olive make the same Crochet Pumpkin-Shaped Doll Pattern suitable for autumn. Burgundy, ivory, and forest green produce a more traditional look. Pastel pink, mint, and cream can create a softer contemporary version. The underlying construction remains unchanged.
You can also experiment with the pumpkin sections. Six broad ribs create a simple beginner-friendly body, while eight narrower ribs produce more texture. Another variation is to crochet the entire body in one color and use contrasting yarn only for the raised lines. Small decorative additions such as a crocheted bow, tiny scarf, leaf, or embroidered details can personalize each doll without changing the core pattern.
Before displaying the finished ornament, perform a final inspection. Check that every yarn tail is woven in, the head and hanging loop are firmly attached, and the stuffing is evenly distributed. Shape each pumpkin section gently with your fingers. If the project is intended purely as seasonal décor, it can now be hung on a tree, wreath, garland, decorative branch, or gift package. Making several dolls in coordinated colors creates an especially attractive handmade collection.
FAQ: Crochet Pumpkin-Shaped Doll Pattern
Is the Crochet Pumpkin-Shaped Doll Pattern suitable for beginners?
Yes. A confident beginner who understands single crochet, increases, decreases, slip stitches, and color changes should be able to complete it. The shaping and assembly require patience, but the individual crochet techniques are relatively simple.
What crochet terminology is used in this tutorial?
The instructions use US crochet terms. The main stitches are chain (ch), slip stitch (sl st), single crochet (sc), and half double crochet (hdc), along with increases and decreases for shaping.
How large should the finished pumpkin doll be?
There is no mandatory size. With medium-weight yarn, a body around 9–12 cm wide makes a useful decorative ornament. Changing yarn weight, hook size, stitch count, or tension will alter the finished dimensions.
How do I make the body look more like a pumpkin?
The key is creating defined pumpkin ribs after stuffing. Pass yarn repeatedly from the bottom center to the top center and around the outside, tightening each section gently. Adding surface crochet or embroidered lines over these indentations makes them even more visible.
Can I make the doll without a wooden bead?
Absolutely. Crochet a small stuffed sphere using skin-tone yarn and embroider the facial features. This gives you an entirely crocheted version and eliminates the need for a wooden component.
Can I use different colors?
Yes. The pattern is highly adaptable. Red, green, and white are ideal for Christmas, while orange and brown create a traditional pumpkin theme. Neutral, pastel, or jewel-tone yarns can give the project a completely different personality.
What yarn works best for this pattern?
A smooth medium-weight yarn is easy to control and shows the ribbed construction clearly. Cotton provides crisp stitch definition, while acrylic is lightweight and available in many colors. Whichever fiber you choose, use consistent yarn thickness throughout the main body.
How much stuffing should I use?
Use enough fiberfill to create a rounded body without making it extremely hard. Moderate stuffing allows the shaping yarn to pull inward and create pronounced grooves. Add stuffing gradually and shape the body frequently.
How can I keep the color changes neat?
Change colors during the final yarn-over of the stitch immediately before the new section begins. Keep unused yarn tension controlled and weave ends securely. Consistent tension prevents gaps between red and white sections.
Can this pattern be made as a Christmas tree ornament?
Yes. The red, white, and green version is particularly suited to a handmade Christmas ornament. Make the hanging loop long enough to pass comfortably over a tree branch and reinforce its attachment to the hat and body.
Can I make several dolls as a matching set?
Yes. A coordinated collection is one of the best uses for this design. Keep the same basic construction while changing hat colors, facial expressions, body stripes, collars, or sizes. This creates variety without requiring an entirely new pattern for every ornament.
How do I make the ornament durable enough to reuse each year?
Weave yarn ends deeply into the crochet fabric, reinforce the head and hanging loop, and avoid placing excessive tension on individual stitches. Store the ornament in a dry container where the body will not remain compressed for long periods.
Is this a toy or a decoration?
The version described here is primarily a decorative craft project. If adapting it for children, avoid detachable beads, glued embellishments, or other small components and consider using an entirely crocheted and embroidered construction appropriate to the intended age and use.
Conclusion
Video Tutorial:
The Crochet Pumpkin-Shaped Doll Pattern combines simple crochet shaping with creative finishing techniques to produce a dimensional seasonal decoration. Throughout this tutorial, you learned how to crochet and stuff the rounded body, create the characteristic pumpkin ribs, emphasize those divisions with green detailing, construct the head, make a pointed hat and collar, and add a secure hanging loop.
The most important part of the design is not complicated stitch work but careful shaping. Even basic single crochet stitches can produce an impressive three-dimensional result when increases, decreases, stuffing, and strategically placed shaping strands work together. The raised green lines provide additional definition and make the alternating body sections stand out beautifully.
Once you understand the basic construction, you can customize the pattern almost endlessly. Turn it into a bright Christmas crochet decoration, use autumn colors for a classic pumpkin doll, experiment with different facial expressions, or make an entire collection of miniature ornaments. Each version can have its own personality while following the same fundamental technique.
If you make this Crochet Pumpkin-Shaped Doll Pattern, leave your sincere opinion about the project and share any suggestions you have for future crochet patterns. Your ideas about colors, variations, sizes, and decorative details can inspire even more creative versions of this cheerful handmade design.