
The Fabric Folded Christmas Tree Door Pattern is a charming way to transform small pieces of Christmas fabric into a dimensional holiday decoration that feels warm, handmade, and festive. Inspired by the layered fabric trees shown in the photo, this project uses padded folded sections arranged from narrow at the top to wide at the bottom.
Alternating traditional Christmas colors such as red, green, cream, and gold gives the tree its recognizable holiday character, while buttons and a sparkling star add personality. Although the finished piece looks detailed, the construction is based on simple sewing, folding, pressing, and layering techniques that can be approached one section at a time.
One of the best features of this fabric Christmas tree pattern is its versatility. The tree can be made as a small ornament, enlarged into a Christmas door decoration, used as a wall hanging, attached to a wreath, or displayed on a table or mantel. It is also an excellent project for using coordinated fabric scraps left from quilting and sewing projects. Instead of requiring large amounts of yardage, the design benefits from combining several prints. Tiny florals, dots, snowflakes, metallic accents, and traditional holiday motifs can all work beautifully together as long as there is enough contrast between neighboring layers.
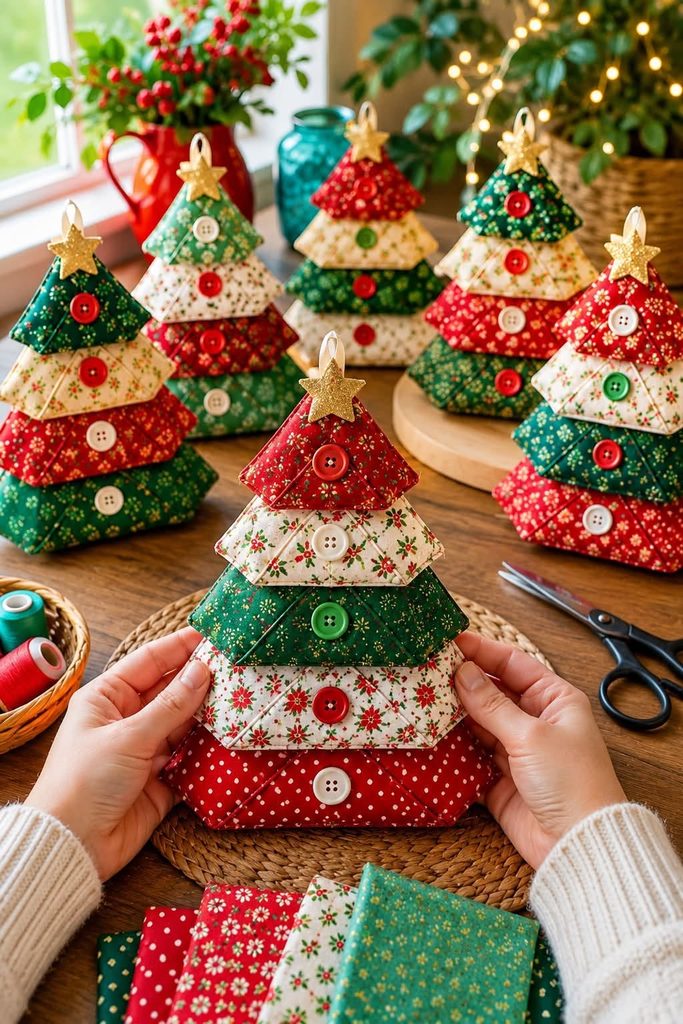
This tutorial explains a practical method for recreating the visual style of the photographed tree rather than claiming to reproduce an unseen commercial pattern. The finished measurements can therefore be adjusted according to the desired use. For a medium Fabric Folded Christmas Tree Door Pattern, aim for a finished tree approximately 30–35 cm tall and 22–26 cm wide at its broadest point. The important principle is proportion: every folded section becomes progressively wider toward the bottom. Careful pressing, consistent seam allowances, symmetrical placement, and neat hand finishing will give the project the polished appearance that makes this style of handmade Christmas decoration so attractive.
Materials, Measurements, and Preparation for the Fabric Folded Christmas Tree Door Pattern
Begin by selecting four or five coordinating cotton fabrics. Quilting cotton is particularly suitable because it is easy to cut, press, fold, and sew. For a classic Christmas sewing project, combine deep green, bright or burgundy red, warm cream, and small holiday prints. You can alternate colors exactly as seen in the inspiration photo or create your own sequence. Approximately one fat quarter’s worth of assorted scraps is usually more than enough for one medium tree, depending on the dimensions you choose.
You will also need lightweight batting or fusible fleece to give each section a softly padded appearance. Gather matching sewing thread, a hand-sewing needle, fabric scissors or a rotary cutter, quilting ruler, pins or clips, an iron, and a sewing machine. Decorative buttons can be placed in the center of each tier. For the top, prepare a small fabric or felt star, and keep a narrow ribbon approximately 15–20 cm long if you want the finished fabric tree ornament to hang from a door hook or wall peg.
For a tree approximately 32 cm tall, prepare five graduated folded sections. A practical starting set of fabric rectangles is approximately 12 × 9 cm, 16 × 11 cm, 20 × 13 cm, 24 × 15 cm, and 28 × 17 cm. These dimensions are flexible because the exact finished size depends on how deeply the fabric is folded and how much the tiers overlap. Cut matching batting pieces slightly smaller than the fabric pieces so excessive bulk does not collect inside the seams.
Before cutting everything, make one test tier from scrap fabric. Fold it into the intended trapezoid or triangular envelope shape and check the finished width. This small test is valuable because folded fabric sewing behaves differently depending on fabric thickness, batting, seam allowance, and pressing. If your test section looks too tall or too narrow, adjust the rectangle before cutting the decorative fabrics. Testing first also makes it easier to establish consistent proportions for all five layers.
Once the dimensions are confirmed, cut each fabric piece carefully on grain. Accurate cutting helps the left and right sides remain balanced when the sections are folded. Mark the vertical center of each piece with a temporary fabric marker or a light finger press. This center reference becomes especially helpful later when stacking the tiers. If the fabric has a directional print, decide which edge must face upward before sewing so motifs such as trees, flowers, or snowflakes do not appear upside down.
Press all fabrics before construction. This may seem like a small step, but pressing is essential for a crisp Fabric Folded Christmas Tree Door Pattern. Wrinkles can distort measurements and cause one side of a tier to become larger than the other. Use the iron setting recommended for your fabric and avoid stretching pieces while pressing. Arrange all five prepared pieces from smallest to largest on the work surface before sewing; this provides a useful preview of the final color sequence.
How to Sew and Fold Each Christmas Tree Layer
Start with the smallest fabric piece. Place the fabric and batting together, keeping the batting centered and away from bulky seam areas. Depending on your preferred construction method, the tier can be sewn as a small lined rectangle and turned right side out, or its raw edges can be turned inward and secured before folding. The goal is to create a clean padded unit with no obvious raw edges. Use approximately a 6 mm seam allowance when appropriate and trim bulky corners before turning.
After turning the piece right side out, gently push the corners into shape without piercing the fabric. Press the unit flat. Find its center again, then bring the lower corners inward and slightly upward so the piece develops the layered envelope appearance visible in the inspiration image. The exact angle can be adjusted until the upper portion forms a narrower peak and the bottom creates a wider horizontal edge. Press the folds carefully once you are satisfied with the symmetry.
Secure the folded edges with a few hidden hand stitches or short machine stitches placed where they will eventually be covered. Avoid stitching across unnecessary areas because part of the charm of this folded Christmas tree sewing pattern comes from the soft dimensional folds. The fabric should remain slightly raised rather than being completely flattened. If you use batting, press gently rather than applying excessive pressure that could remove all of the volume.
Repeat the process with the second fabric rectangle. This tier should finish slightly wider than the first. Place the completed first tier over it temporarily to check the relationship between the two sizes. Ideally, the lower tier should extend evenly beyond both sides of the tier above. If one side extends farther, correct the fold before permanently stitching it. Symmetry is more important than following a measurement to the millimeter.
Continue preparing the third, fourth, and fifth tiers using the same method. Each section becomes progressively wider and may also become slightly taller. Alternating fabrics produces the stacked patchwork effect. For example, you might arrange red at the top, cream second, green third, cream fourth, and red at the base. Another attractive arrangement is green, cream, red, green, and cream. Repetition helps visually connect the individual pieces.
Lay all five completed tiers on a flat surface before joining them. Overlap each tier enough to hide the upper edge of the section below while keeping a generous portion of every print visible. Measure from the center rather than from only one outside edge. The Fabric Folded Christmas Tree Door Pattern should gradually flare outward, creating a balanced triangular tree silhouette. Make any final folding or pressing corrections now because adjustment becomes more difficult after assembly.
Assembling, Decorating, and Adding the Hanging Loop
Begin assembly with the largest bottom tier. Position the next smaller section over its upper center, allowing the pieces to overlap by approximately 2–3 cm. Pin or clip them temporarily, then measure the exposed fabric on the left and right. Both sides should be as equal as possible. Attach the tiers with hidden hand stitches along the overlap or carefully machine stitch through concealed areas. The connection should be strong enough to support the weight of the completed decoration.
Add the remaining sections from largest to smallest. Check the overall tree after attaching every new tier instead of waiting until the end. Place the project upright periodically to make sure it has not begun leaning to one side. The visual center of all five tiers should form one vertical line. This simple habit can make a noticeable difference in the professional appearance of a handmade Christmas tree decoration.
Now add the buttons. The photographed inspiration uses one button near the center of each tier, creating a vertical line of colorful accents. Select red, green, cream, wooden, or decorative buttons that contrast with the fabrics behind them. Sew each button securely by hand. Besides being decorative, strategically positioned buttons can pass through overlapping fabric layers and provide additional stability to the construction.
Create the top star from glitter felt, metallic fabric, plain felt, or another firm decorative material. A star approximately 5–7 cm wide works well for a medium tree, although its size should be proportional to your finished piece. If using fabric, interface it before cutting to help it maintain its shape. Two star pieces can also be sewn together with a small amount of batting between them for a softer three-dimensional topper.
For a hanging version, fold the ribbon in half to create a loop. Position the raw ends behind the uppermost tree tier and stitch them securely before attaching the star. Reinforce this area because it will support the entire decoration. Once the loop is firmly attached, place the star over the top seam so it conceals the ribbon ends. Hand stitching often provides greater control here and helps keep visible stitches to a minimum.
Inspect the completed Fabric Folded Christmas Tree Door Pattern from both the front and back. Trim loose threads and make sure all buttons, folded corners, and hanging components are secure. If the tree will be displayed against a door, you can add a simple felt backing to protect the surface and give the decoration a cleaner reverse side. Keep embellishments lightweight so the tree retains its soft textile appearance rather than becoming unnecessarily heavy.
Finishing Ideas, Display Options, FAQ, and Conclusion
One of the easiest ways to personalize this DIY fabric Christmas tree is through fabric selection. Traditional red, green, and cream create a nostalgic Christmas look, but the same construction works with farmhouse neutrals, icy blues, Scandinavian red and white, or elegant metallic prints. When combining busy prints, include at least one quieter fabric to give the eye a place to rest. Good contrast also helps each folded tier remain clearly visible.
For a rustic version, consider wooden buttons, linen-look fabric, muted plaids, and a natural ribbon loop. For a brighter design, use small-scale holiday prints and contrasting buttons. Metallic thread can add a subtle sparkle around the star, although it is optional. Decorative elements should support the folded construction instead of hiding it, because the layered geometry is the defining feature of the project.
The pattern can easily be resized. For a small ornament, reduce every tier proportionally and use lightweight interfacing instead of thick batting. For a larger Christmas door hanging, increase every rectangle while preserving the gradual progression between tiers. When enlarging the design considerably, use firmer stabilizer or add a full backing so the tree does not bend under its own weight.
This project is also useful for Christmas fabric scraps because every tier can feature a different print. Scraps from previous quilts, table runners, stockings, or holiday sewing projects can become part of a coordinated tree. When working from scraps, arrange the available pieces before cutting. Place stronger colors at strategic points and distribute similar prints rather than grouping them accidentally in one part of the tree.
To store the decoration after Christmas, avoid sharply folding the completed tree. Lay it flat in a storage box or place acid-free tissue between it and other decorations. If batting has been used, heavy objects can compress the tiers over time. The star should also be protected from bending. With careful storage, a well-sewn Fabric Folded Christmas Tree Door Pattern can return to your holiday decorating collection year after year.
The same basic technique can inspire matching ornaments, gift toppers, wall decorations, and miniature trees. Once you understand how the graduated folded pieces create the silhouette, changing the dimensions becomes straightforward. Keep notes about your preferred measurements and overlap distances after finishing the first tree. Those notes make it much easier to reproduce a coordinated collection in different fabrics.
FAQ – Frequently Asked Questions
What is a Fabric Folded Christmas Tree Door Pattern?
A Fabric Folded Christmas Tree Door Pattern is a sewing project made from progressively sized fabric sections that are folded, padded, and layered to create a dimensional Christmas tree shape. Decorative buttons, a star topper, and a hanging loop can then be added to turn the tree into a festive door or wall decoration.
What type of fabric works best for this project?
Quilting cotton is an excellent choice because it presses cleanly and is available in many small-scale Christmas prints. Cotton blends can also work, but fabrics that are extremely stretchy, slippery, or heavy may be harder to fold accurately. For beginners, stable woven cotton is usually the easiest material to control.
Do I need batting inside every folded section?
No. Batting is optional, but a thin layer creates the softly padded appearance seen in the inspiration. Fusible fleece or lightweight batting works especially well. If you prefer sharper folds and a flatter tree, lightweight interfacing can be substituted. Avoid very thick batting because several overlapping layers can quickly become bulky.
How large should the finished Christmas tree be?
For a medium door or wall decoration, approximately 30–35 cm tall and 22–26 cm wide is a practical size. These measurements are suggestions rather than strict requirements. A tree intended for an ornament can be much smaller, while a prominent door decoration can be enlarged proportionally.
How many fabric tiers should I make?
Five tiers recreate the full layered appearance shown in the inspiration image particularly well. However, the construction can be adapted to four, six, or even more tiers. Whatever number you choose, make every lower tier progressively wider so the overall silhouette continues to resemble a Christmas tree.
Can beginners make this folded fabric Christmas tree?
Yes. The project uses approachable skills such as measuring, cutting, straight stitching, turning, folding, pressing, and basic hand sewing. The most important beginner tip is to create one test tier before cutting all the decorative fabrics. This gives you an opportunity to understand the folding method and adjust your measurements.
How do I keep all the tiers centered?
Mark the center of every fabric section before folding and maintain that center reference throughout construction. When assembling the tree, align these center marks vertically. Check the distance from the center to the left and right edges before permanently attaching each new tier.
Can I make the tree without a sewing machine?
Yes. A smaller version can be constructed with careful hand stitching. Turned edges and hidden stitches can produce a beautiful handmade finish. A sewing machine simply makes preparing multiple tiers faster, particularly if you plan to make several trees as decorations or gifts.
How can I make the hanging loop stronger?
Use sturdy ribbon and insert its two ends deeply behind the top tier. Stitch through the ribbon several times before covering the attachment with the decorative star. For a larger tree, the loop can also be anchored through the backing fabric so the weight is distributed across a wider area.
Can I use this idea for decorations other than a door hanging?
Absolutely. The same fabric folded Christmas tree pattern can become a tree ornament, mantel decoration, gift embellishment, wall hanging, or centerpiece accent. Changing the scale and hanging method allows one construction concept to serve several holiday decorating purposes.
How should the finished tree be cleaned?
Because the design contains folds, buttons, batting, and possibly glitter or metallic embellishments, gentle spot cleaning is preferable for most versions. Always consider the care requirements of the individual fabrics and decorative materials you selected. Avoid aggressive washing that could distort the folds or damage the star topper.
Why are my folded tiers uneven?
Uneven tiers usually result from inaccurate cutting, inconsistent folds, or failing to mark the center. Press the fabric first, measure carefully, and compare both sides before stitching. A quilting ruler can make the process much easier. Correcting each tier individually prevents small inaccuracies from accumulating as the tree is assembled.
Conclusion
Video Tutorial:
The Fabric Folded Christmas Tree Door Pattern combines simple sewing techniques with clever folding to create a festive decoration full of texture and handmade character. By preparing graduated fabric pieces, adding lightweight padding, folding each section symmetrically, and stacking the tiers from largest to smallest, you can reproduce the dimensional Christmas-tree effect that makes this design so appealing.
Throughout the project, the most important details are accurate cutting, careful pressing, consistent centering, and secure assembly. Buttons create charming focal points on the individual tiers, while the star and ribbon loop complete the traditional Christmas silhouette. Red, green, and cream fabrics create the classic version, but changing the prints makes it easy to coordinate the tree with virtually any holiday decorating style.
Most importantly, treat the measurements as a practical starting point and allow your own fabrics to guide the final proportions. Make a test fold, adjust the dimensions when necessary, and keep the layers balanced as you work. That flexibility is part of what makes the Fabric Folded Christmas Tree Door Pattern such an enjoyable scrap-friendly sewing project.
After finishing your tree, take a moment to look at how the colors, buttons, folds, and star work together. Handmade Christmas decorations become especially meaningful when every fabric choice adds a little personality. If you try this project, leave your sincere opinion about the pattern and share any suggestions or creative changes you would make. Your ideas may inspire an entirely new variation of this festive folded fabric tree.