
The Spinning Me Around Quilt Block Pattern is a beautiful way to transform simple fabric strips into a quilt block filled with movement, rhythm, and visual interest. The design shown in the reference project uses strips in different prints arranged around a small central square, creating the impression that the fabrics are spinning around the center.
Although the finished block looks intricate, the construction can be approached with straightforward piecing techniques, making it an appealing project for quilters who want something more dynamic than a traditional strip block. The combination of florals, stripes, dots, and solids also demonstrates how effectively this design can use coordinating fabrics from a collection or carefully selected scraps.
With accurate cutting, consistent seam allowances, and regular pressing, the block develops naturally as each new strip is added.One of the most attractive features of the Spinning Me Around Quilt Block Pattern is the opportunity to experiment with fabric placement. In the photographed block, soft pink fabrics are combined with a muted gray center and darker floral strips, producing enough contrast to reveal the rotating structure without making the finished piece look overly busy. Striped fabrics emphasize direction, while floral prints soften the geometric construction.
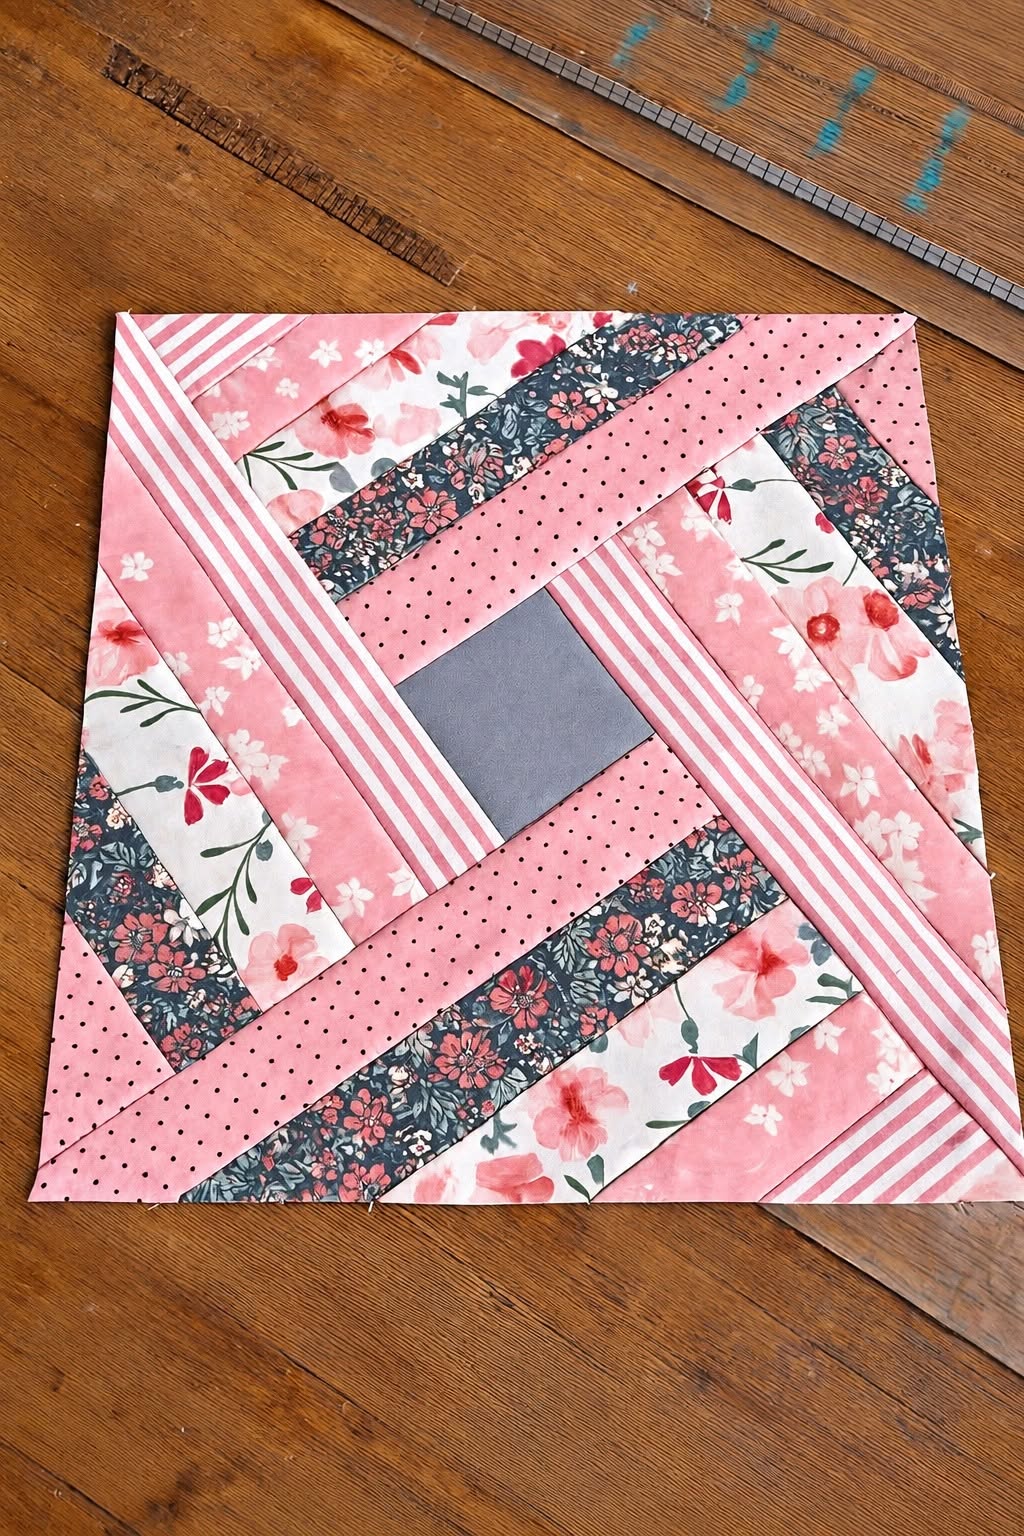
Small dots add another layer of texture and help separate larger motifs. You can follow this same principle with completely different colors: the important idea is to select fabrics that have enough variation in value, scale, and print to make the individual sections visible. This makes the pattern especially useful for scrap quilting because relatively narrow pieces can become important parts of the overall composition.
Before beginning the Spinning Me Around Quilt Block Pattern, it helps to understand that accuracy matters more than speed. Because several strips meet at diagonal-looking visual intersections, small inconsistencies can accumulate as the block grows. A rotary cutter, quilting ruler, cutting mat, sewing machine, neutral thread, iron, and basic quilting supplies are sufficient for the project. Use quality quilting cotton whenever possible because its stable weave makes accurate piecing easier. The tutorial below explains a practical method inspired by the photographed block rather than claiming exact measurements from an image alone. You can make a test block first, establish your preferred finished size, and then repeat the same cutting measurements for additional blocks. This approach provides both creative freedom and reliable consistency.
Materials, Fabric Selection, and Cutting the Pieces
Begin your Spinning Me Around Quilt Block Pattern by choosing approximately five to seven coordinating fabrics. A balanced selection might include a solid fabric, a narrow stripe, a small-scale print, a medium floral, and one darker print. The reference design demonstrates this beautifully with pink, cream, gray, and charcoal tones. Try placing all your fabrics next to one another before cutting. If two prints blend together from a short distance, separate them in the finished block with a lighter or darker strip so that the spinning arrangement remains easy to see.
For a beginner-friendly practice block, start with a center square measuring approximately 10 cm × 10 cm. This square establishes the visual center around which the other pieces will develop. The final dimensions of your block will depend on strip width, seam allowance, and how many rounds you add, so treat these measurements as a customizable starting point rather than dimensions taken directly from the photograph. A solid or subtle fabric is particularly effective in the center because it provides a visual resting point among the surrounding prints.
Next, cut several fabric strips approximately 6 cm wide. You can also use a combination of widths, such as 5 cm, 6 cm, and 7 cm, if you want a more improvised appearance similar to the reference project. Keep in mind that varied widths require more careful planning. Beginners may find it easier to use one consistent width for their first block. Cut the strips longer than you initially expect to need because they can be trimmed accurately after sewing. This reduces the risk of accidentally cutting an important piece too short.
The directional striped fabric deserves special attention. In the Spinning Me Around Quilt Block Pattern, stripes can visually strengthen the illusion of rotation. Before cutting, determine which direction you want those stripes to travel. You might position one striped section vertically, another horizontally, and others at opposing visual angles as the construction expands. Even though the pieces themselves are sewn using straight seams, thoughtful print direction can make the completed block appear much more complex.
Organize the strips before sewing by arranging them loosely around the center square. Alternate light, medium, and dark values instead of placing several nearly identical fabrics next to one another. For example, a gray center could be surrounded by a pink stripe, followed by a dotted fabric, a dark floral, and a pale floral. This sequence helps define each layer. Photographing your arrangement before sewing can also be useful because it gives you a visual reference if the pieces become mixed up.
Finally, check every cut with a quilting ruler. Straight edges and accurate widths are particularly important because the Spinning Me Around Quilt Block Pattern relies on progressive construction. A small cutting discrepancy near the center can become more noticeable toward the outside. Keep the ruler aligned with the fabric grain whenever practical, use a sharp rotary blade, and avoid stretching the strips. Once your center square and coordinating strips are prepared, you are ready to begin building the rotating design.
Building the Spinning Center and Adding Fabric Strips
Place the first fabric strip right sides together along one edge of the center square. Align the raw edges carefully and sew using a consistent 6 mm (1/4-inch) seam allowance, which is the standard seam allowance for many American quilting projects. After stitching, set the seam briefly with the iron, open the strip, and press it away from the center. Trim the strip so that its end aligns neatly with the next edge of the developing unit.
Rotate the piece and add the second strip along the adjacent side. This is where the characteristic movement of the Spinning Me Around Quilt Block Pattern begins to emerge. Sew the second strip across the edge of the center and the end of the previous strip as required by your arrangement. Press it outward and trim it neatly. Continue working in the same rotational direction instead of jumping randomly between sides. Maintaining a consistent sequence makes construction much easier to understand.
Add the third and fourth strips using the same technique. Each new piece extends the previous section and creates another side of the growing shape. Check the center frequently to make sure it remains flat. If the block starts twisting or developing waves, verify that you are not pulling the fabric while sewing or pressing. Pressing should flatten the seams without stretching the pieces. A dry iron and an up-and-down pressing motion can help maintain the geometry of the block.
Once the first rotation is complete, begin another round with contrasting strips. Look at the photographed project and notice how pale florals are positioned near darker floral sections and how the striped fabric creates strong directional lines. You can reproduce the principle without copying every fabric position exactly. Think of each new strip as part of a visual pathway traveling around the block. Alternating print scale and value will make this pathway easier to recognize.
As the block becomes larger, measure after every few seams. Ideally, opposite sides should remain reasonably parallel and the block should lie completely flat. If one section has become slightly uneven, make a conservative correction with your quilting ruler before attaching the next strip. Avoid aggressive trimming during construction because repeatedly removing too much fabric can alter the intended proportions. Small adjustments are usually enough to keep the Spinning Me Around Quilt Block Pattern square and balanced.
Continue adding strips until the block reaches slightly larger than your desired unfinished measurement. Leaving a little extra fabric around the perimeter gives you room for final squaring. At this stage, the design should display a clear sense of movement from the center toward the corners. The alternating fabrics create the spinning illusion, while the central square anchors the entire composition. Place the block on a flat surface and inspect it from a distance before proceeding to final trimming.
Squaring, Pressing, and Creating a Professional Finish
Proper pressing can dramatically improve the appearance of the Spinning Me Around Quilt Block Pattern. After completing all the strips, press the entire block carefully from the back and then lightly from the front. Avoid moving the iron aggressively from side to side because this can distort bias areas or stretch narrow strips. Instead, lift and reposition the iron. The goal is a smooth, flat block in which all seams lie comfortably without puckers or unnecessary bulk.
Decide how you want to manage the seam allowances. Pressing toward the darker fabric is a traditional option because it can help prevent darker seam allowances from showing through pale fabrics. However, some intersections may lie flatter when seams are pressed according to the construction direction. Either approach can work. Consistency and flatness are more important than following one universal pressing rule. Inspect each intersection and choose the direction that prevents unnecessary bulk.
Now square the block. Position a large square quilting ruler over the piece and identify the center. Make sure the central square appears visually balanced within the final dimensions. Trim only enough from each edge to create four straight sides and four accurate right-angle corners. If you plan to make several blocks for a quilt, every unfinished block must be trimmed to exactly the same dimensions. This will make joining the blocks significantly easier.
Do not worry if some outer strips are trimmed into angled-looking sections during squaring. This is part of what gives the Spinning Me Around Quilt Block Pattern its energetic appearance. The edges of the final block need to be straight even though the internal design appears to move diagonally. Before cutting, verify that important seam intersections will not be placed too close to the outer edge, where they could disappear into the seam allowance when blocks are eventually joined.
If your first block does not look perfectly symmetrical, consider it useful information for the next one. Check whether the difference came from cutting, seam allowance, pressing, or strip placement. Quilting accuracy improves quickly when each block is treated as a small learning exercise. A scant 1/4-inch seam may help if your finished units repeatedly turn out slightly smaller than expected, while careful ruler placement can solve many cutting inconsistencies.
At this point, the individual block can be used in many projects. Multiple blocks can form a full quilt, while a single Spinning Me Around Quilt Block Pattern can become a cushion front, mini quilt, wall hanging, tote bag panel, or table decoration. If using several blocks together, rotate alternate blocks before joining them. Changing their orientation can create secondary geometric patterns across the finished quilt and amplify the spinning effect dramatically.
Design Variations, FAQ, and Final Tips for the Spinning Me Around Quilt Block Pattern
Color placement offers one of the easiest ways to personalize this design. For a softer result, choose fabrics within a limited palette such as blush pink, cream, dusty rose, and gray. For a more dramatic block, combine saturated colors with a light background and a very dark accent. You can also create a scrappy Spinning Me Around Quilt Block Pattern using leftover strips from previous projects. In that version, value contrast becomes more important than matching every color perfectly.
Print scale can completely change the personality of the finished block. Tiny dots and narrow stripes make the geometry more obvious, while large florals introduce softer, irregular shapes. Combining both types creates a visually rich result like the reference project. Try not to position every large print in the same area. Distributing bold motifs throughout the block helps the eye travel around the design and supports the spinning impression.
When making several blocks, you can repeat exactly the same fabric sequence or change the sequence from block to block. Repetition produces a controlled, coordinated quilt, while variation creates a more playful scrappy appearance. Another possibility is keeping one fabric constant—perhaps the center square or striped fabric—while changing everything else. That recurring element can visually connect the blocks even when the remaining fabrics are different.
FAQ — What skill level is suitable for this pattern? A confident beginner who understands straight stitching and the basic 1/4-inch quilting seam can try this project. The most important skills are accurate cutting, consistent seams, and careful pressing. Do I need special templates? Not necessarily. A rotary cutter and standard quilting rulers are sufficient for a strip-pieced interpretation of the design. Can I use scraps? Yes. The block is particularly suitable for strips and medium-size scraps because it does not require large continuous pieces of fabric.
FAQ — Why is my block becoming uneven? The most common causes are inconsistent seam allowances, inaccurate strip widths, fabric stretching, or skipping intermediate trimming. Measure regularly instead of waiting until the end. Should all strips have the same width? They can, especially for a more structured version, but carefully planned variations in width can create an improvised look. What fabrics work best? Quilting cotton is the easiest choice because it is stable, easy to cut accurately, and available in countless colors and prints.
Conclusion
The Spinning Me Around Quilt Block Pattern combines straightforward strip piecing with clever fabric placement to create a block that looks energetic and detailed. Throughout this tutorial, you learned how to choose contrasting fabrics, prepare a center square and strips, work progressively around the center, maintain a consistent 1/4-inch seam allowance, press each section, square the completed block, and use color and print direction to strengthen the spinning effect.
The most important lesson is that precision in simple steps can produce an impressive final design. Once you understand the construction, experiment with your favorite florals, stripes, solids, and scraps to create a version that feels completely personal. If you make this block, leave your sincere opinion about the pattern and share any suggestions or creative variations you would like to try next.