
The Basic Log Cabin Quilt Block Pattern is one of the most recognizable and beginner-friendly designs in traditional quilting. Built from a simple center square surrounded by progressively longer fabric strips, this block creates a beautiful geometric spiral that looks much more complicated than it actually is.
The project shown in the reference image is especially appealing because it uses a gradual transition from light cream and floral fabrics to deeper reds and burgundy prints. This contrast makes the construction method easy to see while giving the finished block warmth, movement, and a charming scrappy appearance.
One of the greatest advantages of a Log Cabin quilt block is its flexibility. You can make the block from coordinated fabric collections, leftover strips from previous projects, or carefully selected scraps from your sewing basket. Traditional Log Cabin designs often divide the block visually into light and dark areas, but there is no requirement to follow that rule. For the Basic Log Cabin Quilt Block Pattern, the most important principles are accurate cutting, a consistent seam allowance, careful pressing, and adding the fabric strips in the correct order around the center.
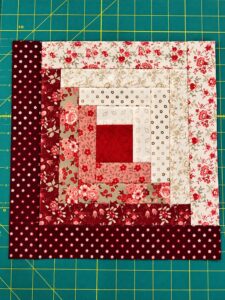
This tutorial explains how to recreate a block inspired by the photograph from beginning to end. Because fabric strip widths can be adjusted to produce different finished sizes, the measurements below provide an approachable starting point rather than requiring one exact commercial pattern. The method uses standard American quilting techniques and a 1/4-inch seam allowance. Once you understand how each “log” is added, you can easily enlarge the block, make several matching blocks for a quilt, or experiment with different fabric arrangements while preserving the distinctive Log Cabin structure.
Materials, Fabric Selection, and Cutting for the Basic Log Cabin Quilt Block Pattern
For one Basic Log Cabin Quilt Block Pattern, gather quilting cotton in approximately six to ten coordinating prints. To achieve an appearance similar to the reference project, choose several light fabrics in cream, ivory, beige, or soft floral prints and several dark fabrics in red, burgundy, wine, or deeper floral patterns. A rotary cutter, acrylic quilting ruler, cutting mat, sewing machine, neutral thread, iron, and ironing surface will also make construction easier and more accurate.
The design begins with a center square. A convenient beginner size is a 2 1/2-inch (6.35 cm) square. Cut this square from a fabric that provides noticeable contrast with the strips that will immediately surround it. In the photographed example, a solid-looking deep red center acts as the visual anchor. You could use a print instead, but choosing a relatively simple center helps emphasize the expanding geometry of the block.
Next, prepare strips approximately 1 1/2 inches (3.8 cm) wide. After sewing with a 1/4-inch seam allowance on each side, a strip of this width contributes approximately 1 inch to the finished block. Beginners often find consistent-width strips easier to handle than cutting every rectangular piece separately. You can cut longer strips first and trim each one to the required length after sewing it to the block.
Separate your fabrics into light and dark values before sewing. Fabric value describes how light or dark a fabric appears rather than its specific color. For example, a pale pink floral print may belong with the light fabrics, while a saturated red floral print belongs with the dark group. This distinction creates the characteristic visual division associated with many traditional Log Cabin quilt patterns.
You do not need a large amount of each fabric. This makes the Basic Log Cabin Quilt Block Pattern particularly useful for scrap quilting. Small remnants can become the shorter inner logs, while longer pieces can be reserved for the outer rounds. If your scraps have slightly different prints but similar color values, combining them can give the block the charming variety visible in the reference photograph.
Before beginning construction, press all fabrics flat and check that the strip edges are straight. Accuracy at this stage prevents small differences from accumulating as the block becomes larger. A slightly crooked inner strip can affect every subsequent round. Keep your rotary ruler aligned with the grain whenever possible and verify the width of several strips before starting to sew.
Building the Center and Adding the First Log Cabin Strips
Place the 2 1/2-inch center square right side up. Take your first 1 1/2-inch strip and place it right sides together along one edge of the square. The strip can be cut exactly to length beforehand, or you can sew from a longer strip and trim it afterward. Stitch using an accurate 1/4-inch seam allowance, then open the strip and press the seam carefully.
Rotate the developing block and add the second strip along the next side. Because the first strip has increased one dimension of the block, this second log will be slightly longer. Align the raw edges, sew with the same 1/4-inch seam, open the fabric, and press. Maintaining the same direction of rotation throughout construction is important because it produces the familiar spiral arrangement.
Continue with the third strip along the next available edge. At this stage, the structure of the Basic Log Cabin Quilt Block Pattern starts becoming recognizable. Each new strip extends across the center section plus the ends of previously attached logs. Instead of memorizing numerous strip lengths, beginners can simply position an oversized strip along the block, sew it, and trim the excess flush with the block edge.
Attach the fourth strip to complete the first round around the center. Check the block with a quilting ruler before continuing. Corners should remain close to 90 degrees, and the outer edges should be reasonably straight. If one edge extends slightly beyond another, trim only what is necessary. Excessive trimming can gradually reduce the intended size of the block.
Pressing deserves special attention. Rather than dragging the iron aggressively across the fabric, place and lift it gently so that the strips are not stretched out of shape. Many quilters press seams toward the newly added strip because the newest piece generally provides room for the seam allowance. With very light fabrics, however, consider which direction prevents a dark seam allowance from showing through.
Now begin the next round using another set of coordinating strips. Following the appearance of the reference image, you can gradually introduce additional floral patterns as the block expands. Keep adding each fabric log in the same rotational sequence. The repeated process—place, sew, open, press, rotate, and trim—is the essential technique behind almost every traditional Log Cabin block.
Creating the Light-and-Dark Spiral and Completing the Outer Rounds
The most interesting feature of this Basic Log Cabin Quilt Block Pattern is the relationship between the light and dark fabrics. Instead of arranging colors randomly, position lighter cream and ivory strips primarily toward two adjacent sides while allowing reds and burgundies to dominate the opposite sides. As the rounds expand, these groups create two distinct areas that seem to spiral around the center square.
Continue adding strips one at a time rather than sewing an entire round without pressing. Sew one log, open it, press it, rotate the block, and then attach the next piece. This deliberate sequence helps maintain accuracy. It also allows you to inspect the block regularly and correct small alignment issues before they become noticeable problems.
For a scrappy appearance similar to the photographed block, change fabrics frequently. The light side might progress from ivory geometric prints to pale botanical fabrics and finally a larger cream-and-red floral. The dark section might move from medium red to burgundy florals and eventually a nearly black red print. Using different scales of prints adds visual depth without changing the simple construction.
As the block grows, the strips naturally become longer. Measure the edge before cutting a strip if you prefer precise precutting. Alternatively, place a longer strip along the edge, stitch it accurately, and trim it square with the existing block afterward. The second technique can be particularly convenient when making a single scrappy Log Cabin quilt block, because it avoids calculating every individual rectangle.
The outermost fabrics have a strong influence on the final appearance. In the reference project, the deepest fabric frames two outer sides while a pale floral fabric dominates the other portion of the perimeter. This strengthens the contrast between the two halves. You can reproduce that visual effect by reserving your lightest and darkest fabrics for the final rounds.
When the block reaches your desired dimensions, place it on the cutting mat and inspect all four sides. Use the horizontal and vertical markings on your ruler to identify any minor irregularities. Square the block carefully, removing as little fabric as possible. The goal is a clean, symmetrical unit that can later be joined accurately to other blocks without distorting the Log Cabin design.
Finishing the Block and Turning the Pattern Into a Quilt
After squaring the Basic Log Cabin Quilt Block Pattern, measure it in several places. Measuring across the top, center, and bottom helps identify whether the block has remained consistent. If you intend to make a full quilt, record the unfinished measurement of the first successful block and use it as the standard for all subsequent blocks.
A single block can be used for much more than a large quilt. Depending on its dimensions, it can become the front of a cushion, a potholder, a small wall hanging, a table mat, or part of a tote bag. This versatility makes the Log Cabin block an excellent practice project for someone learning accurate piecing without committing immediately to a full-size quilt.
For a larger quilt, make multiple blocks using the same construction method. They do not have to contain identical fabrics. Keeping a consistent light-and-dark arrangement is often enough to create unity even when individual prints vary. This is especially useful for using a collection of red, cream, floral, or reproduction-style fabric scraps.
Block orientation dramatically changes the final quilt layout. When several Log Cabin quilt blocks are placed together, rotating individual units can produce diamonds, diagonal bands, zigzags, or large areas of light and dark color. Before joining the blocks permanently, arrange them on a clean floor or design wall and experiment with different rotations until the overall composition feels balanced.
Once you choose an arrangement, sew the blocks into rows with a consistent 1/4-inch quilting seam. Press adjoining seams in opposite directions whenever practical so the intersections nest neatly. Then join the completed rows. Add borders if desired, followed by batting and backing fabric. Quilt the three layers together using straight lines, free-motion quilting, or another method suitable for your experience level.
Finish the project by trimming the quilt sandwich and attaching binding around the outer edge. At this point, the simple center square that started the project has developed into an interconnected geometric design. That transformation is one reason the Basic Log Cabin Quilt Block Pattern remains so enjoyable: the sewing process is repetitive and approachable, yet the finished result can appear detailed and sophisticated.
FAQ About the Basic Log Cabin Quilt Block Pattern
What is a Log Cabin quilt block?
A Log Cabin quilt block is a traditional patchwork design constructed by sewing rectangular fabric strips around a central square. Each strip is commonly called a “log.” The strips are added progressively around the center, producing an expanding geometric pattern.
Is the Basic Log Cabin Quilt Block Pattern suitable for beginners?
Yes. It is an excellent block for developing basic quilting skills because most pieces are rectangles or squares and the construction relies primarily on straight seams. Beginners can practice rotary cutting, maintaining a 1/4-inch seam allowance, pressing, trimming, and squaring.
What width should I cut the fabric strips?
For the version described here, 1 1/2-inch (3.8 cm) strips are an accessible choice. However, Log Cabin blocks can be made with narrower or wider strips. The most important requirement is maintaining a consistent width unless the design intentionally uses irregular logs.
Why do Log Cabin quilts usually have light and dark fabrics?
Separating the strips by value creates contrast and allows multiple blocks to form secondary patterns when placed together. Light and dark sections can create diamonds, diagonal lines, zigzags, and other arrangements depending on how the finished blocks are rotated.
Can I use fabric scraps for this quilt block?
Absolutely. The Basic Log Cabin Quilt Block Pattern is particularly well suited to scraps because the inner logs require relatively small pieces. Sorting scraps into light, medium, and dark groups before sewing makes it easier to create a controlled design.
Do all the fabric strips need to be the same color?
No. Mixing prints and colors is part of the appeal of a scrappy Log Cabin block. You can use many different fabrics while maintaining cohesion through a limited color palette or a consistent light-and-dark arrangement.
Should I cut every log before I start sewing?
Either method works. Experienced quilters may calculate and precut every rectangle, while beginners may find the sew-and-trim method easier. With that approach, you sew a slightly longer strip to the block and trim it flush after stitching.
What seam allowance should I use?
A 1/4-inch seam allowance is standard for American quilt piecing. Consistency matters more than sewing quickly. Even small variations can accumulate across several rounds and affect the final block size.
Should the seams be pressed open or to one side?
Both methods can work, although many traditional quilt makers press the seam toward the newly attached log. Whatever method you choose, press gently and consistently so the block remains flat and square.
How can I prevent my Log Cabin block from becoming crooked?
Start with accurately cut strips, maintain the same seam allowance, press after attaching each piece, and periodically check the block with a square quilting ruler. Avoid stretching the fabric while sewing or pressing. Small accuracy improvements during every round make a significant difference by the outer logs.
Can I make the block larger than the example?
Yes. One of the simplest ways to enlarge a Basic Log Cabin Quilt Block Pattern is simply to continue adding rounds. You can also begin with a larger center square or use wider strips. Keep checking that the block remains square as its dimensions increase.
How many Log Cabin blocks do I need for a quilt?
That depends on the finished block size and desired quilt dimensions. Once you know the finished size of one block, determine how many blocks are needed across the desired width and length. Borders can also be added to increase the overall quilt dimensions.
What fabrics work best for a Log Cabin quilt?
Standard quilting cotton is an excellent choice because it is stable, easy to cut, and easy to press. Using fabrics with similar weights makes accurate piecing easier. A mixture of small florals, subtle geometric prints, tone-on-tone fabrics, and solids can create attractive visual variety.
Can this pattern be made without floral fabrics?
Certainly. Florals create the traditional appearance visible in the reference project, but the construction works equally well with solids, plaids, geometric prints, holiday fabrics, modern prints, or monochromatic collections. The Log Cabin structure comes from the placement of the strips rather than the specific fabric style.
Conclusion
Video Tutorial:
The Basic Log Cabin Quilt Block Pattern demonstrates how a very simple sewing method can produce an impressive patchwork design. Starting with one center square, you learned how to prepare coordinating strips, distinguish between light and dark fabric values, sew with an accurate 1/4-inch seam allowance, and build the block outward one log at a time.
The key sequence is easy to remember: sew, press, rotate, add the next strip, and repeat. Working carefully through each round helps keep the block flat and square. Choosing progressively varied cream, red, floral, and burgundy fabrics can recreate the warm scrappy character of the reference project, while completely different colors can give the same pattern a modern or seasonal appearance.
Most importantly, this technique provides plenty of room for creativity. Once you have completed one block, you can experiment with different strip widths, center colors, fabric values, print combinations, and block orientations. A single block can become a small sewing project, while dozens of blocks can be combined into a striking full quilt.
If you make your own Basic Log Cabin Quilt Block Pattern, leave your sincere opinion about the tutorial and share any suggestions you have. It is always interesting to hear which fabric combinations, measurements, and Log Cabin layouts other quilters enjoy using, and your ideas may inspire new variations of this timeless quilting pattern.