
The Crochet Tulip Lace Pattern is a beautiful way to combine floral crochet with an airy, decorative lace structure. Inspired by rows of colorful tulips surrounded by green leaves, this pattern creates a fabric that feels light, cheerful, and perfect for spring-inspired projects. The repeating flowers can be worked in several colors, while the green framework forms stems, leaves, and open spaces between the blossoms.
Once the repeat becomes familiar, the design develops into a rhythmic crochet project that is enjoyable to work row after row. It can be adapted for table runners, decorative panels, scarves, curtains, shawls, or even larger home décor pieces.One of the most attractive features of this crochet tulip stitch is the contrast between the solid flower petals and the open crochet lace surrounding them. The tulips can be made with red, pink, yellow, purple, or any combination of colors you enjoy.
Green yarn creates the visual connection between the flowers and gives the design its garden-like appearance. Although the finished fabric looks intricate, the construction can be approached through familiar US crochet techniques such as chain (ch), single crochet (sc), double crochet (dc), slip stitch (sl st), and grouped tall stitches. The key is to maintain an even stitch count and repeat the floral sections consistently.
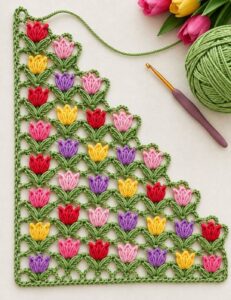
This tutorial explains a practical method for recreating the appearance of the photographed Crochet Tulip Lace Pattern rather than claiming an exact stitch-for-stitch reconstruction from the image alone. Because yarn weight, hook size, tension, and desired dimensions can change the number of repeats required, making a small swatch first is strongly recommended. The instructions below focus on the construction logic: establish the green lace foundation, build leaf-shaped sections, add colorful tulip clusters, connect those motifs with chains, and continue the repeat until the project reaches the desired size. With careful counting and consistent tension, even an adventurous beginner can use these instructions as a starting point for creating a colorful floral lace fabric.
Materials, US Crochet Terms, and the Tulip Lace Foundation
Choose a smooth yarn with enough stitch definition to make the flowers clearly visible. A DK or light worsted-weight yarn is a practical choice for a decorative panel. You will need green for the main lace framework plus small amounts of several flower colors. Cotton or a cotton-blend yarn works particularly well when making table décor because it provides crisp stitches and helps the open lace retain its shape.
Select a crochet hook that produces flexible rather than overly tight stitches. Depending on the yarn, approximately a 3.5–4.5 mm hook may be suitable, but the yarn label and your personal tension should guide the final choice. You will also need scissors, a yarn needle, and optional stitch markers. Markers are especially useful for identifying the beginning and end of each tulip repeat.
The main US abbreviations used throughout the project are ch = chain, sl st = slip stitch, sc = single crochet, and dc = double crochet. A chain is created by yarning over and pulling the yarn through the loop on the hook. For a single crochet, insert the hook into the indicated stitch or space, yarn over, pull up a loop, yarn over again, and pull through both loops.
To make a double crochet (dc), yarn over before inserting the hook, pull up a loop, yarn over and pull through two loops, then yarn over and pull through the remaining two loops. Taller stitches can also be substituted where a longer leaf or petal is desired. The photograph suggests elongated floral shapes, so varying stitch height is useful for recreating the pointed silhouette.
Begin with green yarn and make a foundation chain long enough for your planned number of flowers. Instead of immediately committing to a large table runner or panel, make a sample containing three or four tulip repeats. Work a simple foundation row of sc stitches first. This stable base helps prevent the decorative lace from twisting while you learn the repeat.
For the open areas, use chain spaces between anchored stitches. A basic practice repeat might consist of sc into the next anchor point, ch 4 or ch 5, skip the appropriate foundation stitches, sc into the next anchor point. The exact number can be adjusted during swatching. Your goal is to create evenly sized arches that will later support the leaves and colorful flowers without pulling the fabric inward.
Creating the Green Leaves and Colorful Crochet Tulips
The green leaves are important because they provide both structure and visual definition. At an appropriate chain space, work several stitches of increasing height into or around the same space. For example, work sc, dc, taller stitch, dc, sc as a shaped group. This progression creates a pointed form that resembles a leaf. If your leaf looks too round, lengthen its center stitch; if it looks too narrow, add another tall stitch.
Create a second leaf so the two shapes angle outward from the center of the future flower. The paired leaves should form a recognizable V shape. Between them, leave a central anchor where the colored tulip will be attached. Continue with chains until reaching the next flower position, then repeat the paired-leaf construction. Try to keep every chain arch approximately the same size.
The tulip itself can be represented with a compact crochet cluster. Join your chosen flower color at the central space between the leaves. Work a short beginning chain to establish height. Several partially completed tall stitches can then be gathered together to form a thick petal. To create a cluster, begin each tall stitch but leave its final loop on the hook; after completing the required number, yarn over and draw through the remaining loops.
A convincing tulip can be created from three petal sections. Make the left petal first, then a slightly taller center petal, followed by the right petal. Keeping the center section marginally taller produces the familiar pointed tulip silhouette. Depending on the yarn thickness, each petal can contain two or three tall stitches. Experiment on your swatch until the blossom looks balanced with the leaves.
After finishing the flower, secure the color neatly and return to green for the surrounding framework. When changing colors frequently, weaving the yarn tails into nearby dense stitches keeps the reverse side tidy. Avoid carrying strongly contrasting flower yarn across large open sections because the strands may remain visible through the openwork crochet.
Repeat the same flower construction across the row while changing colors whenever desired. A combination of pink, yellow, red, and purple creates the lively garden appearance shown in the inspiration image. However, color placement does not have to follow a strict sequence. Alternating colors irregularly can make the finished Crochet Tulip Lace Pattern feel more natural and handmade.
Building the Lace Repeat Row by Row
Once the first line of tulips is complete, begin the next green lace row by working chain arches above and between the flowers. These arches establish the spaces for the following row. The important principle is symmetry: every flower repeat should contain the same number of structural chains and attachment points. Count regularly instead of waiting until the end of the row to discover a missing space.
To create the attractive diagonal movement visible in floral lace, position the next row of flowers between the tulips below whenever your stitch count permits. This staggered arrangement prevents the design from becoming a rigid grid. Work green chains toward the midpoint between two lower flowers, form the paired leaves, and reserve the center for another colored tulip.
Continue using crochet chain spaces to travel from one leaf group to the next. Do not pull the chains too tightly. Lace requires enough relaxation for the spaces to open during blocking. If the chain sections are significantly tighter than the flowers, the finished fabric may curve or bunch. A relaxed but consistent hand usually gives the best result.
At the edges, maintain a stable green border. A simple method is to work a few chains followed by sc or dc stitches into the side anchor. This creates a straight line beside the more decorative interior. For a larger rectangular project, checking the edge after every few rows will help you detect accidental increases or decreases before they become difficult to correct.
The repeating sequence can be summarized as green lace arch → paired leaves → central tulip → green connecting arch → next paired leaves. Once this relationship becomes familiar, the pattern becomes much easier to memorize. Instead of thinking about every individual stitch, you begin to recognize each flower and its surrounding green structure as a single repeat.
Continue adding rows until the fabric reaches your preferred dimensions. For a decorative table piece, measure it on the intended surface periodically. For a scarf or shawl, check both width and drape. Remember that blocking can enlarge an open lace crochet pattern, so avoid judging the final dimensions solely from the fabric while it is still on the hook.
Finishing, Blocking, Customizing, and Using the Crochet Tulip Lace Pattern
When the final row has been completed, finish the upper edge with green yarn so that it visually matches the foundation. A simple row of sc stitches provides stability, while a combination of chains and sc stitches preserves a more decorative appearance. Whichever option you choose, avoid adding too many stitches because excess stitches can cause the edge to ripple.
Fasten off securely and weave every yarn tail into stitches of a similar color. Because this pattern contains many individual flowers, there may be more ends than in a single-color crochet project. Weaving them in as you complete several rows can make the finishing stage much more manageable. Pass each tail through several stitches and change direction once for additional security.
Blocking crochet lace is especially important for this project. Follow the care instructions appropriate for your yarn fiber. Gently shape the damp or prepared fabric on a blocking surface, arranging the chain spaces, leaves, and tulip petals evenly. Pin the edges if appropriate for your fiber and allow the project to dry completely before removing it.
Blocking helps transform the appearance of the fabric. Chain arches become more regular, leaves open into defined V shapes, and the tulips stand out more clearly against the background. Do not overstretch the work simply to make it larger. The goal is to encourage the stitches into their intended positions while maintaining the natural texture of the yarn.
There are many ways to customize this Crochet Tulip Lace Pattern. A pastel palette can create a soft spring decoration, while saturated red, purple, yellow, and pink flowers create a brighter garden effect. You can also use one flower color throughout for a more coordinated look. Green is traditional for the framework, but sage, olive, cream, or another complementary shade can completely change the character of the design.
The completed lace can become a crochet table runner, decorative shelf edging, curtain panel, scarf, shawl section, cushion embellishment, or lightweight wall decoration. Larger versions can be created simply by increasing the number of repeats and rows. Whatever project you choose, make a swatch first and record your final stitch counts so the successful repeat can be reproduced consistently.
FAQ About the Crochet Tulip Lace Pattern
Is the Crochet Tulip Lace Pattern suitable for beginners?
It is best suited to confident beginners or intermediate crocheters. You should already feel comfortable with chains, single crochet, double crochet, joining yarn, changing colors, and counting stitch repeats. Practicing one small flower section before beginning a large project makes the process considerably easier.
What does ch mean in US crochet terminology?
Ch means chain. It is one of the fundamental crochet stitches and forms many of the open spaces in this lace design. Chains are especially important here because they connect the flowers and leaves without creating a heavy solid fabric.
What does sc mean?
Sc means single crochet in US terminology. It creates a short, firm stitch that is useful for anchoring chain arches and stabilizing borders.
What does dc mean?
Dc means double crochet in US crochet terminology. It is taller than a single crochet and is useful for forming leaves, petals, and other decorative areas.
How are the tulip petals created?
The flower effect can be produced with groups or clusters of tall stitches worked close together. Making the center petal slightly taller than the side petals helps create the pointed shape associated with a tulip.
Why is my crochet lace curling?
Curling can result from chains that are too tight, incorrect stitch counts, uneven tension, or too few stitches along the edges. First verify your repeat count. If the count is correct, try relaxing the tension of the chain sections and block a small swatch to see whether the fabric settles.
Can I use different yarn weights?
Yes. Changing yarn weight will change the finished dimensions and texture. Fine cotton produces delicate lace, while DK or light worsted yarn creates larger, more visible flowers. Always match the hook to the yarn and make a sample before determining the final size.
Can all the tulips be the same color?
Absolutely. A single flower color creates a sophisticated repeated motif. Multiple colors produce the cheerful garden appearance associated with the inspiration project. Both approaches use the same basic tulip crochet pattern construction.
How can I make the pattern wider?
Add complete floral repeats to the foundation rather than adding random chains. First determine how many foundation stitches or chains your successful swatch requires for one repeat, then multiply that amount by the number of additional repeats required.
How do I keep the sides straight?
Use stitch markers at the first and last structural stitches and count every row. The edge anchors must remain consistent. Accidentally skipping an edge stitch is one of the most common reasons a lace panel gradually becomes narrower.
Do I need to block the finished piece?
Blocking is strongly recommended for decorative lace. It helps organize the open spaces and improves the definition of the leaves and flowers. Always use a blocking technique appropriate for the fiber content of your yarn.
What can I make with Crochet Tulip Lace Pattern?
The motif can be adapted for table runners, decorative panels, scarves, lightweight shawls, curtains, shelf edging, cushion decorations, and other handmade accessories. Changing the yarn, hook size, number of repeats, and color palette allows one floral concept to produce many different projects.
Conclusion
The Crochet Tulip Lace Pattern combines colorful flowers, green leaves, and airy chain spaces to create a distinctive floral fabric. Throughout this tutorial, you learned the basic US crochet terminology needed for the design, including ch, sl st, sc, and dc, as well as the principles behind creating leaf shapes, clustered tulip petals, connecting lace arches, and stable edges.
The most important part of recreating this style is understanding the repeat rather than rushing through individual stitches. Build the green foundation first, establish consistent chain spaces, create matching leaf pairs, position each colorful flower between the leaves, and repeat the same structure across subsequent rows. Careful counting and even tension will make the final project cleaner and more symmetrical.
Color is another major part of the personality of this crochet flower lace pattern. Bright pink, red, purple, and yellow tulips create a joyful garden effect, while pastel or monochromatic combinations can make the same stitch structure feel completely different. This makes the pattern easy to personalize for different seasons, rooms, gifts, and decorative styles.
Finally, take time to weave in the ends carefully and block the finished lace. These finishing steps help define the tulip petals, straighten the edges, and open the chain spaces so the floral structure becomes easier to appreciate. A carefully finished project will show the details of the Crochet Tulip Lace Pattern much more clearly.
If you try this pattern, leave your sincere opinion about the design and how the instructions worked for you. Suggestions for different color combinations, project ideas, or adjustments to the tulip motif are also welcome, because creative variations are one of the most enjoyable parts of turning a crochet technique into something uniquely your own.