
DIY Iron Storage & Travel Case Pattern is a practical sewing project for anyone who wants to create a neat, reusable, and attractive case for storing and transporting a household iron. The design shown in the photo combines a padded interior, a durable fabric exterior, a secure zipper closure, and coordinated fabric pieces that give the finished case a polished handmade appearance. It is especially useful for keeping an iron protected when it is stored in a closet, craft room, laundry area, or taken along on a trip.
This DIY Iron Storage & Travel Case Pattern is also a wonderful opportunity to use beautiful cotton fabric, leftover quilting material, or coordinating solid colors. The example in the image uses a floral fabric combined with teal fabric, creating a simple contrast that makes the case look both functional and decorative. You can follow the same construction concept while choosing colors and prints that match your personal style.
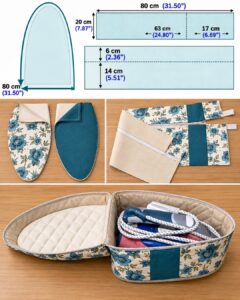
The measurements visible in the pattern provide a helpful starting point for recreating the project. The main rounded body measures approximately 80 cm (31.50 inches) across its widest lower section, while the long rectangular components are approximately 80 cm (31.50 inches) long and 20 cm (7.87 inches) wide. One of the rectangular pieces is divided into approximately 63 cm (24.80 inches) and 17 cm (6.69 inches) sections, while another marking shows approximately 6 cm (2.36 inches) and 14 cm (5.51 inches). Before cutting expensive fabric, it is always wise to make a paper or inexpensive fabric test version to check the proportions against your particular iron.
Materials and Pattern Preparation
The first step in this DIY Iron Storage & Travel Case Pattern is gathering the materials. You will need your main fabric, lining fabric, suitable batting or thin padding, a zipper long enough to follow the case opening, thread, sewing clips or pins, scissors or a rotary cutter, a ruler, measuring tape, and a sewing machine. A medium-weight cotton or quilting cotton is a practical choice because it is easy to sew and can be reinforced with interfacing or batting.
For the main body, use the approximately 80 cm measurement shown in the image as your pattern reference. The shape is rounded at the top and sides, with a flatter lower edge. You can draw the shape on large paper first rather than cutting directly into fabric. This makes it much easier to adjust the curve and create a symmetrical pattern.
To make the rounded shape, fold your paper in half and draw one side of the pattern before cutting it out. When the paper is unfolded, both sides should match. The finished shape should resemble the elongated iron-shaped pieces shown in the photograph. Remember that the actual pattern size should be checked against your iron, particularly if your appliance is substantially larger or smaller than the example.
Next, prepare the long rectangular pieces. The pattern illustration shows a piece measuring approximately 80 cm long by 20 cm wide. Mark the indicated 63 cm and 17 cm sections carefully. These measurements help establish the placement of the contrasting fabric and the areas that will eventually form the case structure and closure.
The second rectangular section includes markings of approximately 6 cm and 14 cm. Transfer these measurements onto your paper pattern using a washable fabric marker or pencil. These markings are useful guides for positioning fabric sections and keeping the finished case visually balanced. If you are adding a contrasting panel, this is the stage where you should decide exactly where that panel will sit.
Before cutting, add your preferred seam allowance to the pattern if the measurements in your reference do not already include it. A seam allowance of around 1 cm is commonly convenient for this type of sewing project, but you can use the allowance you normally prefer. Consistency is more important than choosing one particular measurement.
Cutting, Padding, and Sewing the Main Pieces
Once your pattern pieces are ready, place them on the fabric and cut carefully. For a DIY Iron Storage & Travel Case, you will generally need matching exterior and lining pieces for the main body, along with corresponding pieces for the side or gusset sections. If you want the floral-and-solid appearance shown in the photo, divide the decorative pieces according to your chosen color-blocking arrangement.
The next step is adding the padding. Place the exterior fabric over a layer of thin batting or another suitable sewing stabilizer. You can quilt the layers together using straight lines, diamonds, or a simple grid. The padded construction gives the case more structure and creates a softer interior barrier around the stored appliance.
For the interior, choose a smooth and durable lining fabric. A light cotton can work well, while a slightly heavier fabric can provide additional structure. The lining should be cut carefully so that it corresponds with the exterior pieces. Accurate cutting at this stage makes the zipper installation and final assembly considerably easier.
If you are creating a contrasting fabric panel, sew those pieces together before assembling the complete case. Place the fabric right sides together, stitch along the seam, and press the seam allowance flat. Pressing each seam as you go is a small step that can make a major difference in the professional appearance of the finished DIY Iron Storage & Travel Case Pattern.
After the decorative sections are assembled, begin forming the main case. Match the edges carefully and use clips around curved areas rather than forcing the fabric into position. Curves often require several clips or small adjustments so that the fabric lies smoothly without unwanted folds.
The zipper is one of the most important parts of this project. Attach the zipper gradually, checking after every section that it opens and closes smoothly. Do not sew too close to the zipper teeth, and use a zipper foot if your sewing machine has one. Once the zipper is secured, test it before completing the final seams.
Assembling the Iron Travel Case
With the zipper installed, the next stage is connecting the case components. Start by joining the exterior pieces according to your pattern. Take your time around the curved edges because the shape of the case is what gives the finished project its distinctive appearance. Small clips around the curve can help distribute the fabric evenly.
The dimensions in the reference image are particularly useful during this stage. The approximately 80 cm rectangular length should correspond with the intended perimeter section of the case, while the 20 cm width establishes its depth. If your iron has a different shape, use these dimensions as a starting point and adjust the depth after making a test sample.
When sewing the curved main pieces to the side section, align the centers first. Mark the center point of both pieces and match those points before working toward the sides. This technique reduces the chance of ending up with excess fabric concentrated in one area and helps create a more symmetrical result.
After sewing the exterior, repeat the process with the lining. Leave an appropriate opening if necessary so that the project can be turned right side out. Avoid making the opening too small, particularly if your fabric has multiple layers of batting and interfacing.
Once the exterior and lining are joined, carefully turn the case right side out. Push the curved seams gently into shape using a blunt turning tool or similar sewing aid. Avoid using sharp objects that could puncture the fabric or distort the seams.
Finish by closing the lining opening with a neat machine stitch or hand stitch. Run the zipper several times from end to end and inspect the seams. Your completed DIY Iron Storage & Travel Case Pattern should have a structured exterior, a padded interior, and enough room for your particular iron without placing unnecessary pressure on the zipper.
Finishing Details, Customization, and Practical Tips
One of the most enjoyable parts of this DIY Iron Storage & Travel Case Pattern is customization. You can replace the floral fabric with geometric prints, stripes, solids, or seasonal designs. A contrasting central panel can be made wider or narrower depending on the look you want. You can also use matching fabric scraps to create coordinating accessories.
Consider adding a small fabric handle to make the case easier to carry. The handle can be created from a strip of sturdy fabric, folded and stitched along its length. Attach it securely to the exterior before the case is completely assembled so the reinforcement is hidden between the fabric layers.
For additional organization, you can add a small internal pocket. A pocket can hold a heat-resistant pad, cord, plug adapter, or other small sewing-room accessories. If you add a pocket, keep it positioned so that it does not interfere with the iron or prevent the zipper from closing properly.
Another useful customization is extra quilting. Straight-line quilting can reinforce the padded layers while creating an attractive handmade finish. Keep the quilting pattern simple if you want the floral fabric to remain the main visual feature. You can also use the quilting thread to coordinate with the solid accent fabric.
Always allow the iron to cool completely before placing it inside the finished storage case. The fabric and padding used in a handmade case should not automatically be assumed to be heatproof or suitable for storing a hot appliance. This project is designed primarily for storage and travel after the iron has cooled, which is an important practical consideration.
Finally, remember that handmade patterns are flexible. The measurements shown in the reference image are a useful guide, but appliances vary considerably in size and shape. Measure your own iron before finalizing the pattern, especially its length, widest point, handle dimensions, and height. Making a quick mock-up from inexpensive fabric can save material and help you achieve a better-fitting DIY Iron Storage & Travel Case.
FAQ About the DIY Iron Storage & Travel Case Pattern
Can I make this DIY Iron Storage & Travel Case Pattern without advanced sewing experience?
Yes. The project involves several intermediate sewing techniques, including curved seams and zipper installation, but it can be approached step by step. Beginners may find it easier to practice the zipper and curved seams on scrap fabric before working on the final case.
What fabric is best for an iron storage case?
Medium-weight cotton or quilting cotton is a practical option because it is easy to cut, sew, press, and customize. Adding suitable batting or interfacing can provide additional structure. Always choose materials appropriate for sewing and follow their care and heat limitations.
Do I need batting for the case?
Batting is not absolutely mandatory, but it can improve the structure and appearance of the project. The example shown has a padded appearance, so a thin layer of batting helps recreate that look. The exact thickness should be selected according to the desired flexibility and the materials available.
Can I change the measurements in the pattern?
Yes. The dimensions shown are a reference for the photographed project. The most important consideration is the size of your own iron. Measure the appliance and make a paper or fabric mock-up before cutting your final materials.
What zipper length should I use?
The zipper should correspond to the opening you are creating rather than being selected solely by the iron’s dimensions. Because zipper placement can vary according to construction, measure the prepared opening and allow enough length for comfortable installation and finishing.
Can I use different fabrics for the outside and lining?
Absolutely. Using different fabrics is one of the easiest ways to personalize a DIY Iron Storage & Travel Case Pattern. A patterned exterior with a solid lining can create a clean look, while coordinated prints can make the project more colorful.
Why should I make a test version first?
A test version allows you to confirm the proportions before using your final fabric. It is particularly helpful when modifying the approximately 80 cm by 80 cm main shape or the 80 cm by 20 cm rectangular sections for a different iron.
Can I add pockets to the travel case?
Yes. A small interior or exterior pocket can be useful for storing a cord or other accessories. Make sure the pocket is securely sewn and positioned so that it does not interfere with the appliance, zipper, or overall shape of the case.
Can the case be used to store a hot iron?
It should not be treated as a heatproof container unless every material used has been specifically designed and tested for that purpose. Allow the iron to cool completely before putting it into the handmade case. This helps protect both the project and the surrounding environment.
How can I make the finished case look more professional?
Accurate cutting, consistent seam allowances, careful pressing, smooth zipper installation, and neatly finished seams make the biggest difference. Taking your time around curves and matching the center points of the pattern pieces will also improve the final result.
Conclusion
Video Tutorial:
This DIY Iron Storage & Travel Case Pattern provides a practical way to transform fabric, batting, a zipper, and a little sewing time into a useful handmade organizer. By starting with the approximately 80 cm rounded main shape and the 80 cm × 20 cm rectangular sections shown in the reference, you can recreate the overall structure while adjusting the measurements to suit your own iron.
The project also demonstrates how simple details can make a handmade item more attractive and functional. Color-blocking, quilting, contrasting fabrics, a padded lining, and a secure zipper all contribute to the finished appearance. Most importantly, measuring your own appliance and creating a test version before cutting your final fabric can help you achieve a more accurate fit.
If you enjoyed this DIY Iron Storage & Travel Case Pattern, consider trying your own combination of fabrics and adding practical details that suit your sewing needs. Remember that the case should be used for storing or transporting an iron only after the appliance has cooled completely. Leave a sincere opinion about the project and share your suggestions or ideas for improving the pattern—your experience may inspire someone else to create their own version.