
Crochet Easy Cat Pattern is a charming project for anyone who enjoys creating small crochet accessories that are quick, practical, and full of personality. Inspired by the cat-shaped pieces shown in the reference image, this project combines a rounded body, a compact head with pointed ears, a curved tail, and an optional miniature bow.
The finished cat can become a keychain, bag charm, zipper pull, decorative appliqué, or handmade gift. Because the construction uses familiar US crochet stitches, it is also an approachable project for crocheters who want to practice shaping without committing to a large amigurumi project.
One of the most appealing features of this Crochet Easy Cat Pattern is its simple construction. Instead of making a complicated three-dimensional toy with many separately stuffed pieces, you can build a small, mostly flat cat using basic increases and decreases. The reference design suggests a compact silhouette with a wider rounded lower body, narrower neck area, square-rounded head, tiny triangular ears, and a decorative curled tail. Cotton yarn is especially suitable because it gives the stitches enough definition to make the shape easy to recognize, although other smooth yarns can also work.
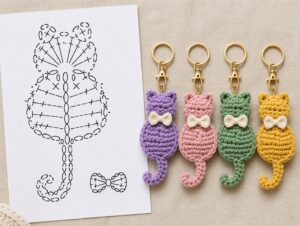
This tutorial explains the project using US crochet terminology and provides a practical interpretation that can be adjusted according to your yarn and desired finished size. Since crochet tension, yarn thickness, and hook size affect the dimensions, focus on maintaining the proportions rather than trying to achieve one exact measurement. You will learn the essential crochet abbreviations, how to shape the body, how to form the cat’s head and ears, how to create the curved tail, and how to finish the project neatly. The result is a customizable easy crochet cat that can be made in many colors and adapted for several creative uses.
Materials, US Crochet Abbreviations, and Pattern Preparation
For this Crochet Easy Cat Pattern, choose a smooth cotton or cotton-blend yarn in your preferred cat color. Small amounts are sufficient, making this an excellent scrap yarn crochet project. You can use lavender, pink, sage green, mustard yellow, gray, cream, brown, black, or practically any color you like. If you want to reproduce the decorative bow, keep a small amount of contrasting yarn such as ivory or white.
Choose a crochet hook that produces a firm fabric with your yarn. For many lightweight cotton yarns, a hook around 2.5–3.5 mm works well, but the yarn label and your personal tension should guide your final choice. You will also need scissors, a yarn needle, and, if you are turning the cat into a keychain, a metal key ring or swivel clasp. Stitch markers can be helpful when shaping the rounded portions.
Before beginning, become familiar with the main US crochet abbreviations used throughout the project. ch = chain, sl st = slip stitch, sc = single crochet, hdc = half double crochet, dc = double crochet, st/sts = stitch/stitches, inc = increase, and dec = decrease. An increase usually means working two stitches into the same stitch, while a decrease combines two stitches into one.
The chain stitch (ch) creates the foundation for small details such as the tail or bow. To make a chain, yarn over and pull the yarn through the loop already on the hook. The slip stitch (sl st) is a very short joining stitch made by inserting the hook, pulling up a loop, and pulling that loop directly through the loop on the hook. Slip stitches are especially useful for joining rounds and shaping edges.
The single crochet (sc) is the primary stitch for this cat because it produces a dense, tidy fabric. Insert the hook into the designated stitch, yarn over, pull up a loop, yarn over again, and pull through both loops. An increase (inc) is made by working two single crochets into one stitch. A single crochet decrease (sc2tog) is created by partially working two neighboring single crochets and finishing them together.
For the best-looking crochet cat keychain, keep your tension consistent. A tight but comfortable tension gives the cat a defined silhouette and helps prevent the piece from becoming floppy. If the fabric feels excessively stiff, move up slightly in hook size. If large spaces appear between stitches, try a smaller hook. Make a small test section when using unfamiliar yarn so you can decide whether you like the resulting texture before completing the entire cat.
Step-by-Step Crochet Cat Body, Head, and Ears
Begin the Crochet Easy Cat Pattern with the rounded lower body. One accessible method is to start with a magic ring and work 6 sc into the ring. Pull the ring closed. For the next round, work 2 sc in each stitch around, giving you 12 stitches. Continue increasing evenly in subsequent rounds until the circle reaches approximately the width you want for the lower body. A small keychain cat generally needs only a few increase rounds.
Once the lower section has enough width, work one or two rounds without increases. This creates the fuller oval belly visible in the finished design. Then begin reducing the width toward the neck. Make evenly spaced sc2tog decreases rather than placing all the decreases together. Gradual decreases produce a smooth cat silhouette and prevent one side from becoming noticeably flatter than the other.
When the body has narrowed sufficiently, begin transitioning into the head. Depending on how you construct the piece, you can continue directly upward or make the head separately and sew it securely to the body. For a continuous version, work a small number of increases around the upper section so that the head becomes wider than the neck. Continue with sc stitches until you have a compact head with roughly straight sides.
To create the characteristic ears, divide the top edge visually into three sections: left ear, center dip, and right ear. On the left side, work a short combination such as sc, hdc, dc, hdc, sc over several stitches to create a raised triangular point. The exact sequence may need adjustment depending on your stitch count. Work one or more low stitches across the center before repeating the shaping in reverse for the second ear.
Another beginner-friendly method is to crochet each ear separately. Ch 3, work a small group of stitches back across the chain, fasten off, and sew the miniature triangle onto the upper corner of the head. Repeat for the opposite side. This method makes it easier to control ear placement and is particularly useful when your first attempt at shaping ears directly into the head does not produce symmetrical points.
After completing the head, inspect the entire easy crochet cat pattern before fastening off. Both ears should appear approximately equal, the head should sit centrally above the belly, and the sides should transition smoothly toward the body. Small imperfections are normal in handmade crochet. If one edge looks slightly uneven, a final border of sl st or sc can often smooth the outline while providing a polished finish.
How to Crochet the Curved Tail and Decorative Bow
The curved tail is one of the details that makes this Crochet Easy Cat Pattern instantly recognizable. Attach the yarn near the bottom center or slightly to one side of the body. Chain approximately 10–15 stitches, depending on the size of your cat. The chain should be long enough to create a visible tail without becoming disproportionately large compared with the body.
Beginning in the second chain from the hook, work sc back along the chain. To encourage a natural curl, place occasional increases by working 2 sc into selected chain stitches. For a stronger curl near the tip, place two or three increases relatively close together. The extra stitches force the tail to curve naturally instead of hanging completely straight.
You can manipulate the tail gently with your fingers after fastening off. Curve it upward and inward to create the characteristic hook-like cat tail shown in the reference style. If the tail curls too tightly, stretch it carefully and redistribute the curve. If it remains too straight, additional increases or a slightly tighter hook tension can help on your next version.
For the miniature crochet bow, begin with a short chain or small magic ring. One simple approach is to create two tiny fan-shaped sections from a central point. Work a combination such as ch 2, 2 dc, ch 2, sl st into the center, then repeat the same sequence for the opposite side. This creates two small bow loops without requiring multiple pieces.
Fasten off while leaving a reasonably long yarn tail. Wrap this yarn around the center of the bow several times to pinch the two sides together. Secure the yarn on the back with a knot or a few hidden stitches. Sew the finished bow directly beneath the cat’s head. A cream or white bow creates strong contrast against colorful cats, while a tone-on-tone bow gives the project a softer appearance.
The bow is completely optional. You can keep your crochet cat keychain pattern minimalist, embroider a tiny collar, add a crocheted flower, or use different yarn colors for seasonal versions. When making an accessory intended for very young children, avoid loosely attached beads, buttons, or similar small components. Embroidered or crocheted decoration provides an attractive alternative without relying on detachable embellishments.
Finishing, Keychain Assembly, Color Ideas, and Customization
Once all the crochet sections are finished, weave in every loose yarn end with a yarn needle. Run each end through several stitches on the back of the work, change direction, and pass it through a few more stitches before trimming. Properly woven ends are especially important for a crochet keychain, because the finished piece may experience considerably more handling than a decorative item kept at home.
If the cat needs additional firmness, you can make two identical cat silhouettes and join them around the outer edge with single crochet or slip stitches. This creates a thicker charm and can hide the backs of decorative stitches. Before completely closing the two layers, you may add a very small amount of fiberfill if you prefer a slightly padded appearance rather than a completely flat piece.
To transform the cat into a keychain, create a strong attachment point at the top of the head. Insert your hook through a central stitch between the ears and join the yarn. Make a small chain loop, then secure it firmly with a slip stitch. Pass the key ring or clasp through this loop. Reinforce the attachment with your yarn needle if the charm will be used frequently on keys, purses, or backpacks.
Color selection can completely change the personality of the Crochet Easy Cat Pattern. Soft lavender and pink create a sweet pastel look, while sage green offers a calm handmade aesthetic. Mustard or golden yellow creates a cheerful version. Traditional cat-inspired colors such as charcoal gray, cream, ginger, brown, or black also work beautifully. Using the same bow color across several cats can visually connect a coordinated collection.
You can also change the finished size without changing the overall concept. For a miniature charm, use thinner yarn and a smaller hook. For a larger ornament or appliqué, use thicker yarn and a correspondingly larger hook. Remember that changing yarn weight affects not only height but also width and thickness, so test the proportions before making multiple matching pieces.
After finishing, gently shape the body, ears, and tail with your fingers. Cotton crochet can also benefit from careful blocking when necessary. Lay the piece flat, adjust the silhouette, and allow it to settle into shape. Avoid excessive stretching because the compact stitches are part of what gives this easy cat crochet project its neat appearance. Once shaped, your cat is ready to become a keychain, gift topper, bag charm, ornament, or decorative handmade accessory.
FAQ – Crochet Easy Cat Pattern
Is the Crochet Easy Cat Pattern suitable for beginners?
Yes. The project mainly relies on chains, slip stitches, single crochet, increases, and decreases. Beginners should already feel comfortable identifying individual stitches before attempting the shaping, but the overall construction is much simpler than many three-dimensional crochet animals.
What is the best yarn for a crochet cat keychain?
Cotton and cotton-blend yarns are excellent choices because they provide good stitch definition and create a durable fabric. Smooth yarn is generally easier to work with than fuzzy yarn when making a small project where every stitch contributes to the final shape.
What hook size should I use?
A 2.5–3.5 mm crochet hook can work well with many lightweight cotton yarns. However, yarn thickness varies between manufacturers. Choose a hook that creates dense stitches without making crocheting uncomfortable.
How can I make the cat smaller or larger?
The easiest method is to change yarn weight and hook size. Thinner yarn creates a smaller cat, while thicker yarn produces a larger one. More advanced crocheters can also change the number of increase rounds in the body and head.
How do I make the crochet tail curl?
Create a chain and work back along it while placing occasional increases. The extra stitches encourage the strip to curve. Adding more increases near the end produces a more pronounced curl.
Can I make the cat without the bow?
Absolutely. The bow is decorative and is not required for the cat construction. You can leave the neck plain or replace the bow with an embroidered collar, tiny flower, or another crocheted embellishment.
Can I use this pattern as an appliqué instead of a keychain?
Yes. Leave off the keychain loop and sew the finished cat onto a tote bag, blanket, pouch, fabric project, or other suitable surface. A flatter version is particularly convenient for appliqué work.
Why does my cat body look uneven?
Uneven shaping often comes from inconsistent tension or decreases that are concentrated in one area. Try distributing increases and decreases evenly around the body. Counting your stitches at the end of each shaping round can also help.
How do I keep the ears symmetrical?
Mark the center of the head before shaping the ears. Count the same number of stitches on each side and repeat the same stitch sequence for both ears. If crocheting directly into the head feels difficult, make two separate triangular ears and sew them into position.
Can I make several cats in different colors?
Yes. This pattern works especially well as a coordinated collection. Pastels, neutral colors, bright shades, and realistic cat colors can all be used while keeping the same basic construction.
Conclusion
The Crochet Easy Cat Pattern combines simple stitches with clever shaping to create an adorable handmade cat that can be completed without the complexity of a large amigurumi project. Throughout this tutorial, you learned the essential US crochet abbreviations, including ch, sl st, sc, hdc, dc, inc, and dec, along with practical techniques for building a rounded body, shaping the head, forming pointed ears, and keeping the finished silhouette balanced.
You also learned how to make the characteristic curved crochet tail, create an optional miniature bow, weave in the yarn ends, and attach the finished cat securely to keychain hardware. Once you understand the basic construction, the same idea can be customized through different yarn weights, colors, hook sizes, decorative details, and finishing techniques. This makes the project useful both for practicing crochet skills and for using leftover yarn creatively.
The best part of the Crochet Easy Cat Pattern is the freedom to give every little cat a different personality. Try a pastel collection, realistic cat colors, contrasting bows, or different tail shapes and see which combination you enjoy most. If you make this project, leave your sincere opinion about the pattern and share your suggestions for variations you would like to try. Your creative ideas can inspire even more ways to transform this simple crochet cat into a unique handmade project.