
The Crochet Cat Paper Clip Pattern is a charming little project that combines the cozy texture of crochet with the everyday usefulness of a paper clip. These adorable cat-shaped accessories are small enough to make with just a little yarn, yet they have plenty of personality. Inspired by the cute cat faces shown in the reference image, this project is designed to be approachable for beginners while still being enjoyable for experienced crocheters.
The finished cat can be attached to a large metal paper clip to create a practical bookmark, planner accessory, notebook decoration, or handmade office gift. With a few basic stitches and simple shaping techniques, you can create several cats in different colors and expressions.
One of the nicest things about this Crochet Cat Paper Clip Pattern is how customizable it can be. The example features cats in gray, cream, tan, and pink, but you can choose virtually any yarn color that matches your personal style. Soft neutrals create a classic appearance, while pastel shades give the cats a playful look. You can also experiment with facial details, ear shapes, and tiny embroidered accents. Because the crochet piece is intentionally small, it is a wonderful way to use leftover yarn from previous projects. A small amount of stuffing is generally unnecessary for this flat design, which keeps the finished accessory lightweight and easy to attach to a paper clip.
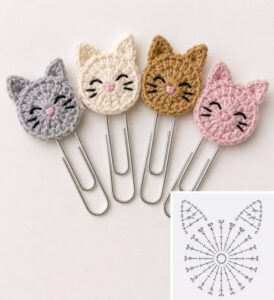
This project also makes a lovely handmade gift for teachers, students, coworkers, stationery lovers, readers, and anyone who enjoys cute crochet accessories. The Crochet Cat Paper Clip Pattern can be made individually or as a small collection of colorful cats. They are especially useful for organizing notes, marking pages, decorating planners, and keeping important papers together. The pattern below explains the stitches, shaping, assembly, and finishing process in a clear sequence. The goal is to create a simple cat face with two pointed ears and a rounded lower section, then secure that crochet piece neatly to a large paper clip. Always work carefully with the metal clip, especially when making this project for children.
Materials, Crochet Stitches, and Pattern Preparation
To make this Crochet Cat Paper Clip Pattern, you will need a small amount of medium-weight or cotton yarn, a crochet hook appropriate for your yarn, scissors, a yarn needle, and a large metal paper clip. Cotton yarn is particularly convenient because it produces defined stitches and holds the small cat shape nicely. You will also want a small amount of black yarn or embroidery thread for the eyes and whiskers, plus pink yarn for the tiny nose. If you prefer, the facial details can be embroidered using the same yarn with a smaller needle.
The main crochet piece is worked in the round, beginning at the center of the cat’s face. A magic ring gives the design a neat starting point, although you can substitute a chain ring if you are more comfortable with that technique. The basic stitches used in this Crochet Cat Paper Clip Pattern are the chain stitch, slip stitch, single crochet, and double crochet. The ears are formed by strategically increasing and decreasing the shape rather than creating separate pieces, which helps keep the finished cat compact and easy to attach to the clip.
For beginners, it is useful to understand the difference between the American crochet terms used here. A single crochet (sc) is made by inserting the hook into the stitch, yarn over, pulling up a loop, yarn over again, and pulling through both loops. A double crochet (dc) is taller and is created by yarning over before inserting the hook, then completing the stitch in stages. These two stitches provide enough variation to create the rounded face and pointed ears without making the project complicated.
The approximate finished crochet cat should measure around 2 to 2.5 inches across, depending on your yarn weight and tension. The metal paper clip can be larger than the crochet piece, as shown in the reference design. If your cat looks too large or too small, simply adjust your hook size or yarn thickness. Remember that handmade crochet pieces naturally vary slightly in size. For this type of accessory, a small difference does not affect the overall appearance or usefulness.
Before beginning, take a moment to decide where the facial features will go. The eyes should sit symmetrically on either side of the center, while the small nose can be positioned slightly below them. The whiskers can be embroidered afterward using short lines. Planning these details before stitching helps create the cute expression visible in the finished Crochet Cat Paper Clip Pattern. You can also use a scrap piece of paper to sketch the face placement before embroidering directly onto the crochet.
For the best result, keep your crochet fabric fairly firm rather than extremely loose. A tighter tension helps the cat retain its shape and prevents the metal paper clip from overwhelming the small crochet piece. However, avoid pulling your stitches so tightly that the fabric becomes stiff or difficult to work. The ideal tension creates a flat, flexible piece with clearly visible stitches. Once your materials are ready, you can begin the cat face and build the recognizable ears and rounded cheeks.
Step-by-Step Crochet Cat Face Pattern
Start the Crochet Cat Paper Clip Pattern with a magic ring. Work 6 single crochet stitches into the ring and gently pull the yarn tail to close the center. If you prefer not to use a magic ring, chain 2 and work the 6 single crochet stitches into the second chain from the hook. Place a stitch marker in the final stitch if that helps you keep track of your rounds. The first round forms the small center of the cat’s face.
For Round 2, work 2 single crochet stitches into each stitch around, giving you a total of 12 stitches. In Round 3, use the sequence of 1 single crochet in the first stitch followed by 2 single crochet in the next stitch, repeating around. This produces approximately 18 stitches. Continue increasing gradually so the piece expands into a small circle. Keep your stitches even because consistent tension will make the cat face smoother.
For Round 4, work approximately 1 single crochet in each of the next 2 stitches, followed by an increase in the next stitch, repeating around. This should bring the total to roughly 24 stitches. At this point, the crochet piece should resemble a small rounded disk. The exact stitch count can vary slightly depending on your yarn and tension, so focus on maintaining a balanced circular shape rather than forcing the fabric to match an exact measurement.
Now comes the most recognizable part of the Crochet Cat Paper Clip Pattern: creating the ears. Instead of making separate triangles and sewing them onto the face, shape the upper edge by using taller stitches and strategically placed increases. You can work a sequence of single crochet stitches across one side, followed by several double crochet stitches to build the first ear point. Then return to single crochet stitches through the center and repeat the taller stitches for the second ear.
To make the ears more defined, work several stitches toward the top of the first ear, placing the tallest stitch near its center. Then descend gradually toward the face. Repeat the same arrangement for the second ear, trying to keep both sides symmetrical. If you want sharper ears, use slightly taller stitches toward the tips. If you prefer a softer kitten appearance, use mostly single crochet and only a few double crochet stitches.
Once the upper edge and ears are complete, continue around the lower part of the face with single crochet stitches. Keep the bottom rounded and smooth. When you reach the starting point, use a slip stitch to join the round and fasten off, leaving a yarn tail long enough for weaving. Weave the tail securely through the back of several stitches before trimming it. The completed piece should now resemble the basic cat-head silhouette shown in the reference image.
Adding the Face and Attaching the Paper Clip
After completing the crochet portion, it is time to give your cat its personality. Use black embroidery thread or thin black yarn to create two small eyes. The reference design uses simple curved or closed-eye details, which give the cats a friendly and playful expression. You can recreate that look with a few short stitches. Alternatively, small embroidered dots can be used for open eyes. Keep both eyes at approximately the same height for a balanced appearance.
Next, add the tiny nose using pink yarn. A few stitches arranged into a small triangle or oval are enough to create the nose. The nose is one of the smallest details in the Crochet Cat Paper Clip Pattern, but it makes a noticeable difference to the finished face. Use only a small amount of yarn so the feature remains delicate. If the nose appears too large, gently adjust the stitches or remove them and try again with thinner thread.
The whiskers can be embroidered using three short lines on each side of the face. Try to space them evenly and angle them slightly outward. They do not have to be perfectly identical because handmade details often look more charming when they retain a little individuality. If you want an especially simple design, you can use only two whiskers per side. The important thing is to keep the embroidery secure so the yarn does not loosen during everyday use.
Now place the finished crochet cat over the upper portion of the large paper clip. The reference design shows the metal clip extending downward from behind the cat, allowing the crochet piece to sit securely at the top. Position the clip so its upper section is centered behind the crochet. You can attach it with strong sewing stitches made through the back of the crochet and around the appropriate section of the paper clip.
When sewing the paper clip in place, use the same yarn color as the cat or a matching neutral shade. Make several small stitches around the metal section without pulling so tightly that the crochet fabric becomes distorted. The goal is to keep the clip firmly positioned while preserving the rounded cat shape. Check the front frequently while sewing to make sure the metal does not shift noticeably from the center.
Finally, inspect your finished Crochet Cat Paper Clip Pattern from both sides. Make sure all yarn ends are woven in securely and that the paper clip moves freely enough to hold papers or mark a page. If you are giving the accessory as a gift, check that there are no loose strands or sharp exposed sections. You can repeat the pattern in multiple colors to create a complete collection of crochet cat clips for organizing notebooks, documents, planners, or books.
FAQ: Common Questions About the Crochet Cat Paper Clip Pattern
Can a beginner make this Crochet Cat Paper Clip Pattern?
Yes. The project uses several fundamental crochet techniques, including chains, single crochet, increases, slip stitches, and simple shaping. The small size makes it possible to practice without committing to a large project. Beginners may want to practice the circular starting technique on scrap yarn first. Once comfortable with the basic stitches, the cat shape becomes much easier to manage.
What yarn is best for a Crochet Cat Paper Clip Pattern?
Cotton or cotton-blend yarn is an excellent option because it provides clear stitch definition and keeps the small shape relatively stable. Smooth acrylic yarn can also work well. Avoid very fuzzy yarn if you want the facial details and ear shape to remain clearly visible. For a tiny accessory, a medium or lightweight yarn can make the finished piece easier to handle.
Can I change the colors of the crochet cat?
Absolutely. Color customization is one of the most enjoyable parts of this project. You can make gray, cream, brown, pink, black, orange, or multicolored cats. You can even create seasonal versions using different color combinations. Changing colors does not require changing the basic structure of the Crochet Cat Paper Clip Pattern, so it is an easy way to personalize your finished accessories.
How do I make the cat ears pointier?
To create more pointed ears, concentrate taller stitches toward the center of each ear and gradually return to shorter stitches on both sides. A combination of single crochet and double crochet can create a natural triangular shape. Your yarn tension also affects the appearance. If your ears look too rounded, try slightly taller stitches or reduce the number of stitches around the ear tips.
Do I need stuffing for this crochet cat?
No. This particular Crochet Cat Paper Clip Pattern is designed as a flat crochet embellishment rather than a stuffed amigurumi figure. Keeping the cat flat makes it lightweight and allows the paper clip to function properly. If you want a slightly raised appearance, you could make two crochet faces and lightly join them, but this is optional and not necessary for the basic design.
Can I use the finished cat as a bookmark?
Yes. Because the crochet cat is attached to a long metal paper clip, it can be used to mark pages while the crochet portion remains visible outside the book. It can also be used for planners, notebooks, folders, and stacks of paper. Avoid forcing the clip onto very thick materials, as excessive pressure can bend the metal or distort the crochet attachment.
How can I make several cats look different?
Small changes can create completely different personalities. Experiment with eye styles, whisker placement, nose colors, ear shapes, and yarn colors. You could make sleepy cats with curved eyes, cheerful cats with larger embroidered eyes, or minimalist cats with only a tiny nose and whiskers. These small variations make a set of Crochet Cat Paper Clip Pattern designs feel handmade and unique.
How should I care for a crochet cat paper clip?
Keep it dry and avoid placing it in situations where the yarn may snag on rough surfaces. If the crochet becomes dusty, gently clean it according to the care instructions for your yarn. Avoid pulling on the embroidered face or metal clip. With careful handling, the small crochet accessory can remain attractive and useful for a long time.
Conclusion
The Crochet Cat Paper Clip Pattern is a simple, creative project that turns a basic paper clip into an adorable handmade accessory. In this tutorial, you learned how to prepare the materials, create the rounded crochet face, shape the pointed cat ears, embroider the eyes, nose, and whiskers, and securely attach the crochet piece to a metal paper clip.
You can use the same basic construction to create cats in many colors and styles, making each one a little different. This is also a practical project for using small yarn leftovers while practicing important crochet techniques. If you try this pattern, leave your honest opinion about the instructions and share any suggestions that could make the project even more enjoyable for other crocheters.