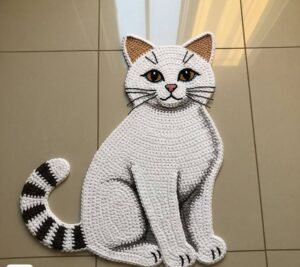
If you love handmade home décor, then a Cat Rug Crochet Pattern – Step by Step Tutorial is a perfect project to explore. Crocheting rugs not only adds a warm and cozy touch to your home but also allows you to express your creativity through yarn, color, and stitches. This pattern is especially charming because it combines practicality with the cuteness of a cat design, making it suitable for bedrooms, nurseries, or even as a unique gift for cat lovers.
In this tutorial, you will find clear explanations, simple techniques, and a detailed approach to help you create your own crochet cat rug. By following the instructions, you will learn how to make a decorative and functional rug that adds personality to any room. Whether you are a beginner who wants to practice basic stitches or an experienced crocheter looking for a fun and creative challenge, this Cat Rug Crochet Pattern – Step by Step Tutorial will guide you through the process with ease.
One of the best things about making a crochet rug shaped like a cat is the versatility of design. You can customize the size, choose playful colors, or even adjust the pattern to match your home’s style. With a bit of patience and creativity, you will not only craft a rug but also enjoy the relaxing process of crochet itself. Let’s dive into the details and discover how to bring this adorable rug to life.
Materials Needed for the Cat Rug Crochet Pattern
When beginning a Cat Rug Crochet Pattern – Step by Step Tutorial, having the right materials is essential. The yarn you choose will define both the texture and durability of your rug, so selecting a sturdy and soft option is recommended. Cotton yarn is a popular choice because it is both absorbent and comfortable underfoot.
Aside from yarn, you will also need an appropriate crochet hook. The hook size generally depends on the thickness of your yarn, but larger hooks usually help create looser and softer stitches that are ideal for rugs. A 6 mm to 8 mm hook is commonly used for projects like this.
Another important tool is a pair of sharp scissors to cut your yarn neatly. You will also benefit from using a tapestry needle, which is useful for weaving in loose ends and attaching different parts of the cat design, such as the ears and tail.
A stitch marker can be a valuable helper, especially if you are working in rounds. It ensures that you keep track of the starting point and avoid mistakes in counting. Stitch markers are optional, but they can save time and frustration, particularly for beginners.
In addition, you may want to use a non-slip mat or liner underneath your finished rug. Since crochet rugs can slide on smooth floors, this simple trick improves safety and stability without altering the beauty of your piece.
Finally, make sure to have a comfortable workspace with good lighting. Crocheting a rug requires attention to detail, and a cozy environment will enhance your crafting experience while working on this Cat Rug Crochet Pattern – Step by Step Tutorial.
Step by Step Instructions for Crocheting the Cat Rug
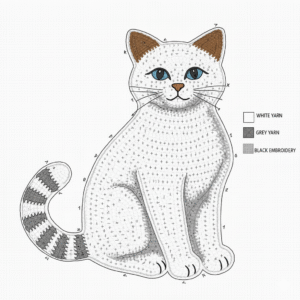
The Cat Rug Crochet Pattern – Step by Step Tutorial begins with a basic circular shape, which will form the main body of the cat. To start, create a magic ring and work single crochets around it. This method provides a tight and clean center, which is ideal for rugs.
As you continue, increase your stitches evenly in each round to maintain a flat circle. Consistency in stitch count is important to prevent curling or uneven edges. A common formula is to add additional stitches in each round at equal intervals.
Once the circular base reaches the desired size, it’s time to add details that bring the cat to life. Crochet small triangular pieces to form the cat’s ears and attach them securely to the top of the rug. This adds the first touch of personality to the pattern.
Next, you can work on the tail. A long, slightly curved strip crocheted separately and sewn onto the rug gives the cat a playful look. Depending on your preference, the tail can be thin, thick, straight, or curly, making each rug unique.
Eyes, nose, and whiskers can also be crocheted as small appliqués or embroidered directly onto the rug. This is where you can experiment with colors—black yarn for whiskers, pink for the nose, and white for the eyes are classic choices.
By following these steps carefully, you will complete the body, face, ears, and tail, turning a simple round rug into an adorable Cat Rug Crochet Pattern – Step by Step Tutorial that truly stands out.
Tips for Customizing Your Cat Rug
One of the most enjoyable aspects of this Cat Rug Crochet Pattern – Step by Step Tutorial is the opportunity to personalize it. Customization allows you to adapt the design to your own preferences or the décor of your home.
For example, color selection plays a big role. A black cat rug looks elegant and mysterious, while a white or cream version feels light and cozy. Bright colors, on the other hand, can make the rug playful and perfect for a child’s room.
You can also adjust the size of the rug to fit different spaces. By continuing to increase the rounds, you can create a larger rug for a living room, or keep it smaller for use as a decorative mat by the bed.
Texture is another element to explore. By using different stitch patterns, such as double crochets, puff stitches, or bobbles, you can add a unique touch to the rug. These variations not only make the project more fun but also change the overall look and feel.
Adding extra features is another creative idea. For instance, you could crochet a small yarn bow or collar to place on the cat’s neck, making the rug even cuter and more distinctive.
Lastly, keep in mind that this project can be a wonderful handmade gift. A customized cat rug shows thoughtfulness and care, making it perfect for birthdays, baby showers, or housewarming presents. With creativity, your Cat Rug Crochet Pattern – Step by Step Tutorial becomes more than a craft—it turns into a heartfelt piece of art.
Common Mistakes and How to Avoid Them
While working on a Cat Rug Crochet Pattern – Step by Step Tutorial, beginners often encounter challenges that can affect the final result. Knowing these common mistakes in advance can save time and frustration.
One frequent issue is failing to increase stitches evenly, which leads to curling or a wavy effect. To avoid this, always count your stitches carefully and follow the increase pattern in each round.
Another problem is using yarn that is too thin or delicate. Rugs need durability, so lightweight yarns may not provide the strength required for everyday use. Opt for medium to bulky weight yarns for the best results.
Sometimes crocheters pull their yarn too tightly, making the rug stiff and uneven. Relaxing your hands and keeping tension balanced ensures a smoother and softer finish.
Forgetting to weave in ends properly is another common mistake. If not secured, loose ends can unravel and weaken the rug over time. Use a tapestry needle to weave them securely.
Color changes can also be tricky. Make sure transitions are neat and invisible by weaving in the ends carefully at the back of your work. This makes the rug look professional and polished.
By being mindful of these small details, your Cat Rug Crochet Pattern – Step by Step Tutorial will not only be easier but will also result in a rug that looks clean, sturdy, and ready to impress.
FAQ About Cat Rug Crochet Pattern – Step by Step Tutorial
1. Is this pattern suitable for beginners?
Yes, this Cat Rug Crochet Pattern – Step by Step Tutorial is beginner-friendly, as it mainly uses simple stitches like single crochet and basic increases.
2. How long does it take to complete the rug?
The time varies depending on your skill level and the size you choose, but most people finish it in a few days of casual crocheting.
3. Can I wash my crochet cat rug?
Yes, most rugs made with cotton or sturdy yarns can be washed gently by hand. Avoid high heat when drying to keep the shape intact.
4. What yarn is best for this rug?
Cotton yarn is highly recommended because it is durable, soft, and easy to clean. You can also use blends, as long as they are strong enough.
5. Can I change the design features, like the eyes or tail?
Absolutely. This pattern is flexible, so you can modify details such as the eyes, whiskers, or tail shape to suit your preference.
6. Will the rug slip on the floor?
Yes, crochet rugs can slide on smooth surfaces. Adding a non-slip mat or liner underneath is the best way to prevent this.
Pattern
Creating a Cat Rug Crochet Pattern – Step by Step Tutorial is a fun and rewarding project that combines practicality with creativity. From choosing yarn and mastering basic stitches to customizing features like ears, tail, and colors, this tutorial provides everything you need to succeed.
By following the step-by-step process and keeping in mind the tips for customization and avoiding mistakes, you can crochet a rug that is not only useful but also full of personality. Whether for your own home or as a handmade gift, the result will surely be appreciated.
Now that you have learned the process, we’d love to hear from you. What do you think of this Cat Rug Crochet Pattern – Step by Step Tutorial? Share your opinions, experiences, and suggestions to inspire others in the crochet community!