
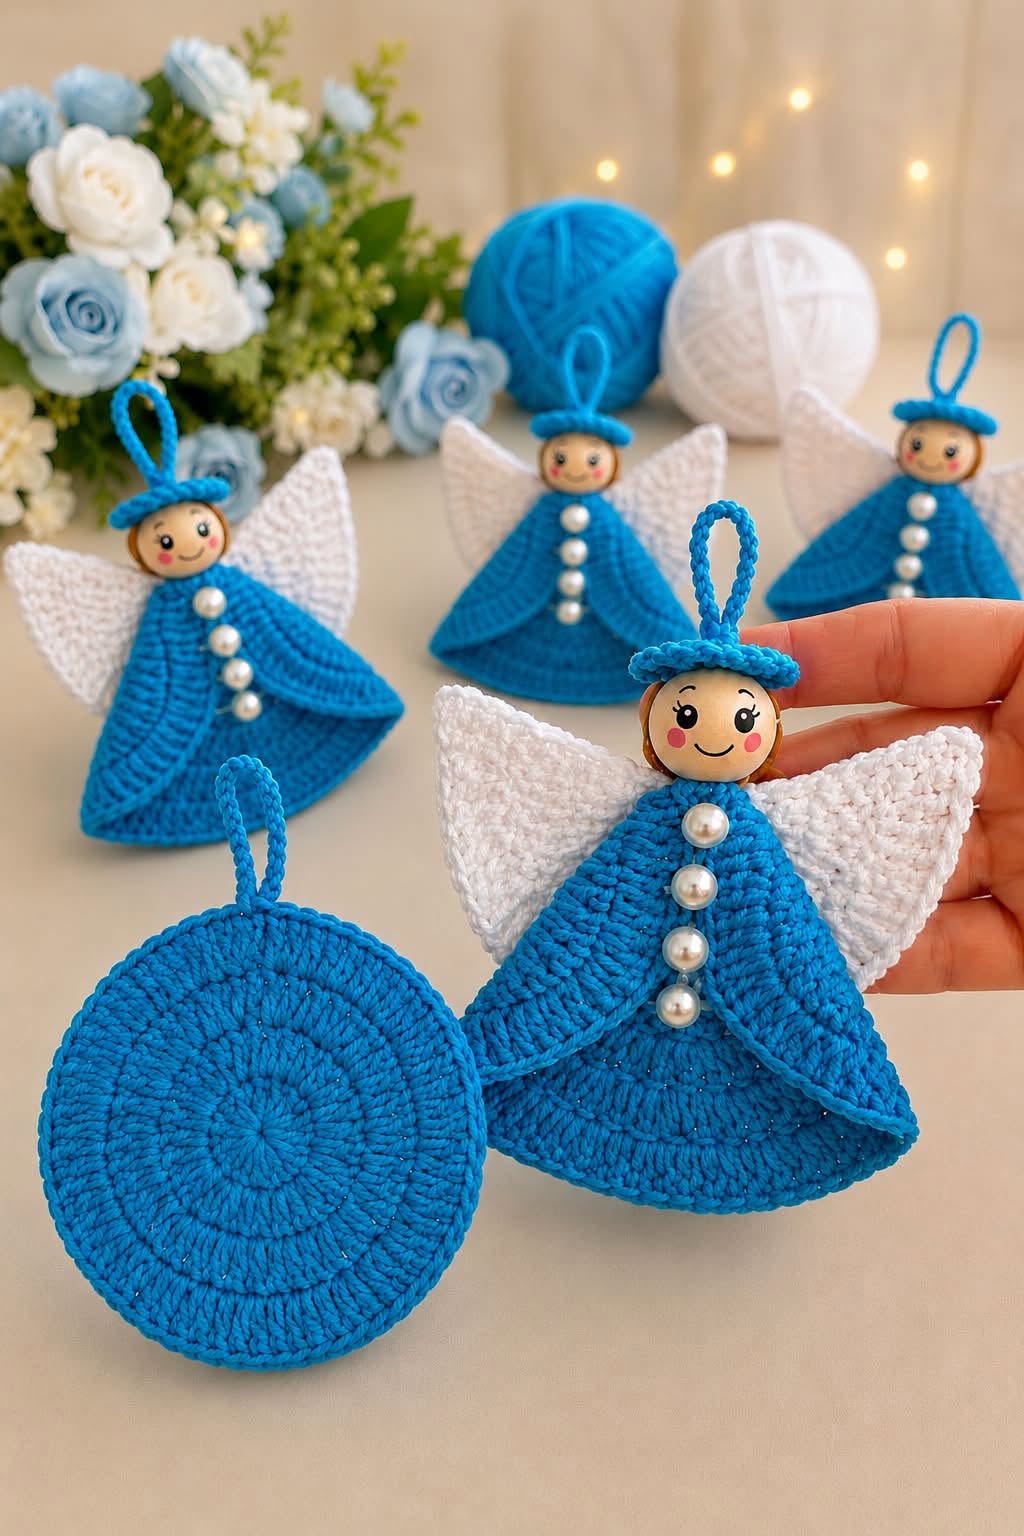
Crochet Angel Keychain Pattern is a charming crochet project that combines a simple circular skirt, delicate wings, a small head, and a practical hanging loop to create an angel-inspired ornament. Based on the style shown in the reference image, the finished piece can be used as a keychain, Christmas ornament, bag charm, handmade decoration, or small gift.
The construction is especially approachable because most of the crocheted sections use familiar stitches and straightforward shaping. Instead of requiring complicated amigurumi techniques, the design relies mainly on increases, basic US crochet stitches, and simple assembly.
One of the most attractive features of this crochet angel pattern is how easily it can be personalized. The sample look combines a bright blue dress with white wings, but you can choose traditional Christmas colors, soft pastels, neutrals, metallic yarn, or colors that match a special event. Small decorative beads can be added down the front of the dress, while the head can be made with a wooden bead or a crocheted sphere. Because yarn weight, hook size, and personal tension affect the final dimensions, the instructions below focus on a flexible construction method rather than one rigid finished size.
This tutorial uses US crochet terminology and explains the main stitches as they appear in the project. The basic abbreviations are ch (chain), sl st (slip stitch), sc (single crochet), hdc (half double crochet), dc (double crochet), st/sts (stitch/stitches), inc (increase), and MR (magic ring). An increase means working more than one stitch into the same stitch to expand the fabric. If you are making the angel as a decorative keychain or ornament, make sure every sewn component is firmly attached. Beads and other small embellishments should not be used on an item intended as a toy for babies or very young children.
Materials, Crochet Stitches, and Preparation
For the Crochet Angel Keychain Pattern, choose a smooth cotton or cotton-blend yarn that gives the dress enough structure to hold its bell-like shape. A lightweight DK or similar yarn works particularly well. You will need one main color for the dress and halo, white or cream yarn for the wings, a crochet hook appropriate for your yarn, a yarn needle, scissors, stitch markers, and a small head component. Decorative beads are optional.
The main dress begins as a crochet circle. This is important because the circular construction creates the wide lower section visible in the reference design. When part of the circle is folded or arranged around the angel’s body, it naturally creates overlapping panels that resemble a flowing robe. Keeping your increases evenly distributed will help the circle remain flat instead of becoming wavy or bowl-shaped.
To begin crocheting, make an MR (magic ring). The magic ring is an adjustable loop that allows the first round of stitches to close neatly at the center. If you prefer not to use an MR, ch 4 and join the first chain with a sl st to form a small ring. Crochet the first round into this opening and tighten the center afterward.
The most useful stitch for creating a smooth, flowing dress is dc (double crochet). In US terminology, make a double crochet by yarn over, insert the hook into the designated stitch, yarn over and pull up a loop, yarn over and pull through two loops, then yarn over again and pull through the final two loops. Double crochet creates height quickly and gives the circular piece a graceful drape.
For smaller structural sections, sc (single crochet) is useful. Insert the hook into the stitch, yarn over, pull up a loop, yarn over again, and pull through both loops. Hdc (half double crochet) sits between sc and dc in height: yarn over, insert the hook, pull up a loop, yarn over, and pull through all three loops. These stitches are useful for shaping wings and finishing edges.
Before starting the complete Crochet Angel Keychain Pattern, make a small test circle with your selected yarn and hook. Your fabric should be firm enough to retain its shape without becoming stiff. If large gaps appear between stitches, try a slightly smaller hook. If the work feels difficult to manipulate or curls tightly despite correct increases, move up one hook size.
Step-by-Step Crochet Angel Dress and Body
Start the angel’s dress with an MR. Round 1: ch 3 to establish height, then work 11 dc into the ring. Join with a sl st to the top of the beginning chain. You should have the appearance of approximately 12 evenly distributed double-crochet sections. Pull the magic ring closed carefully so the center is neat and secure.
For Round 2, ch 3 and work 2 dc into each stitch around, treating the beginning chain consistently according to your preferred round-counting method. Join with a sl st. The purpose of this round is to expand the circle evenly. Spread the work flat after finishing the round and check that the increases are evenly positioned.
For Round 3, continue the standard circular increase sequence. Ch 3, work 1 dc in the next stitch and 2 dc in the following stitch; repeat this increase rhythm around. Join with a sl st. For Round 4, increase the spacing again by working 1 dc into each of the next two stitches followed by 2 dc into the next stitch. Continue around and join.
If you want a larger angel, continue expanding the crochet circle with the same mathematical progression. On each new round, place one additional regular dc between increases. For example, the next round uses three individual dc stitches before the increase, followed by four on the subsequent round. Stop when the circle is large enough to form the desired dress. For a keychain-sized project, keeping the piece relatively compact is usually preferable.
Once the circle is finished, arrange it into the angel’s robe shape. Bring the upper sides inward so that two curved sections overlap toward the center, leaving the wider portion flared at the bottom. The exact amount of overlap depends on the yarn and circle size. Use a few discreet stitches with matching yarn to secure the upper folds while allowing the bottom edge to remain open and bell-shaped.
Create a small neck attachment area at the upper center. You can use several tight sc stitches or simply sew through the folded layers securely with a yarn needle. Attach the wooden bead or crocheted head above this point. Pass your yarn through the head attachment several times so that it cannot rotate or pull loose during normal decorative use.
To reproduce the decorative appearance of the example, sew three or four pearl-style beads vertically along the front of the angel. Position them before sewing to check the spacing. For a completely crocheted alternative, make tiny bobbles or French-knot-style yarn details instead of beads. This creates a softer handmade crochet angel without separate plastic or metal embellishments.
How to Crochet the Wings, Halo, and Hanging Loop
The wings are one of the defining features of this Crochet Angel Keychain Pattern. They can be made as two separate triangular pieces or as one symmetrical piece placed behind the body. For a simple individual wing, ch approximately 10 to 14 stitches depending on your yarn and desired size. The goal is to create a compact triangle that extends visibly beyond the dress.
Beginning in the second chain from the hook, work sc across the foundation. On the next row, use progressively taller stitches such as sc, hdc, and dc to begin widening the outer section. Turn and continue shaping the wing by adding stitches toward the widest area while reducing stitches near the tip. The exact stitch count can be adjusted because the wing needs to complement your finished dress rather than match one fixed measurement.
Another beginner-friendly method is to crochet a small triangle. Ch 2 and work several sc into the second chain from the hook. Turn, ch 1, and increase at the beginning and end of each row. Continue until the triangle reaches the required size. To create more texture, alternate rows of sc and hdc, or work only through the back loops on selected rows to produce subtle ridges.
Make the second wing using exactly the same number of rows. Place both wings behind the head and upper dress, angling their points slightly upward. Use white yarn and a yarn needle to sew through the inner edges of the wings and the back of the dress. Avoid sewing too close to the outer wing edges because they should remain free enough to show their shape.
For the blue halo effect, make a chain long enough to fit decoratively above the head and join it with a sl st to create a small ring. You can work one round of sc around the chain ring for extra thickness. Position this piece horizontally above or around the upper head area and sew it securely. The halo adds a recognizable finishing detail while also helping visually connect the head to the hanging loop.
To make the crochet hanging loop, attach the main-color yarn behind the halo, ch approximately 18 to 25 stitches, and sl st back into the attachment point. The number of chains depends on how large you want the loop. For a thicker loop, sl st into every chain on the way back. Fasten off securely and weave the yarn tail through several stitches so the loop can support the ornament.
Assembly, Finishing, Customization, and FAQ
Before completing your Crochet Angel Keychain Pattern, inspect every component individually. The circular dress should sit evenly, the wings should be symmetrical, and the head should remain centered. Weave in all yarn ends using a yarn needle, passing each tail through several stitches before trimming. Good finishing work makes a significant difference in a small project because every detail remains visible.
When assembling the angel, attach the wings before completing the final head and halo positioning whenever possible. This allows the wing seams to remain hidden behind the body. After sewing the wings, attach the head securely to the top of the dress and then position the halo. Finally, attach or reinforce the hanging loop.
You can customize the pattern by changing the yarn colors. White and gold create a traditional Christmas crochet angel, while blue and white reproduce the fresh look of the reference image. Burgundy, forest green, cream, silver, pale pink, lavender, or icy blue can create entirely different styles without changing the construction.
Texture can also transform the project. Cotton yarn creates crisp stitch definition, while acrylic tends to feel softer. A subtle metallic strand worked together with the main yarn can add festive sparkle. When changing yarn thickness, remember that the finished size will also change, so select the hook according to the yarn rather than relying on a single universal hook size.
Blocking can help improve the wings and circular dress. Lightly dampen the crocheted sections, shape them with your hands, and allow them to dry completely on a flat surface before final assembly. Follow the care recommendations for your particular yarn, especially when using fibers that may react differently to heat or moisture.
For a keychain version, consider attaching a proper key ring or swivel clasp to the crocheted loop. The crochet loop itself works beautifully for lightweight ornaments, but hardware provides additional durability when the angel will be carried regularly on keys or a bag. Stitch the attachment point firmly and check it periodically if the finished angel receives frequent handling.
FAQ: What crochet skill level is recommended for this pattern?
This Crochet Angel Keychain Pattern is suitable for confident beginners and intermediate crocheters. You mainly need to understand chains, slip stitches, single crochet, half double crochet, double crochet, increases, fastening off, and basic sewing. Beginners can practice the circular dress first because it contains the most important shaping technique in the project.
FAQ: What does MR mean in US crochet terminology?
MR means magic ring or magic circle. It is a technique used to begin crocheting in the round with an adjustable center. After crocheting the first stitches into the loop, the yarn tail is pulled to close the center opening. It is commonly used for circular crochet motifs and amigurumi.
FAQ: What is the difference between US sc, hdc, and dc?
In US crochet terminology, sc means single crochet, hdc means half double crochet, and dc means double crochet. Single crochet is relatively short and dense, half double crochet provides medium height, and double crochet is taller. Combining these stitch heights makes it easier to shape areas such as the angel wings.
FAQ: Can I make the angel without decorative beads?
Absolutely. The beads are purely decorative. You can leave the front plain, embroider small dots, crochet tiny bobbles, add miniature buttons suitable for decorative use, or create contrasting yarn details. A bead-free version can be especially useful when you want a completely soft crochet ornament.
FAQ: Why is my circular dress becoming wavy?
A wavy circle often indicates that the fabric has too many increases for the yarn, hook, or tension being used. Check the stitch count and make sure increases follow an even progression. If the count is correct but the fabric still ripples strongly, adjusting the hook size or modifying the increase frequency slightly may help.
FAQ: Why does my crochet circle curl upward?
Curling can occur when there are too few increases, when the hook is too small, or when your tension is particularly tight. First verify the stitch count. If the mathematics are correct, try relaxing your tension or moving to a slightly larger crochet hook.
FAQ: Can the Crochet Angel Keychain Pattern be made larger?
Yes. Continue adding rounds to the circular dress while maintaining the established increase sequence. You can also use thicker yarn and a larger hook. Increase the wings, head, halo, and hanging loop proportionally so that the angel maintains a balanced appearance.
FAQ: Can I use this pattern as a Christmas ornament instead of a keychain?
Yes. The same construction works beautifully as a crochet Christmas ornament. For a tree decoration, you may prefer a lighter hanging loop rather than metal keychain hardware. Multiple angels in coordinated colors can also create a cohesive set of handmade holiday decorations.
FAQ: How can I make both wings the same size?
Count every row and stitch while making the first wing and write the numbers down. Repeat exactly the same sequence for the second wing. Place the two finished pieces together before attaching them to check their size, angle, and overall symmetry.
FAQ: How should I care for the finished crochet angel?
Care depends primarily on the yarn and embellishments used. For decorative pieces, gentle spot cleaning is usually the simplest option. Avoid aggressive washing when the project includes a wooden head, glued details, metal hardware, or decorative beads that may be damaged by water.
Conclusion
Video Tutorial:
The Crochet Angel Keychain Pattern turns basic crochet techniques into a sweet handmade decoration with plenty of room for personalization. Throughout this tutorial, you learned how to begin with a magic ring, expand a flat circular dress using double crochet and increases, fold and secure the robe, shape two wings, attach the head, create a halo, and finish the project with a practical hanging loop.
The most important part of this project is maintaining consistent tension and balanced proportions. The dress does not need to match one exact measurement to look beautiful. Instead, concentrate on keeping the circle flat, making both wings approximately symmetrical, and positioning the head and embellishments carefully. These small details give the completed angel a polished appearance.
Once you understand the basic construction, the same Crochet Angel Keychain Pattern can become the starting point for many variations. Experiment with different yarn colors, wing textures, embroidered decorations, crocheted bobbles, metallic accents, and different hanging-loop lengths. You can make small versions for keychains or larger ones for seasonal decorations.
This project is also an enjoyable way to practice essential US crochet stitches without committing to a large piece. From the magic ring and circular increases to simple shaping and assembly, each stage reinforces techniques that can be applied to many other crochet projects.
If you make your own angel, leave your sincere opinion about the pattern and share any suggestions or creative changes you would make. Your ideas about colors, yarn choices, wing shapes, embellishments, and finishing details can inspire even more variations of this charming handmade Crochet Angel Keychain Pattern.