
The Stairway To Heaven Quilt Block Pattern is a striking patchwork design that combines strong geometric movement with a surprisingly approachable construction method. Inspired by the block shown in the reference image, the design creates a staircase that travels diagonally across the square, separating two contrasting fabric areas.
Small half-square triangle units form the steps, while progressively sized strips and rectangles build the surrounding sections. The result is a block that looks complex from a distance but can be assembled through a logical sequence of traditional quilting techniques. Because the pattern relies heavily on contrast, it is also an excellent project for experimenting with fabric combinations already available in your sewing room.
One of the most appealing characteristics of the Stairway To Heaven Quilt Block Pattern is the way the eye naturally follows the diagonal staircase. In the photographed example, a dark printed fabric fills the lower-left portion, a soft muted green occupies the upper-right area, and dark green paired with cream creates the individual stair units. You do not need to reproduce these exact colors. The essential idea is to select two larger contrasting fabrics for the background areas and two additional fabrics with enough light-and-dark difference to make every stair clearly visible. Careful fabric placement is more important than using a particular print or color palette.
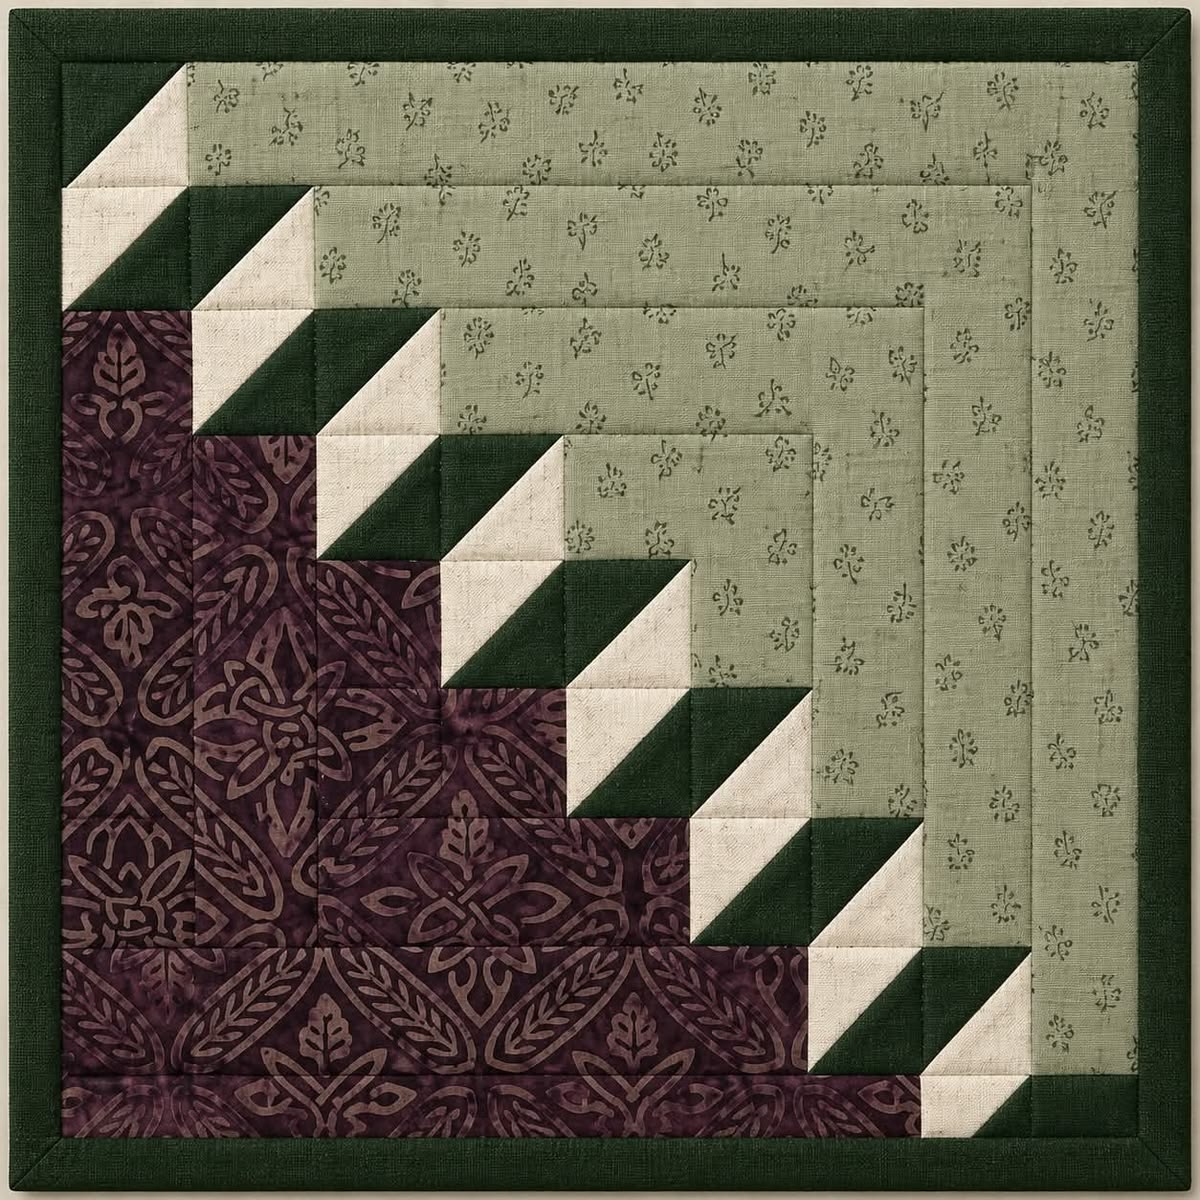
This tutorial explains a practical method for recreating the appearance of the photographed block rather than claiming to reproduce an original commercial pattern. Since the exact measurements of the photographed piece cannot be verified from an image alone, the cutting dimensions below are presented as an adaptable construction plan. The most important principles are consistent seam allowances, accurately made half-square triangles, careful pressing, and checking the block after every stage. Once you understand how these components work together, the same construction concept can be scaled for a small wall hanging, table topper, pillow front, or a larger quilt made from multiple blocks.
Materials, Fabric Selection, and Understanding the Stairway Design
Begin by studying the structure of the Stairway To Heaven Quilt Block Pattern. The most noticeable feature is the diagonal line of repeating square units. Each square is visually divided into contrasting triangles, producing the illusion of steps climbing from the lower-right corner toward the upper-left corner. These units establish the entire rhythm of the design, so they should be prepared before the larger background sections are assembled.
For a practice block or small wall-hanging version, gather four coordinated quilting cottons: Fabric A for the darker lower-left section, Fabric B for the lighter upper-right section, Fabric C for the dark portion of the staircase, and Fabric D for the light portion of the staircase. You will also need coordinating thread, a rotary cutter, an acrylic quilting ruler, a cutting mat, an iron, pins or clips, and a sewing machine capable of producing an accurate straight stitch.
A useful starting point is to make the stair units finish at approximately 7.5 cm (3 inches) each. For half-square triangles of this approximate finished size, cut your starting squares slightly oversized—about 9 cm (3½ inches) works conveniently—so the completed units can be trimmed accurately. Quilters who prefer another block size can enlarge or reduce these measurements as long as every repeated unit is changed proportionally.
The half-square triangle, commonly abbreviated as HST, is one of the fundamental units in patchwork quilting. It consists of two right triangles sewn together along their diagonal edges to create a square. In this project, alternating light and dark HST sections provide the crisp diagonal movement seen along the staircase. Oversizing and trimming HSTs is especially helpful for beginners because it provides room to correct minor sewing variations.
Before cutting the larger fabrics, decide approximately how many stair units you want in your block. The reference design uses a long diagonal progression, so an odd number such as seven or nine units creates an attractive staircase. Lay paper squares on a table first if necessary. Position them diagonally and imagine progressively larger sections extending from either side. This simple planning exercise can prevent cutting errors later.
Finally, preparation and accuracy should take priority over speed. Press the fabric before measuring it, square the folded edge if cutting strips, and make every measurement from a clean ruler line. Use a consistent ¼-inch seam allowance, approximately 6 mm, throughout the piecing process. Small inconsistencies multiply quickly in a geometric block, whereas precise cutting allows the staircase to remain straight and the surrounding sections to meet neatly.
Making the Half-Square Triangle Stair Units
To begin constructing the staircase, place one Fabric C square and one Fabric D square right sides together. On the wrong side of the lighter square, draw a diagonal guideline from one corner to the opposite corner. This line is not normally the sewing line. Instead, it acts as the center reference for the standard two-at-a-time HST method.
Sew a straight seam approximately 6 mm (¼ inch) away from the marked diagonal line on one side. Rotate the unit and sew another seam the same distance from the guideline on the opposite side. Maintaining the same distance on both seams is important because uneven sewing can produce distorted triangles. Repeat this procedure until you have enough paired squares for all of the required stair components.
Use a rotary cutter and ruler to cut directly along the original drawn diagonal. Each paired square will now produce two half-square triangle units. Open the units carefully and press the seams. You may press toward the darker fabric to help prevent the seam allowance from showing through the light fabric, although pressing seams open can also be useful when several seams eventually intersect.
Now trim every HST to exactly the same measurement. For the suggested scale, trimming each unit to approximately 8 cm (3⅛ inches) before it is incorporated into the surrounding piecing gives you a manageable module, but the precise measurement can be adjusted to suit your planned finished block. Place the ruler’s 45-degree marking directly over the diagonal seam before trimming all four sides. Accuracy at this stage determines how crisp the staircase will look.
Arrange the finished units diagonally on your work surface. Follow the orientation shown in the reference image: the light and dark triangles should alternate consistently so they produce a continuous stepped ribbon instead of unrelated zigzags. Take a quick photograph of your arrangement before sewing. This gives you a convenient visual reference if the pieces are accidentally moved while you work.
Start joining the HST units into small stair sections rather than attempting to sew the entire diagonal at once. Match corners carefully, pin where necessary, and sew using the same ¼-inch seam allowance. Press after every addition. The objective is not simply to produce a diagonal row; the repeated triangles should appear to climb naturally from one level to the next while maintaining clean square corners.
Once the staircase units have been prepared, measure them rather than relying exclusively on theoretical dimensions. Real fabric and real seams can produce tiny differences. Use the actual dimensions of your sewn components to determine the exact lengths of the neighboring strips. This measure-as-you-build method is particularly effective for recreating a block from a photograph because it compensates for minor variations while preserving the overall visual structure.
Building the Graduated Fabric Sections Around the Staircase
The lower-left portion of the Stairway To Heaven Quilt Block Pattern can now be built using Fabric A. Notice how the reference block does not contain one enormous triangular piece. Instead, rectangular and square fabric sections increase gradually beside the staircase. This construction method makes the design much easier to piece with straight seams and avoids sewing difficult inset angles.
Begin near the smallest interior step. Cut a Fabric A rectangle whose height corresponds to the neighboring stair module. Sew it beside the appropriate HST section, matching the edges carefully. Press the seam and check that the newly assembled section remains square. This first addition establishes the relationship between the staircase and the darker background area.
Continue downward by adding progressively larger Fabric A rectangles or strips. Each new level extends farther toward the left and bottom edges. Think of the construction as a series of nested right angles. Instead of trying to create the entire dark area at once, you are expanding the block one rectangular stage at a time. This approach closely reflects the stepped geometry visible in the reference photograph.
The upper-right section is constructed similarly using Fabric B. Begin with the smaller interior area beside the staircase and add progressively longer strips as you move outward. In the photographed block, this lighter region creates several visible nested bands. Maintaining consistent strip widths will help preserve that elegant architectural appearance.
After adding each strip, press the seam before attaching another piece. Pressing is different from aggressively ironing back and forth. Place the iron onto the seam, lift it, and reposition it as needed. Sliding the iron repeatedly can stretch the bias edges of the HST units and gradually distort the block. A flat, square block is much easier to join and quilt later.
Periodically place a large square quilting ruler over the project and check the alignment of the diagonal staircase. Do not aggressively trim the outside edge while construction is still underway. Instead, correct small inconsistencies through careful seam placement. Save the final squaring process until all of the major sections have been assembled.
As the two contrasting background areas grow, the characteristic Stairway To Heaven effect becomes increasingly obvious. Fabric A should visually anchor one side while Fabric B opens the opposite side. The HST units create the transition between them. This combination of large calm areas and small high-contrast geometric pieces is what gives the block such strong movement without making the overall composition feel excessively busy.
Completing, Squaring, Bordering, and Quilting the Block
When all staircase and background sections have been joined, place the block on a flat surface and inspect it from a short distance. Look specifically at the diagonal progression. The steps should remain visually consistent from one corner toward the other. If one unit has accidentally been rotated, correcting it before adding borders will be much easier than discovering the mistake after quilting.
Square the completed center carefully. Find the center and diagonal references with your ruler, then trim only the minimum amount necessary from each outer edge. Squaring a quilt block means creating four straight sides and four 90-degree corners while keeping the internal design centered. Avoid trimming one side heavily simply to reach a predetermined measurement; maintaining visual balance is more important.
The photographed project includes a narrow dark border that frames the entire composition beautifully. To recreate this effect, cut strips from Fabric C or another coordinating dark fabric. Sew the strips to two opposite sides first, press them outward, measure the new width, and then cut the remaining two border strips to fit. This produces a cleaner frame than guessing all four lengths in advance.
For especially neat corners, you can create mitered borders, which produce the diagonal corner seams visible in many carefully finished quilt projects. Beginners can instead use straight-set borders because they are easier and still produce an attractive result. Either technique works; the important point is that the border remains even around all four sides and does not cause the center to ripple.
If you want to turn the block into a small quilted piece, layer the finished top with batting and backing fabric. Smooth all three layers carefully and baste them using your preferred method. Straight-line quilting is particularly suitable for this geometric design. You might quilt parallel to the staircase, stitch along the major seams, or create evenly spaced lines that echo the rectangular background sections.
Finish the outside with quilt binding. Cut binding strips, join them into one continuous length, fold and press the strip in half lengthwise, and attach it around the perimeter. Miter the corners neatly and join the final ends before securing the folded edge to the back. Once pressed, your Stairway To Heaven Quilt Block Pattern project is complete and ready to display or incorporate into a larger quilt.
The design also offers many opportunities for personalization. Try autumn fabrics, Christmas colors, blue-and-white combinations, scraps from previous projects, or monochromatic shades. The staircase becomes most visible when there is strong value contrast, meaning a noticeable difference between light and dark fabrics. Prints can work beautifully, but avoid selecting four fabrics with nearly identical values because the geometric pathway may disappear.
FAQ About the Stairway To Heaven Quilt Block Pattern
What is a Stairway To Heaven Quilt Block Pattern?
The Stairway To Heaven Quilt Block Pattern is a geometric patchwork concept in which contrasting units create a staircase-like diagonal movement across a quilt block. The surrounding fabric sections increase progressively, reinforcing the impression that the steps are traveling through the design.
Is this quilt block suitable for beginners?
Yes. Although the completed block looks detailed, its construction uses familiar quilting techniques such as straight seams, rectangles, strips, and half-square triangles. A confident beginner who can maintain an accurate ¼-inch seam allowance should be able to complete it successfully.
What is the most important technique in this pattern?
Accurate half-square triangle construction is particularly important. Because the HST units form the visible staircase, inconsistent sizes or diagonal seams can interrupt the pattern. Making the units slightly oversized and trimming them afterward is an excellent way to improve precision.
Do I have to use green, cream, and brown fabrics?
No. Those colors reflect the reference project, but the block can be made with almost any palette. What matters most is contrast. Choose fabrics that allow the staircase to stand apart clearly from the larger background sections.
Can I make the block larger or smaller?
Absolutely. The design is scalable. Increasing the size of the HST modules and surrounding strips creates a larger block, while smaller modules produce a more detailed miniature version. Keep all measurements proportional and maintain the same seam allowance throughout the project.
Why should half-square triangles be trimmed after sewing?
Trimming removes small inaccuracies created during stitching and pressing. Even experienced quilters can produce HST units that vary slightly. Squaring each one to an identical size makes subsequent seams easier to align and helps maintain the clean diagonal structure.
Should seams be pressed open or to one side?
Either method can work. Pressing toward the darker fabric is traditional and may help prevent dark seam allowances from showing through pale fabrics. Pressing open reduces bulk where several seams intersect. Choose one approach according to the fabric weight and construction stage.
How can I keep the staircase from becoming crooked?
Check every component before joining the next section. Trim HST units accurately, use a consistent ¼-inch seam, and measure completed sections frequently. It is easier to correct a tiny discrepancy immediately than to compensate for accumulated errors near the outer border.
What can I make with this block besides a full quilt?
A single block can become a wall hanging, cushion cover, table topper, oversized potholder, decorative panel, or centerpiece for a quilted bag. Multiple blocks can also be rotated and combined to create larger secondary geometric patterns.
Can scrap fabrics be used for this project?
Yes. A scrappy version can be especially attractive. For the staircase, however, try to preserve a clear light-versus-dark relationship. Consistent fabric values will maintain the visual path even when individual prints and colors change.
Does the block need a border?
No, but a border gives the design a finished frame and can stabilize the outer edges. A dark narrow border similar to the one visible in the reference project emphasizes the square shape and provides a strong visual ending to the nested sections.
What quilting design works best for the finished project?
Simple straight-line quilting complements the geometry very well. Stitching parallel to the stairway or echoing the rectangular sections reinforces the structure without competing with the patchwork. More decorative free-motion quilting can also be added to the larger background areas if desired.
Conclusion
Video Tutorial:
The Stairway To Heaven Quilt Block Pattern demonstrates how a few fundamental patchwork techniques can create an impressive geometric composition. By combining half-square triangles, progressively sized fabric sections, strong color contrast, accurate seams, and careful pressing, you can reproduce the staircase effect that makes this design so recognizable.
The construction becomes much easier when approached in stages. First prepare and trim the HST units, then establish the diagonal stairway, build the contrasting background areas progressively, square the finished center, and finally add the border. Working methodically gives you opportunities to check measurements and alignment before small inaccuracies become larger problems.
This pattern is also wonderfully adaptable. Changing the fabrics can transform its personality completely, from traditional and earthy to modern, festive, pastel, or boldly colorful. Once you understand the underlying structure, you can experiment with different block dimensions, stair sizes, border widths, and layouts while preserving the characteristic diagonal movement.
Most importantly, allow yourself time to enjoy the process. Precision matters in quilting, but handmade work does not need to look mechanically perfect to be beautiful. Each fabric choice and carefully sewn seam adds personality to the finished project.
If you make your own Stairway To Heaven Quilt Block Pattern, leave your sincere opinion about the tutorial and share your suggestions. It is always interesting to know which fabric combinations you would choose, what part of the construction you found most useful, and what quilting projects you would like to see explained next.