
Crochet Star Snowflake Pattern is a beautiful holiday crochet project that combines the delicate geometry of a traditional snowflake with the warm, handmade character of crochet. Inspired by the ornament shown in the photo, this design features a circular center, six decorative points, open lace spaces, and an optional small star embellishment in the middle.
Finished in ivory or white yarn with subtle gold details, it can become an elegant crochet Christmas ornament, window decoration, gift topper, or handmade addition to a holiday garland.One of the most appealing features of this Crochet Star Snowflake Pattern is that the design looks elaborate while being constructed from familiar crochet techniques.
Chains create the airy openings, clusters and tall stitches build the body of the snowflake, and carefully placed picots or chain loops form the pointed outer edge. Once you understand how the six sections repeat around the center, the project becomes much easier to follow. The pattern is also flexible enough to work beautifully without beads, although small pearl or metallic beads can add the festive appearance seen in the inspiration image.
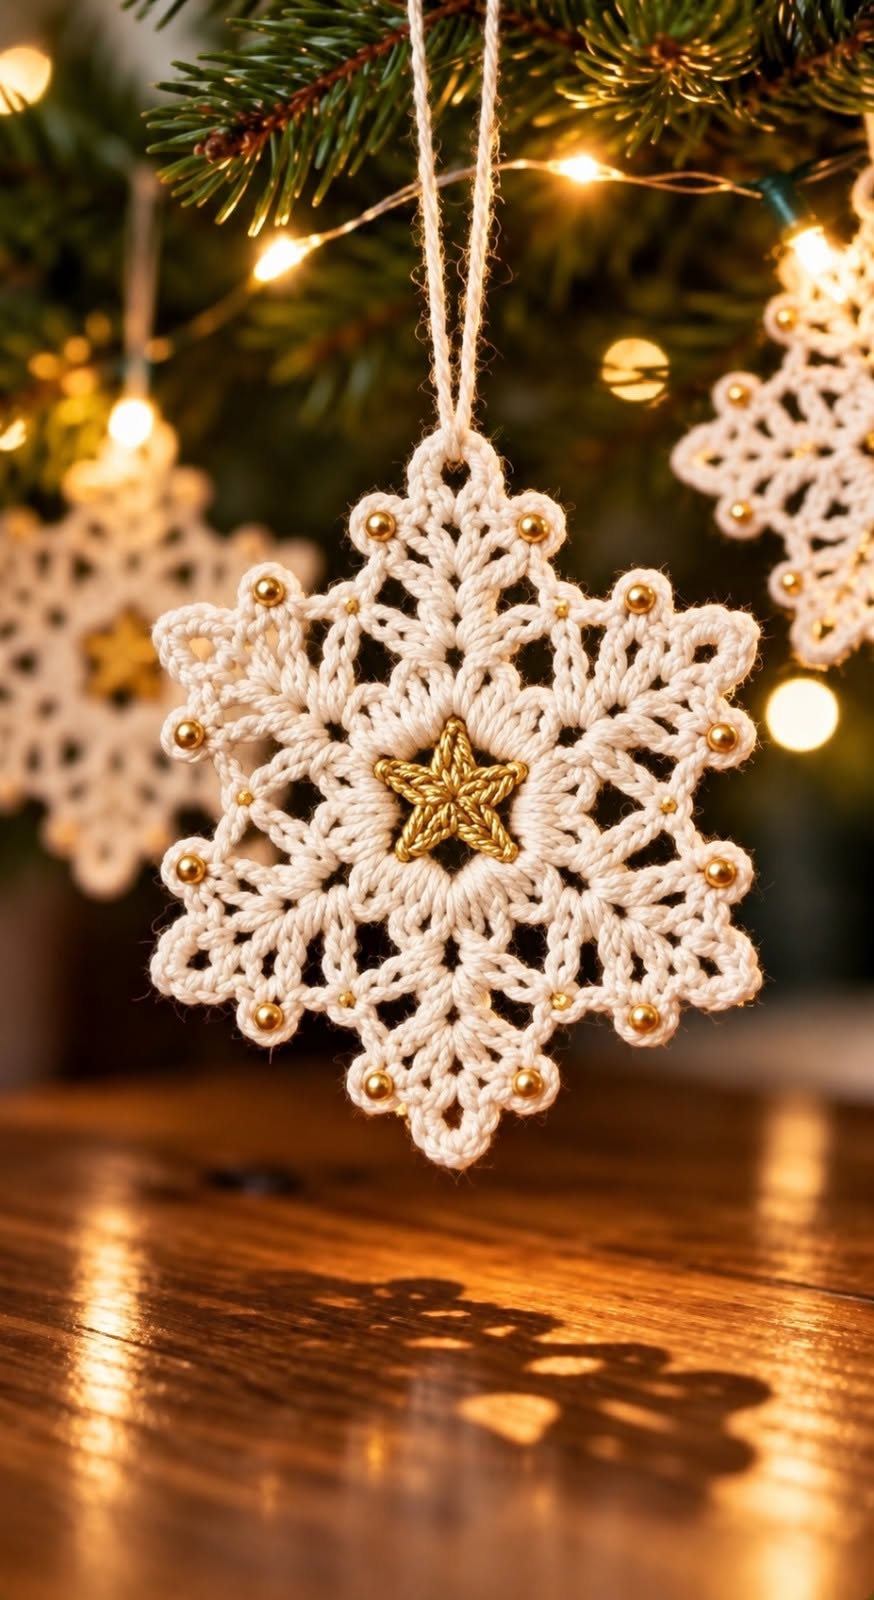
This tutorial uses US crochet terminology and explains the construction round by round so that crocheters can understand how the motif develops. Because yarn thickness, hook size, tension, and blocking can change the final measurements, consider the stitch counts and proportions below a practical interpretation of the photographed design rather than an exact reproduction of an unpublished pattern. The goal is to create a balanced crochet snowflake ornament with six prominent points, decorative lacework, and a defined star-like center that can be customized for your own Christmas décor.
Materials, Crochet Abbreviations, and Preparation
For this Crochet Star Snowflake Pattern, choose a smooth cotton crochet thread or lightweight cotton yarn that provides good stitch definition. White, natural, cream, or ivory works especially well for the classic snowy appearance. A fine cotton thread will produce a delicate ornament, while a slightly heavier yarn creates a larger and more substantial snowflake. You will also need an appropriately sized crochet hook, scissors, a yarn needle, rust-resistant pins for blocking, and optional small beads or metallic thread.
The main US crochet abbreviations used throughout the tutorial are: ch = chain, sl st = slip stitch, sc = single crochet, hdc = half double crochet, dc = double crochet, tr = treble crochet, and st/sts = stitch/stitches. You will also see sp = space, which refers to a chain space or opening where several stitches can be worked. Rep means repeat. Understanding these abbreviations before beginning makes the instructions much easier to follow.
A chain stitch (ch) is made by yarning over and pulling the yarn through the loop already on the hook. Chains are especially important in a lace snowflake because they do more than move the work from one location to another. Groups of chains create the open spaces between solid sections, allowing light to pass through the ornament and giving the finished motif its delicate appearance.
A double crochet (dc) begins with a yarn over. Insert the hook into the indicated stitch or space, yarn over and pull up a loop, yarn over and pull through two loops, then yarn over again and pull through the final two loops. Double crochet stitches provide much of the height in this snowflake. Groups of dc stitches can also be placed into the same chain space to produce the fan-like sections visible around the motif.
The treble crochet (tr) is taller. Yarn over twice before inserting the hook, pull up a loop, and then work through the loops two at a time until one loop remains. Treble crochet is useful near the tips because its additional height helps transform a circular motif into a pronounced six-point snowflake. Maintaining even tension is particularly important with tall stitches because loose trebles can make one point noticeably larger than another.
Before starting, decide whether you want to incorporate gold beads, pearl beads, or another embellishment. The safest and easiest approach for a decorative ornament is often to sew embellishments securely onto the completed crochet after blocking. This gives you control over their exact placement. If the ornament will be displayed around small children or pets, consider leaving small detachable embellishments off entirely.
Crocheting the Center and Building the Six Sections
Begin the Crochet Star Snowflake Pattern with a magic ring. If you prefer not to use a magic ring, ch 4 and join with a sl st into the first chain to form a small ring. The opening should remain relatively small because this becomes the visual center of the ornament. Ch 3 to represent the height of the first dc and prepare to establish the stitches that support the six-fold symmetry.
For Round 1, work 11 dc into the center ring and join with a sl st to the top of the beginning ch-3. Counting the starting chain as a dc gives you 12 stitch positions. Tighten the center carefully if you used a magic ring. These 12 positions can be divided naturally into six groups of two, making them a useful foundation for a six-point snowflake.
For Round 2, begin developing the openwork. Ch 3, work 1 dc in the same general section, then ch 2. Work 2 dc into the next appropriate stitch area and ch 2 again. Continue around so that you create six paired sections separated by six ch-2 spaces. Join neatly at the end. The precise goal of this round is symmetry: six solid areas and six equally sized openings.
For Round 3, sl st as needed until the hook reaches the first ch-2 space. Ch 3 and work additional dc stitches into that same space to create a small fan. A practical structure is 3 dc, ch 2, 3 dc in each ch-2 space, with a small chain between neighboring fans if needed to prevent crowding. Repeat the same sequence in all six spaces. You should now clearly see six sections radiating outward.
For Round 4, begin turning those fans into branches. Move to the central ch-2 space of the first fan. Work 2 dc, ch 3, 2 dc into this space, then create a chain bridge toward the next fan. Repeat around, keeping every branch identical. These repeated increases give each section enough width to support the decorative lace that will appear in the following rounds.
Lay the motif flat before continuing and count everything carefully. There should be six main sections arranged at roughly equal angles. If there are five or seven, or if one section contains a different number of stitches, correcting the error now will be much easier than attempting to compensate later. A successful crochet star snowflake depends more on consistent repetition than on complicated individual stitches.
Creating the Lace Points and Decorative Star Shape
The next stage creates the characteristic pointed outline of the Crochet Star Snowflake Pattern. Begin at the center space of one established section. A useful point sequence is 2 dc, 2 tr, ch 3, 2 tr, 2 dc worked around the central chain space. The taller treble stitches raise the center of the section while the shorter double crochet stitches soften the transition along both sides.
At the tip, the ch-3 can be converted into a small picot by making a sl st into the first chain of that ch-3 group. A picot is a tiny decorative projection frequently used in crochet lace. If you want a softer and more open snowflake, leave the ch-3 as a loop instead. Repeat whichever treatment you choose consistently across all six main points.
Between the large points, work decorative chain arches. For example, ch 4 or ch 5, sc into an appropriate lower chain space, ch 4 or ch 5, and move toward the next main point. These arches create the smaller side branches visible in ornate snowflake motifs. Adjust the chain length slightly if your yarn produces arches that are either too tight or excessively loose.
On the next decorative pass, work into these chain arches rather than exclusively into individual stitches. A combination such as sc, hdc, 2 dc, ch 3 picot, 2 dc, hdc, sc can create a smaller secondary point. Repeat the same arrangement in corresponding arches around the motif. This creates an alternating rhythm between large star-like points and smaller decorative peaks.
To emphasize the center, you can crochet a separate miniature five-point star appliqué in metallic gold thread. Start with a tiny ring and work five small points using short combinations of chains, sc, dc, and sl st. Because very fine metallic thread behaves differently from cotton, keep the star simple. Once finished, position it over the central opening and sew it securely using matching thread.
Alternatively, keep the entire snowflake monochromatic. A plain white or ivory crochet snowflake can be especially attractive when the texture itself is the focus. Instead of a separate center star, create a small raised center using surface crochet or a compact ring of sc stitches. Customization does not change the essential structure: a central circle, six repeated sections, open chain spaces, and pointed lace edging define the finished Crochet Star Snowflake Pattern.
Blocking, Embellishing, and Finishing the Christmas Ornament
Blocking is one of the most important steps when making a crochet lace snowflake. Immediately after crocheting, the points may curl and the openings may look uneven. Gently wet the finished motif according to the care requirements of your chosen fiber, remove excess moisture without twisting, and place the snowflake on a suitable blocking surface. Carefully spread all six main points into position.
Use rust-resistant pins to secure each point. Begin with opposite points rather than working clockwise around the snowflake. Pin the top and bottom points first, then the left and right sections, and finally adjust the remaining points. Measure from the center to each tip when greater precision is desired. This method helps maintain the six-point symmetry that gives a snowflake its recognizable shape.
For a firmer Christmas tree ornament, you may choose to stiffen the snowflake after testing the method on a yarn sample. The desired stiffness depends on the fiber and how the ornament will be displayed. A hanging snowflake generally benefits from enough structure to keep the points open, but it does not necessarily need to become completely rigid. Allow it to dry thoroughly before removing the pins.
Once the crochet is completely dry, add the optional gold beads. Place them symmetrically near the tips and decorative intersections, taking inspiration from the photograph. Sew every bead individually and securely rather than relying on adhesive. Consistent placement makes the decoration look intentional. Gold beads provide a warm Christmas effect, while white pearls, silver beads, or no beads at all can produce very different styles from the same crochet motif.
To create the hanging loop, attach yarn or decorative cord to one main point. For a crocheted hanger, join the yarn at the tip, ch 30 to 40, depending on the desired length, and sl st back into the same attachment point. Fasten off and weave the tails securely into the back. Another option is to thread a separate cord through the top point after the snowflake is completed.
Finally, inspect the entire Crochet Star Snowflake Pattern from both sides. Weave in every remaining yarn end, check that embellishments are secure, and gently reshape any section that moved after blocking. Your finished piece can be hung from a Christmas tree, displayed in a window, incorporated into a garland, attached to a wrapped gift, or used as part of a collection of handmade crochet Christmas decorations.
FAQ About the Crochet Star Snowflake Pattern
Is the Crochet Star Snowflake Pattern suitable for beginners?
It is most comfortable for an adventurous beginner or intermediate crocheter who already knows chain, slip stitch, single crochet, double crochet, and treble crochet. The individual techniques are approachable, but keeping six repeated lace sections symmetrical requires careful counting.
What yarn works best for a crochet snowflake?
Smooth cotton thread or lightweight cotton yarn is an excellent choice because it provides crisp stitch definition and responds well to blocking. Fine thread produces a delicate lace ornament, while thicker yarn creates a larger snowflake with a softer appearance.
What hook size should I use?
Choose a hook that suits the yarn or crochet thread you select. For decorative lace, many crocheters prefer a slightly smaller hook than they might use for a soft garment because tighter stitches can help the finished snowflake maintain definition. Always test your yarn-and-hook combination before committing to a specific finished size.
How large will the finished snowflake be?
There is no single required measurement for this version. The diameter depends on yarn thickness, hook size, tension, the number of chains used in the arches, and blocking. The important measurement is symmetry: all six major points should extend approximately the same distance from the center.
Why does my crochet snowflake curl?
Some curling before blocking is normal, especially when tall stitches and chain arches are combined. Severe cupping can indicate that the outer rounds do not contain enough space, while excessive ruffling can indicate too many stitches or overly loose chains. First verify the stitch count, then block the completed motif.
How can I make the snowflake points sharper?
Use consistent tension, include picots at the tips, and block each point individually. Tall stitches such as treble crochet can also help create a more pronounced peak. Do not skip blocking, because it is often the step that transforms a soft circular motif into a crisp snowflake.
Do I have to use beads?
No. Beads are entirely optional. The lace construction provides enough visual interest for a beautiful ornament on its own. Metallic thread, tiny bows, pearls, or a central star appliqué are additional possibilities, but a simple white snowflake remains a classic choice.
Can I make several snowflakes from the same pattern?
Absolutely. Once you understand the repeated six-section construction, this is an excellent pattern for making coordinated decorations. You can vary the yarn, center embellishment, beads, hanging cord, or final round while keeping the basic Crochet Star Snowflake Pattern consistent.
How do I keep all six points identical?
Count stitches and chains after completing each section rather than waiting until the end of a round. You can also place stitch markers at the beginning of each major repeat. When blocking, measure from the center to each point and reposition the pins until the distances are approximately equal.
Can this pattern be used for decorations other than a Christmas tree?
Yes. The completed crochet star snowflake can become a window ornament, gift decoration, winter garland element, table accent, wreath embellishment, or handmade tag. Smaller versions can also be incorporated into larger decorative crochet projects.
Conclusion
The Crochet Star Snowflake Pattern combines simple crochet fundamentals with decorative lace techniques to create an ornament that looks intricate and festive. Beginning with a compact center, the pattern develops through six repeated sections, using double crochet, treble crochet, chain spaces, arches, and picots to gradually create the recognizable snowflake silhouette.
The most important lessons are to maintain six equal repeats, count the stitches carefully, and give enough attention to finishing. Blocking dramatically improves the appearance of the lace, while optional beads and a small metallic center star can transform a simple white motif into an elegant handmade Christmas ornament inspired by the photographed design.
Once you are comfortable with the construction, try making several variations using different yarn weights, center details, or embellishments. The same basic Crochet Star Snowflake Pattern can produce everything from delicate miniature decorations to larger statement snowflakes for seasonal displays.
I would love to know your sincere opinion about this Crochet Star Snowflake Pattern. Share what you liked about the design, what you would change, and any suggestions you have for future crochet tutorials and Christmas patterns.