
Crochet Heart Bracelet Pattern is a charming handmade accessory that combines a small textured heart, a comfortable crocheted band, and an adjustable closure into one beautiful project. Inspired by the bracelet shown in the photo, this design is ideal for crocheters who enjoy making small projects that can be completed without a large amount of yarn.
The centerpiece is a dimensional crochet heart, while the band uses simple stitches to create a neat braided appearance. Decorative beads can be placed beside the heart to add a polished jewelry-style finish. Because the bracelet is adjustable, it can also be adapted to several wrist sizes. This tutorial uses US crochet terminology and explains the process from the first chain to the final finishing details.
One of the advantages of this Crochet Heart Bracelet Pattern is that it offers an opportunity to practice several useful crochet techniques on a very small scale. You will work with chain stitches, single crochet, half double crochet, double crochet, slip stitches, increases, shaping, and cord construction. The heart can be worked separately and then attached to the bracelet, which makes it easier to control its shape and positioning. The bracelet pictured has a soft blue color paired with small metallic beads, but the design can easily be personalized with different yarn colors. Cotton or cotton-blend yarn is particularly practical because it produces defined stitches and usually holds the heart shape well. A smaller crochet hook also helps create the dense texture needed for a jewelry project.
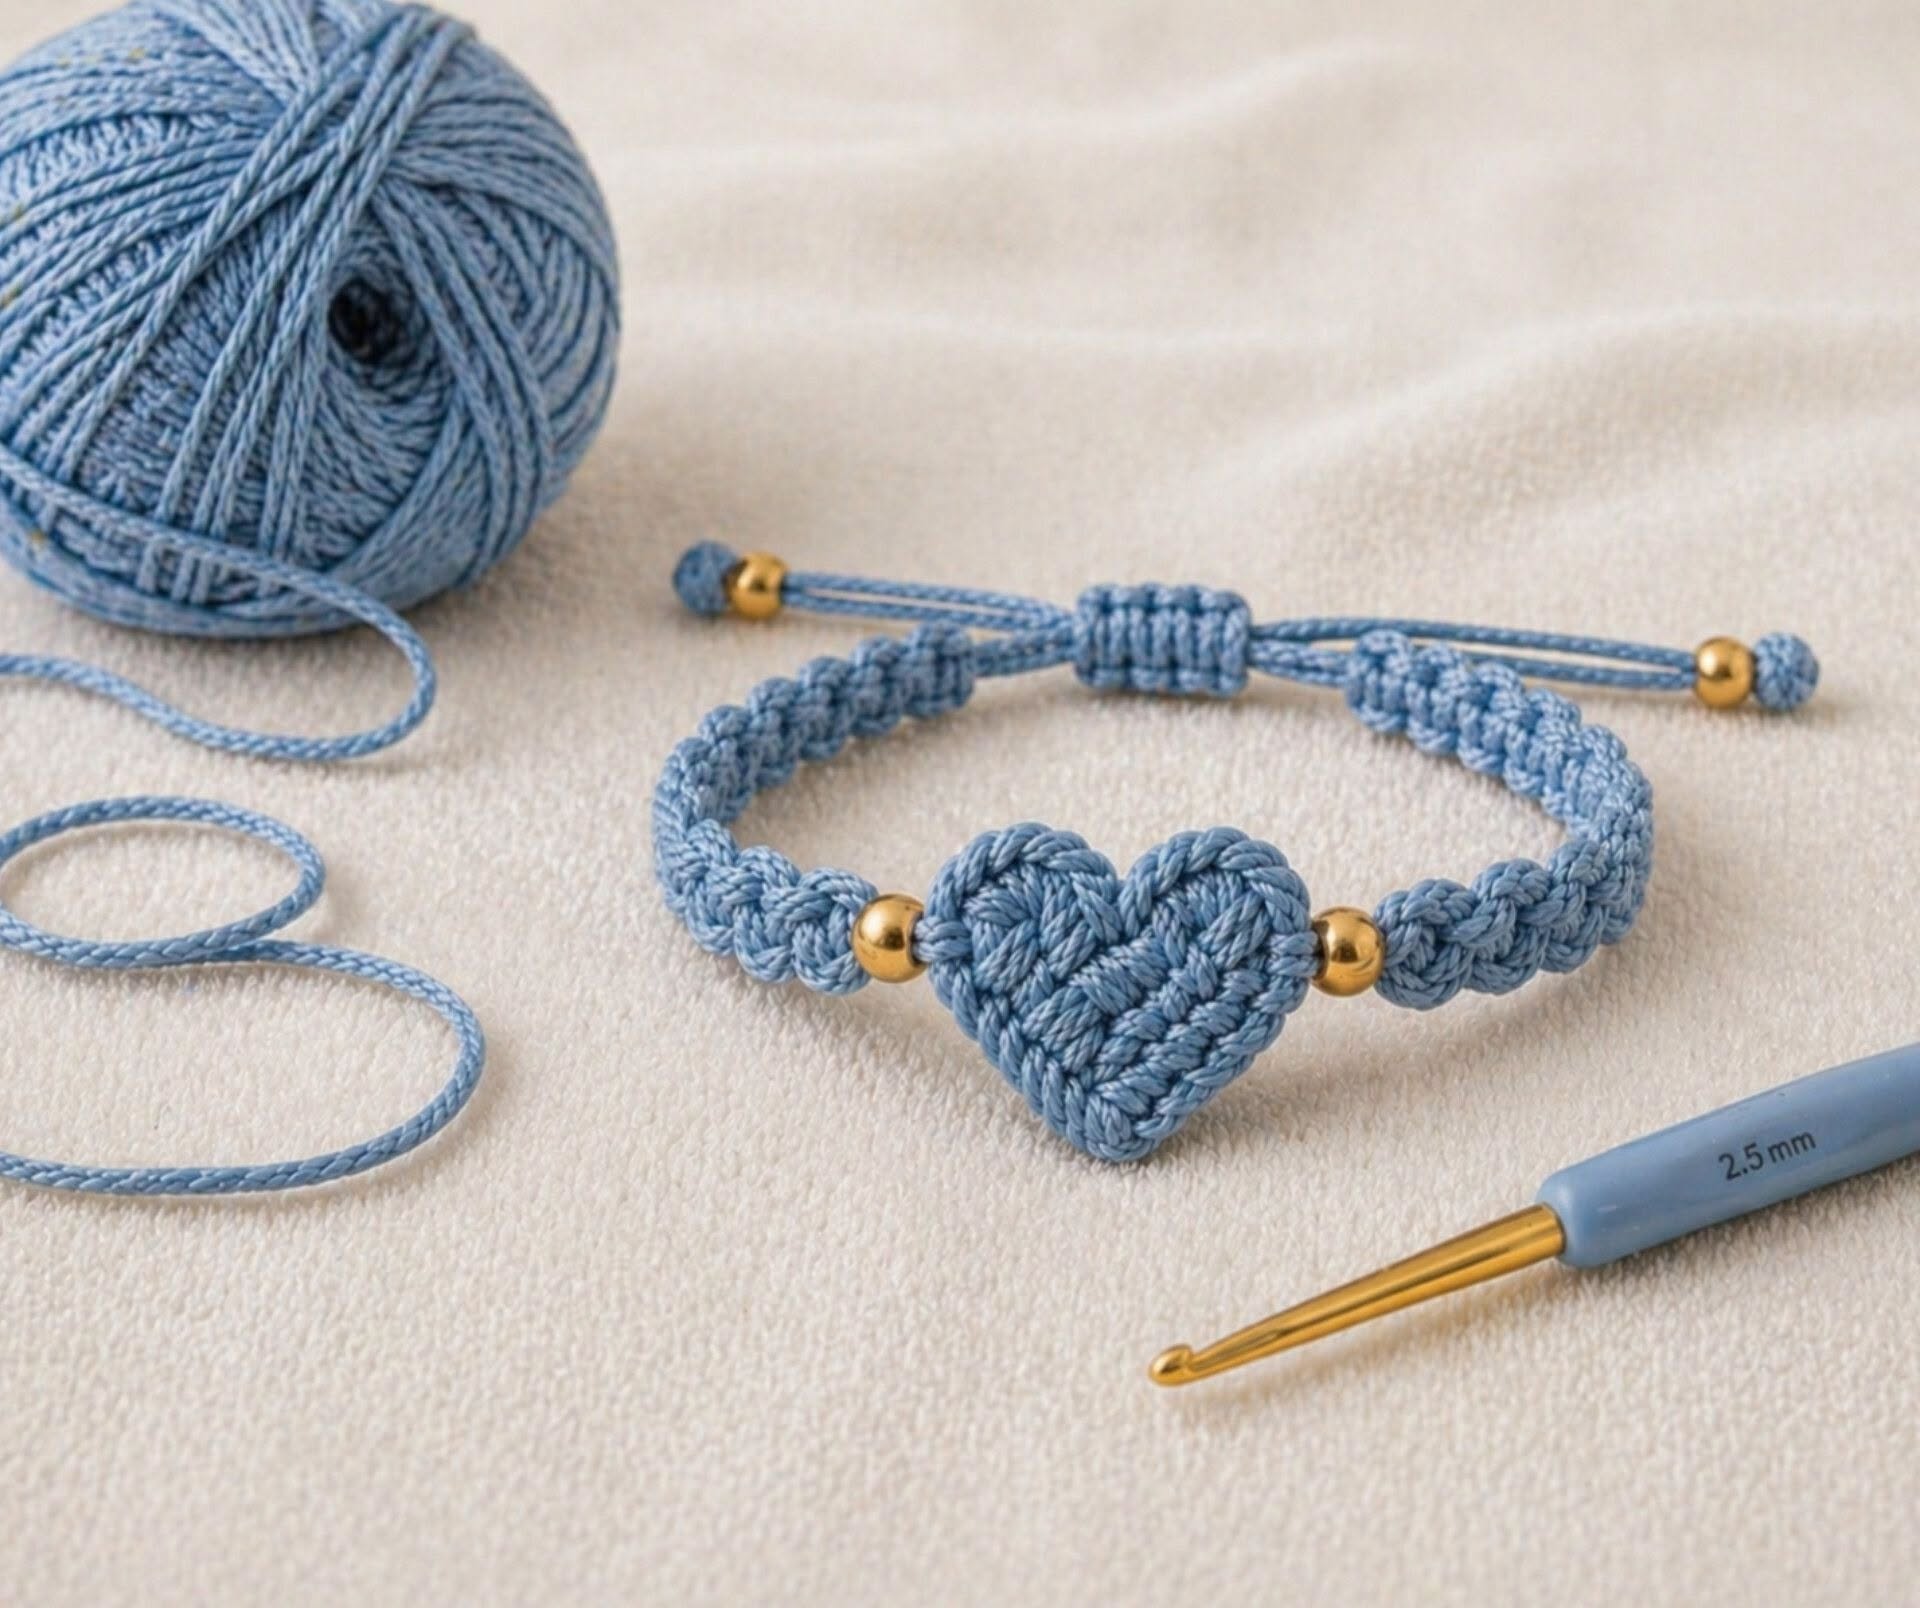
Before beginning, remember that handmade crochet accessories can vary considerably depending on yarn thickness, hook size, tension, and wrist measurement. For that reason, the measurements in this tutorial should be treated as a practical starting point rather than an absolute requirement. The sample style can be created with approximately 15–25 g of lightweight cotton yarn, a 2.5 mm crochet hook, two decorative beads with openings large enough for the chosen yarn or cord, a yarn needle, scissors, and a measuring tape. You may also want a stitch marker when shaping the heart. Always measure the bracelet against the intended wrist before completing the adjustable closure. With these supplies ready, you can begin creating your own crochet bracelet with heart centerpiece from start to finish.
Materials, US Crochet Abbreviations, and Bracelet Preparation
For this Crochet Heart Bracelet Pattern, choose a smooth lightweight cotton or cotton-blend yarn. A sport-weight or fine yarn works especially well for producing the compact appearance seen in the inspiration photo. You can use a 2.5 mm crochet hook as a starting point, although a 2.0–3.0 mm hook may be more suitable depending on the yarn. The goal is to create firm stitches without making the fabric excessively stiff.
The main US crochet abbreviations used throughout the project are: ch = chain, sl st = slip stitch, sc = single crochet, hdc = half double crochet, dc = double crochet, st/sts = stitch/stitches, inc = increase, and FO = fasten off. When the instructions say to increase, work two stitches into the same stitch or space unless another method is specified. Understanding these basic terms will make the bracelet much easier to follow.
Start by measuring the wrist where the bracelet will normally sit. Do not make the crocheted band exactly equal to the entire wrist circumference because the heart centerpiece and adjustable cords will contribute additional length. For an average adult bracelet, the decorative crocheted section may measure approximately 13–16 cm, including the heart, before the sliding cords are added. Always customize this measurement for the wearer.
The crochet heart motif should be made first because its finished width determines how long each side of the bracelet needs to be. A compact heart measuring approximately 3–4 cm wide creates a balanced centerpiece for a delicate bracelet. If your heart turns out larger, simply shorten the side bands. If it is smaller, extend each band with additional stitches or rows.
Before crocheting, consider whether you want to include decorative beads. The photograph uses a bead on each side of the heart and additional beads on the adjustable cord ends. If you plan to reproduce that look, check that the holes are wide enough for your yarn or crocheted cord. Beads are decorative and completely optional; the heart bracelet can be finished beautifully without them.
Gauge is less strict here than it would be for a sweater or fitted garment, but consistent tension remains important. Crochet a few chains and single crochet stitches before beginning if you are using unfamiliar yarn. Your stitches should be compact enough to keep the bracelet stable while remaining flexible enough to curve comfortably around the wrist. This balance produces a cleaner, more professional-looking handmade crochet bracelet.
How to Crochet the Heart Centerpiece Step by Step
Begin the crochet heart with a magic ring, or ch 4 and join with a sl st into the first chain to form a small ring. The magic-ring method creates a particularly neat center because the opening can be tightened afterward. Keep your starting tail long enough to weave in securely once the heart is finished.
For the first shaping round, work ch 2, then place a combination of taller stitches into the center ring to establish the two upper lobes and pointed bottom. A practical sequence is: 3 dc, 3 hdc, ch 1, 1 dc, ch 1, 3 hdc, 3 dc, followed by ch 2 and sl st into the ring. Pull the magic ring gently closed. You should now see the recognizable outline of a small heart.
To make the heart fuller and closer to the dimensional appearance of the photo, work a second round around the outside. Begin near the upper center and use sc and hdc stitches around the curves. Work increases around each rounded lobe so the fabric can expand without curling. Along the lower sides, gradually return to shorter stitches as you approach the bottom point.
At the very bottom of the heart, place 2 or 3 stitches into the point, depending on how sharply you want it defined. Continue symmetrically up the opposite side. Symmetry matters more than an exact stitch count for this small decorative element, so compare both halves as you crochet. Finish with a sl st near the center indentation between the two upper lobes.
If you want the raised, almost corded texture visible in the inspiration image, add a final edging of surface slip stitches or tightly worked single crochet around the heart. Insert the hook consistently so the border follows the natural outline. Avoid adding too many stitches along the curves because excessive increases can cause the motif to ripple. A firm border makes the crochet heart centerpiece look crisp and defined.
Fasten off and weave the yarn tail through several stitches on the back. Gently shape the two upper lobes with your fingers and pull the bottom point into position. You can lightly block the motif if necessary, but avoid stretching it. Once finished, measure the width of your heart because this measurement will help determine the final length of the Crochet Heart Bracelet Pattern.
Crocheting and Attaching the Bracelet Bands
The bracelet band can be created in several ways, but a narrow textured strip works especially well with this design. Attach the yarn securely to one side of the finished heart, ch 3, and work back with 2 sc beginning in the second chain from the hook. Join the short strip to the heart with a sl st. This establishes a narrow foundation from which the side band can grow.
Continue working short rows of sc or sl st, turning after each row. Another attractive option is to work a narrow crochet cord and gently twist it after completion, creating the braided visual effect seen in the photo. Keep the band approximately 0.8–1.2 cm wide so the heart remains the focal point. Maintain firm, even tension throughout the strip.
If you are adding a bead beside the heart, place it before completing the full side section. Depending on the size of the bead hole, you can thread it directly onto the working yarn before crocheting or attach it afterward with a separate yarn strand. Position the bead close to the outer edge of the heart so that it creates a transition between the centerpiece and the textured band.
Continue crocheting until the first side reaches the required length. For example, if your decorative portion needs to measure about 15 cm and the heart is 3 cm wide, each side could measure roughly 6 cm. This is only an example. Wrist measurements and desired fit should always determine the actual length of your crochet bracelet band.
Repeat the same construction on the opposite side of the heart. Count your rows carefully so both sides contain the same number whenever possible. Lay the bracelet flat after every few rows and compare the lengths. Matching tension on both sides prevents the heart from sitting off-center when the bracelet is worn.
When both sides are complete, reinforce every connection point by weaving the yarn tails through several neighboring stitches. Small accessories receive frequent movement, so secure finishing is important. At this stage, the bracelet should consist of a central heart, optional beads, and two matching textured bands. Try the piece around the wrist before moving on to the adjustable crochet closure.
Making the Adjustable Closure and Finishing the Bracelet
To reproduce the adjustable style shown in the photo, make a thin cord at the end of each bracelet band. One simple method is to crochet a long chain of approximately 8–12 cm from each side and then slip stitch back along the chain. This creates a stronger cord than a plain chain while remaining narrow enough to pass through the sliding closure.
Lay the two cords parallel so that they overlap by several centimeters. Using a separate strand of yarn, create a small sliding sleeve around both cords. Ch 4–6, depending on the thickness of the cords, wrap the chain around them, and join it into a ring. Work several compact rounds or rows of sc around this little sleeve. It should be snug enough to stay in position but loose enough for the cords to slide.
Test the closure before fastening off. Pull one cord in each direction to enlarge the bracelet opening, then pull the ends outward to reduce its circumference. If the slider is too tight, remake it with one additional chain stitch. If it moves too freely, reduce the starting chain or use a slightly smaller hook. A functional adjustable bracelet closure should move deliberately rather than slipping by itself.
For the decorative cord ends, thread a small bead onto each cord if desired. Tie a secure knot beneath each bead or crochet a tiny stopper at the end using several sc stitches worked into a small loop. In the inspiration photo, the combination of metallic beads and crocheted end details gives the bracelet a jewelry-like finish while still keeping the handmade character of the design.
Now inspect the entire Crochet Heart Bracelet Pattern carefully. Trim loose fibers only after every yarn tail has been woven securely into the work. Check that the heart sits in the center, both bands are approximately equal, and the slider operates smoothly. If necessary, gently reshape the heart with your fingers. Avoid aggressive stretching because that can distort such a small motif.
Your bracelet can now be customized in countless ways. Try cream yarn with wooden beads for a natural appearance, red or pink yarn for a romantic theme, pastel shades for spring, or contrasting colors for the heart and band. You can also make matching bracelets in different sizes. The combination of a crochet heart motif, narrow band, decorative beads, and adjustable fastening makes this pattern versatile while remaining approachable for crocheters familiar with basic stitches.
FAQ – Frequently Asked Questions About the Crochet Heart Bracelet Pattern
What skill level is recommended for this Crochet Heart Bracelet Pattern?
This project is suitable for an adventurous beginner or intermediate beginner who already understands basic US crochet stitches. The most important skills are making chains, slip stitches, single crochet, half double crochet, double crochet, and working several stitches into the same space. The adjustable closure may require a little patience the first time, but its construction is straightforward once you understand how the two cords overlap.
What type of yarn is best for a crochet heart bracelet?
Smooth cotton yarn is an excellent choice because it offers good stitch definition and creates a sturdy accessory. Fine cotton or sport-weight cotton can produce the compact jewelry-style appearance shown in the photo. Cotton blends can also work well. Very fuzzy yarns are generally less suitable when you want the heart and individual stitches to remain clearly visible.
Can I make the bracelet without beads?
Yes. Beads are entirely optional. Instead of beads, you can connect the heart directly to the crocheted bands and create small knots or crocheted stoppers on the cord ends. Removing the beads can also make the project easier for beginners and creates a completely fiber-based crochet bracelet.
How can I make the heart larger?
Use a thicker yarn and larger crochet hook, or add another carefully shaped edging round around the completed heart. When adding another round, use increases around the upper curves and enough stitches at the lower point to maintain the heart shape. Remember that a larger centerpiece requires shorter side bands if you want to preserve the same overall bracelet circumference.
How do I adjust the bracelet for a smaller wrist?
Measure the wrist before finishing the side bands and reduce the number of rows on each side equally. Keep enough room for comfortable movement without making the bracelet excessively loose. The sliding closure provides additional adjustment, which makes this adjustable crochet bracelet particularly convenient when the exact wrist measurement is not known.
Why is my crochet heart curling?
Curling usually occurs because the stitches are too tight or because there are not enough increases around the curved sections. Try relaxing your tension or adding an extra increase where the heart begins to cup. A small amount of curling can often be corrected through gentle shaping, but significant curling usually indicates that the stitch distribution needs adjustment.
Can I use embroidery floss or crochet thread instead of yarn?
Yes. Crochet thread or sturdy embroidery cotton can produce an even more delicate bracelet. You will need to select a smaller hook that matches the chosen material. Because thinner thread creates smaller stitches, you may also need additional rows in the bracelet bands to achieve the desired length.
How long should the adjustable cords be?
A practical starting length is approximately 8–12 cm per cord, although the ideal length depends on wrist size and how widely the bracelet needs to open. The opening must become large enough to pass comfortably over the hand. It is better to begin with slightly longer cords because they can be shortened during finishing.
How can I keep the heart centered on the wrist?
Make both side bands the same length and attach them at matching points on the heart. Count the rows rather than relying only on visual estimation. After constructing the bands, place the bracelet flat and confirm that the heart sits midway between both ends before adding the closure.
Can the Crochet Heart Bracelet Pattern be made as a handmade gift?
Absolutely. Its small size and customizable design make it a thoughtful handmade project for many occasions. You can personalize the color, heart size, bead style, and bracelet length for the recipient. When making one for someone else, an adjustable closure is particularly useful because it provides flexibility in fit.
How do I care for a handmade crochet bracelet?
Care depends primarily on the fiber and decorative materials used. For a cotton bracelet, gentle hand cleaning with cool or lukewarm water is generally a practical approach, provided the yarn label permits it. If metallic, wooden, painted, or specialty beads are included, take their care requirements into account as well. Reshape the heart gently and allow the bracelet to dry flat.
Can I turn this pattern into other accessories?
Yes. The small crochet heart can be used independently as an appliqué, gift decoration, bag charm component, or decorative element for other handmade projects. You can also experiment with the bracelet construction by replacing the heart with another small crochet motif while retaining the same bands and sliding closure.
Conclusion
Video Tutorial:
The Crochet Heart Bracelet Pattern combines simple crochet techniques with a delicate accessory design that can be customized for different styles and wrist sizes. Throughout this tutorial, you learned how to select suitable yarn and a crochet hook, understand the essential US crochet abbreviations, shape a small heart centerpiece, create matching side bands, incorporate optional decorative beads, and finish everything with an adjustable sliding closure.
The most important part of this project is taking your time with the small details. Consistent tension helps the heart retain its shape, matching rows keep the centerpiece properly positioned, and secure finishing makes the bracelet more durable. Once you understand the basic construction, changing colors, yarn thicknesses, beads, and measurements makes it easy to create your own variation of this handmade crochet heart bracelet.
This is also a useful project for practicing fundamental crochet skills without committing to a large piece. From ch, sl st, sc, hdc, and dc to increases and finishing techniques, each stage contributes to skills that can be applied to many future crochet projects. The adjustable construction adds another practical technique to your crochet knowledge while giving the finished accessory a polished appearance.
If you make this Crochet Heart Bracelet Pattern, leave your sincere opinion about the project and share any suggestions you have. Your ideas about colors, yarn choices, heart variations, or different finishing techniques can inspire new ways to personalize this simple and beautiful crochet accessory.