
The Starshine Log Cabin Quilt Block Pattern is a beautiful way to combine two classic quilting ideas in one project: a bold patchwork star and the layered framing effect associated with a Log Cabin quilt block. The design shown here begins with a traditional-looking star in the center and gradually expands outward with rectangular fabric strips.
The combination creates movement while keeping the construction approachable, especially when the project is assembled from the center outward. Red, cream, green, and soft botanical prints give the sample a warm traditional character, but the same structure can look completely different in modern solids, pastels, scraps, or seasonal fabrics.
Because each new border frames the work that came before it, the finished block has impressive visual depth without requiring complicated curved piecing. It is an excellent project for practicing accurate cutting, consistent seam allowances, triangle units, strip piecing, pressing, and careful squaring.
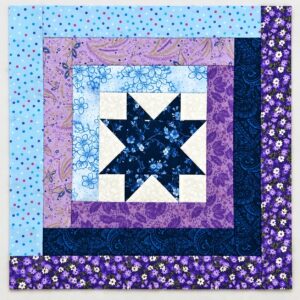
The term Starshine Log Cabin Quilt Block Pattern describes the relationship between the two most noticeable elements of the design. “Starshine” refers to the strong central star, whose points seem to radiate from the middle, while “Log Cabin” describes the progressive strips surrounding that focal block. Traditional Log Cabin quilting is based on adding fabric strips around a central unit, and this project adapts that familiar principle to create a larger decorative frame around the star. The photograph is especially useful as a visual guide because it shows how different fabric values can separate each stage of construction. Light cream fabric provides contrast around the red star, while floral, green, and red strips establish clearly defined outer rounds. The result is a block that feels detailed but can still be constructed logically one section at a time.
For this tutorial, the measurements can be adjusted because the photograph itself does not provide a printed scale, and the most important goal is to reproduce the proportions and construction method of the pictured project. A practical starting size is a center star of approximately 30.5 cm (12 in) finished, followed by borders approximately 7.5 cm (3 in) wide. You may enlarge or reduce those dimensions according to the project you want to make. Always remember that cutting measurements need to include your chosen seam allowance; American quilting commonly uses a 1/4-inch seam allowance, approximately 6 mm. Before cutting all of your fabric, sew a small test seam and verify that your machine produces an accurate quarter-inch seam. Small differences accumulate quickly in a geometric block, so careful preparation will make the final Starshine Log Cabin Quilt Block Pattern noticeably cleaner and easier to square.
Materials, Fabric Selection, and Cutting the Starshine Center
Begin by choosing fabrics with enough contrast to make the center star easy to recognize. To capture the character of the photographed block, select a medium or dark red floral for the star, a cream or very light neutral for the background, and several coordinating red, green, cream, and botanical prints for the surrounding Log Cabin strips. Quilting-weight cotton is ideal because it cuts accurately, presses well, and remains stable during piecing. Wash and prepare fabrics according to your normal quilting routine, then press them before cutting so folds do not distort the measurements.
For a center section around 30.5 cm finished, think of the star as a 3 × 3 grid, with each section finishing at approximately 10.2 cm. The four corners are light background squares, while the remaining sections create the star points and center. Since several construction methods can produce this appearance, it is helpful to lay the pieces on your cutting table exactly as they will appear in the finished block before sewing. This simple preview prevents rotated triangle units and makes the star structure much easier to understand.
The prominent triangular points can be created with half-square triangle units or carefully pieced flying-geese-style sections, depending on how closely you want to reproduce the visual arrangement. A half-square triangle, often abbreviated HST, is a square composed of two right triangles sewn diagonally together. When making HSTs, cut them slightly oversized whenever possible, stitch accurately, press the seam, and trim each unit to the exact required size. This extra trimming step greatly improves the alignment of the star points.
If using the two-at-a-time HST technique, place one light square and one red square right sides together. Draw a diagonal guideline from corner to corner on the wrong side of the lighter square. Sew approximately 6 mm (1/4 in) on both sides of that line, cut directly along the marked diagonal, open the two units, and press them carefully. Square the units before adding them to the block. The goal is for every diagonal seam to travel precisely from corner to corner.
Arrange your completed components into three horizontal rows before joining anything permanently. Compare the arrangement with the reference design: light corners should visually frame the star, red triangles should point outward, and the red center should remain the dominant focal area. Stand a short distance away from the layout or photograph it with your phone. Looking at a picture often makes a misplaced unit immediately noticeable. Once you are satisfied, stack each row in order so the pieces cannot become mixed.
Sew the components within each row using a consistent 1/4-inch quilting seam. Press neighboring seams in opposite directions where practical so the intersections can nest together. Join the three rows, matching the important star intersections with pins or clips rather than stretching the fabric to force them into place. Press the finished center from both sides, then square it carefully. A flat, accurately squared center is essential because every surrounding border in the Starshine Log Cabin Quilt Block Pattern will build upon its dimensions.
Sewing the Inner Borders Around the Star Block
The first surrounding round creates visual breathing space between the star and the stronger outer colors. In the reference image, a light floral print forms much of this transitional area, while a rich red strip helps establish the staggered Log Cabin effect. Choose a fabric that is lighter or quieter than the central star so that the star remains visually dominant. A floral cream, low-volume print, or subtle neutral works particularly well.
Instead of cutting every strip to a theoretical measurement before sewing, an accurate technique is to measure the actual completed center. Quilt blocks can vary slightly after stitching and pressing, so using the real measurement prevents borders from becoming too long or too short. Cut the first strip to match one side precisely, sew it with a 6 mm seam allowance, and press the strip away from the center. Measure again before cutting the next piece.
Continue adding strips around the center in a rotating sequence. This is what gives the project its Log Cabin construction. Each new strip extends along a side that now includes the previously attached piece, so the dimensions gradually increase. Keep the order consistent—clockwise or counterclockwise—and place the block back on your table after every seam. This helps preserve the stepped appearance instead of accidentally creating ordinary symmetrical borders.
Pressing is especially important during this stage. Rather than aggressively sliding the iron over the fabric, lift and place it to avoid stretching the long edges. First set the seam briefly while the pieces are still closed, then open the strip and press it into position. If the fabrics are light enough that seam allowances might show through, consider pressing toward the darker fabric. A pressing cloth can also protect delicate printed cotton from excessive heat.
As the first frame develops, check the block with a large quilting ruler. Corners should remain close to 90 degrees, and opposite edges should stay parallel. If a strip extends slightly beyond the block, trim only after it has been sewn and pressed. Avoid repeatedly trimming large amounts to correct an increasingly crooked block; significant distortion usually indicates an inaccurate seam or stretched border that should be corrected before another round is added.
The reference design uses the changing prints to make each stage easy to see. You can recreate that character by using a light floral on part of the first round and a deeper red on another portion. This creates a subtle spiral effect and connects the central red star to the later red border. For a scrappier interpretation, use different coordinating fabrics while maintaining similar color values. The important principle is contrast, not an exact fabric match.
Before moving to the larger outer frame, measure the block vertically through the center and horizontally through the center. Record these measurements rather than assuming the block has reached a predetermined size. If the two dimensions differ slightly because of the intentional Log Cabin progression, that can be part of the design. However, the individual corners should still be square and the fabric should lie flat without ripples or puckers.
Building the Log Cabin Rounds and Keeping the Block Square
The next stage gives the Starshine Log Cabin Quilt Block Pattern its distinctive layered appearance. Select progressively stronger fabrics, such as a muted botanical green, deep green paisley, bright floral red, and cream dotted print. In the photograph, these fabrics create clear bands around the star while maintaining a coordinated red-and-green palette. You can follow the same color progression or substitute colors that suit your own décor, season, or fabric collection.
For borders approximately 7.5 cm finished, cut strips wide enough to include the seam allowances. If you prefer a slimmer frame, use narrower strips consistently. Wider strips make the block grow rapidly and allow large-scale prints to remain visible. Whatever width you choose, consistency is important. Use a rotary cutter, acrylic ruler, and cutting mat whenever possible, keeping the ruler aligned with the fabric grain so the strips remain straight.
Attach one strip along the appropriate side of the existing block and stitch from beginning to end without pulling either layer. Press the seam, trim the strip flush, rotate the work, and add the next strip. Continue around the block. This sew, press, rotate, and measure rhythm is one of the most useful habits in Log Cabin quilting because it reduces measurement errors and keeps the project organized.
The green round provides a strong visual frame around the softer inner fabrics. If you are working with directional paisley, stripes, words, or other directional motifs, decide before cutting whether you want all designs to face the same way. Directional fabric requires more planning because rotating a strip can change the orientation of the print. Floral and scattered prints are generally easier for beginners because they can be turned in almost any direction.
After the green sections, introduce the outer red floral and cream dotted fabrics. Notice how alternating light and dark areas changes the apparent movement of the design. Color value refers to how light or dark a fabric appears rather than its specific hue. Strong value differences make the Log Cabin structure more visible. If several fabrics seem too similar, photograph them in grayscale; this can help reveal whether there is enough contrast between neighboring rounds.
Continue checking the project after each new strip. Place a square ruler at every corner and confirm that the previous seams remain perpendicular. Measure through the center rather than only along the outside edges when determining border lengths. This prevents excess fabric from accumulating along the perimeter. Borders that are too long can create waves, while borders that are too short may cause the block to cup inward. Accurate measuring produces a much flatter finished quilt top.
Complete the outermost round using the final contrasting fabric. The photographed project uses a red floral print that echoes the central star, visually tying the outside edge back to the middle. This repetition is a useful quilt color-design technique because it creates unity across a busy collection of prints. Once the last strips are attached, give the entire block a careful final press and square the outside edges without removing unnecessary fabric.
Finishing, Quilting, and Using Your Starshine Log Cabin Block
Once the pieced top is complete, decide how you would like to use your Starshine Log Cabin Quilt Block Pattern. A single large block can become a wall hanging, table topper, cushion front, or decorative mini quilt. Multiple blocks can be joined into a larger quilt. Because the borders add substantial size around the center star, even one block can make an attractive standalone project without requiring dozens of repeated units.
If making a quilted piece, prepare a quilt sandwich consisting of the pieced top, batting, and backing fabric. Cut the batting and backing slightly larger than the quilt top on all sides. Smooth the backing, position the batting over it, and place the quilt top right side up. Baste the layers using your preferred quilting-safe method, making sure there are no folds or wrinkles underneath.
For the quilting itself, simple straight lines are very effective because the patchwork already provides plenty of visual interest. You might quilt along the edges of the star, stitch inside the rectangular borders, or use evenly spaced straight lines across the entire project. Stitching in the ditch means quilting very close to a seam line so the quilting blends into the piecing. This method can emphasize the construction without competing with patterned fabrics.
More experienced quilters may prefer free-motion quilting in the larger border areas. Loops, gentle leaves, stars, or meandering designs can add texture without changing the patchwork structure. Avoid quilting one area extremely densely while leaving another completely unquilted unless that contrast is intentional. Balanced quilting helps the finished project remain flat and gives the quilt block pattern a consistent texture.
After quilting, trim the excess batting and backing so the edges are straight and square. Prepare binding strips, join them end to end, press them lengthwise, and attach the binding around the perimeter. Miter the corners neatly and join the final ends before finishing the second edge by machine or hand. A binding that repeats the dark red, green, or cream fabric can create a polished frame around the entire design.
Finally, inspect the completed project and enjoy the small variations that make handmade quilting unique. Precise points are satisfying, but a successful quilt does not require every intersection to be absolutely perfect. The most important skills developed through this Starshine Log Cabin Quilt Block Pattern are accurate cutting, controlled piecing, thoughtful pressing, color placement, and working systematically from a central motif toward the outer edges. Those skills transfer beautifully to many future patchwork projects.
FAQ: Starshine Log Cabin Quilt Block Pattern
Is the Starshine Log Cabin Quilt Block Pattern suitable for beginners?
Yes. A confident beginner who is comfortable with straight seams can make this project. The star requires slightly more attention than the rectangular borders, but constructing and trimming the triangle units carefully makes the process much easier.
What is the best fabric for this quilt block?
Good-quality quilting cotton is an excellent choice because it is stable, easy to cut, easy to press, and available in countless prints. Using fabrics of similar weight also helps seams behave consistently.
Do I have to use red, green, and cream fabrics?
No. Those colors reproduce the traditional character of the pictured block, but the pattern works with almost any coordinated palette. Blue and white can create a crisp appearance, while autumn colors, pastels, monochromatic fabrics, or bright scraps can completely transform the design.
What seam allowance should I use?
A 1/4-inch seam allowance, approximately 6 mm, is standard for many American patchwork projects. More important than the exact system is consistency. Use the same accurate seam allowance throughout the block so individual units fit together correctly.
How can I make my star points line up accurately?
Make triangle units slightly oversized and trim them accurately before assembly. When joining rows, match critical intersections and pin them before stitching. Maintaining a consistent seam allowance also prevents points from shifting.
Why should I measure the block before cutting each border?
Actual pieced dimensions can differ slightly from theoretical measurements because of seam allowances, fabric behavior, pressing, and cutting. Measuring the real block allows you to cut borders that fit it instead of forcing the block to fit predetermined strips.
How do I prevent Log Cabin borders from becoming wavy?
Measure carefully, avoid stretching the fabric while sewing, and press rather than dragging the iron across the strips. A border that is longer than the edge it is attached to can produce waves or puckering.
Can I make the block larger?
Absolutely. One of the easiest ways to enlarge the project is to add additional Log Cabin rounds. You can also start with a larger center star or use wider strips. Keep checking that the block remains square as its dimensions increase.
Can scraps be used for this project?
Yes. The design is particularly suitable for a scrap quilt because every surrounding strip can be made from a different coordinating fabric. To maintain visual structure, organize scraps by light, medium, and dark values before deciding where to place them.
What can I make with one finished block?
A single block can become a table topper, wall quilt, pillow cover, oversized placemat, decorative panel, or centerpiece for a larger quilt. Adding extra borders is an easy way to adapt it to a specific finished dimension.
Do the outer strips have to follow the exact colors in the photograph?
No. The important concept is the progression around the central star. Repeating one or two colors from the center in the outer rounds can help create a cohesive appearance even when the individual prints are completely different.
Should seams be pressed open or to one side?
Either method can work, although many patchwork quilters press seams to one side when they want neighboring seam allowances to nest. For bulky intersections, pressing selected seams open may help reduce thickness. Choose the approach that keeps your particular fabrics flat and easy to assemble.
Conclusion
The Starshine Log Cabin Quilt Block Pattern combines a striking star centerpiece with the satisfying rhythm of Log Cabin-style construction. Beginning with accurately pieced triangle units, you can assemble the center star, surround it with contrasting inner strips, and then continue building outward with progressively larger fabric rounds. Careful cutting, a consistent 1/4-inch seam allowance, thoughtful pressing, and frequent measuring are the key techniques for keeping the design straight and balanced.
The project also demonstrates how important fabric value, color contrast, strip piecing, HST construction, accurate quilting seams, and squaring are in patchwork. You do not need to duplicate the fabrics in the photograph to achieve a beautiful result. By preserving the relationship between the star, light background, and surrounding Log Cabin rounds, you can personalize the block with Christmas prints, modern solids, vintage florals, scraps, or any palette you enjoy.
Most importantly, this pattern can grow with your skills. Make one block for a small decorative project, add more rounds for a larger centerpiece, or repeat the design to create an entire quilt. Once you understand the center-out construction, experimenting with colors and prints becomes one of the most enjoyable parts of the process. If you make your own Starshine Log Cabin Quilt Block Pattern, leave your sincere opinion about the tutorial and share any suggestions, color combinations, or construction ideas you would like to see explored in future quilting projects.