The Swan Crochet Rug Pattern – Step by Step Tutorial is a creative and elegant project that combines beauty with functionality. A crochet rug shaped like a swan not only adds charm to your home decor but also allows you to practice important crochet techniques while crafting something unique. This kind of handmade rug stands out in any room, creating a cozy and artistic atmosphere. Beginners and experienced crocheters alike can enjoy making it because the pattern offers both simplicity and sophistication.
Learning to crochet a swan rug requires attention to detail, patience, and a willingness to follow each step carefully. With the right yarn, hook size, and instructions, this project becomes a rewarding experience. The process may seem complex at first, but once you break it down into smaller steps, it becomes quite manageable. This Swan Crochet Rug Pattern – Step by Step Tutorial will guide you through every detail, ensuring you understand not only the stitches but also the assembly process that gives the swan its recognizable form.
What makes the Swan Crochet Rug Pattern – Step by Step Tutorial even more exciting is that it allows room for personalization. You can choose different yarn colors to match your home interior, experiment with textures, or add decorative elements such as borders or embroidery. The swan design itself symbolizes grace and tranquility, making this rug an ideal gift or a centerpiece for your own home. In the following sections, we will go step by step through the materials, the stitches, the process of crocheting the body and wings, and the final touches to complete your rug.
Materials and Preparation for the Swan Crochet Rug
To start this project, you will need to gather the essential materials. The right tools and yarn will make the process smoother and the results more professional. Opt for durable yarn that is soft yet sturdy enough for a rug, usually medium to bulky weight. White is the classic choice for a swan, but you can experiment with pastel shades or even bolder colors if you want a unique twist.
Choosing the correct crochet hook size is another key factor. A larger hook may give the rug a looser texture, while a smaller hook creates tighter stitches. For most swan rug patterns, a hook size between 4.5 mm to 6 mm works well. Ensure your hook is comfortable to hold, as this project will take time and consistency in your hand movements.
Besides yarn and hook, you may need a tapestry needle to weave in loose ends, scissors for trimming yarn, and stitch markers to help you keep track of sections. Having all your tools ready before starting the Swan Crochet Rug Pattern – Step by Step Tutorial saves time and avoids interruptions during the process.
Preparation also includes choosing the location where you plan to use the rug. Since it’s handmade, it’s best to place it in low-traffic areas such as a bedroom or living space corner. This will help preserve its beauty and prevent it from wearing out too quickly.
Before beginning, practice the basic stitches required for this rug. Most swan rug patterns use simple stitches like chain stitch, single crochet, double crochet, and slip stitch. Mastering these basics ensures a smoother experience as you progress through the steps.
Lastly, set aside enough time for this project. While small crochet items can be made quickly, a rug requires patience and dedication. Treat the process as both a creative journey and a relaxing activity.
Step by Step Process: Creating the Swan’s Body
The first step of the Swan Crochet Rug Pattern – Step by Step Tutorial is creating the body of the swan. Start by making a foundation chain, which will determine the overall size of your rug. The length of the chain should be proportionate to the size you want the body to cover.
Once the chain is complete, begin working rows of single crochet stitches. These stitches form the base of the body and give it structure. Continue crocheting until you achieve an oval shape, which represents the swan’s torso. Shaping is essential, so remember to increase stitches evenly at both ends to keep the oval balanced.
After establishing the oval base, switch to double crochet stitches for the upper layers. This not only speeds up progress but also adds texture. You can adjust the number of increases in each row to gradually expand the oval until it reaches the desired dimensions.
At this stage, focus on maintaining consistent tension. Uneven stitches can distort the shape of the swan’s body, making assembly harder later. Using stitch markers can help you identify the beginning and end of each round.
To add definition, you may incorporate different stitch techniques, such as front post double crochet, which creates a raised effect. This detail enhances the three-dimensional appearance of the swan rug.
When you are satisfied with the body’s size and shape, fasten off the yarn and prepare to move on to the wings and neck. The body serves as the foundation for the entire rug, so ensure it looks neat and symmetrical before continuing.
Crocheting the Swan’s Wings and Neck
The wings are an important part of the Swan Crochet Rug Pattern – Step by Step Tutorial because they bring elegance and movement to the design. Start each wing separately, using a smaller oval shape similar to the body but in reduced dimensions.
For the wings, you can use a combination of double crochet and treble crochet stitches. These longer stitches create a feathery effect that mimics the natural look of swan feathers. Working in rows and adding increases at the edges helps achieve a spread-out wing shape.
Once both wings are complete, attach them carefully to the sides of the body. Use a tapestry needle and whip stitch to secure them in place. Ensure they are symmetrical and evenly aligned. This placement is crucial for the overall balance of the swan design.
The neck and head come next. Start with a long foundation chain that represents the curve of the swan’s neck. Work rows of single crochet to give it thickness and stability. As you move toward the head, reduce the stitch count slightly to create a rounded form.
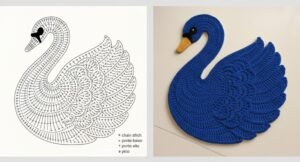
To define the head, add small details such as a beak using a different yarn color, usually orange or yellow. Black yarn or embroidery thread can be used for the eye, giving the swan its expressive appearance.
Finally, sew the neck and head onto the upper part of the body, curving it gracefully to mimic the natural posture of a swan. This step transforms the rug from a simple oval into a recognizable swan figure.
Final Touches and Finishing the Rug
After assembling the body, wings, and neck, the Swan Crochet Rug Pattern – Step by Step Tutorial is almost complete. However, finishing touches make a big difference in the final result. Start by weaving in all loose yarn ends neatly using a tapestry needle. This ensures durability and a professional look.
Blocking the rug is highly recommended. Wet blocking involves dampening the rug slightly, then shaping it on a flat surface to its exact dimensions. Pin it in place and let it dry completely. This step helps the stitches relax and align, giving the rug a polished finish.
If you wish, you can add a border around the swan’s body to frame the design. A scalloped border made of double crochet clusters adds elegance and makes the rug stand out. This is optional but enhances the overall presentation.
Consider using anti-slip backing if you plan to place the rug on smooth surfaces. This keeps it safe and prevents accidents. You can sew or glue a thin non-slip fabric to the underside of the rug.
Maintenance is also an important part of finishing. Handmade rugs should be washed gently by hand or on a delicate machine cycle. Avoid harsh detergents to preserve the yarn’s softness and color.
With all these finishing steps complete, your swan rug is ready to brighten any space in your home. The final result is a decorative piece that carries both personal effort and artistic expression.
FAQ About Swan Crochet Rug Pattern – Step by Step Tutorial
What type of yarn is best for a swan crochet rug?
Bulky or medium-weight yarn works best, as it provides both durability and softness suitable for rugs. Cotton blends are popular choices.
Can beginners follow this tutorial?
Yes, beginners can follow the Swan Crochet Rug Pattern – Step by Step Tutorial, as it mostly uses basic stitches like chain, single crochet, and double crochet.
How long does it take to make a swan crochet rug?
The time varies depending on your skill level and the size of the rug, but on average, it may take several days to a week.
Is it possible to make the swan rug in different sizes?
Absolutely. By adjusting the foundation chain and the number of rows, you can create a smaller or larger rug to fit your space.
How do I clean a crochet rug safely?
Gently hand wash or use a delicate machine cycle with mild detergent. Lay flat to dry to maintain shape and texture.
Can I customize the swan’s colors?
Yes, while white is the traditional choice, you can experiment with pastel or bold colors to match your decor style.
Pattern
The Swan Crochet Rug Pattern – Step by Step Tutorial is a rewarding project that combines creativity, technique, and beauty. From preparing your materials to shaping the body, wings, and neck, every step builds toward a decorative rug that adds charm and uniqueness to your home. The process may take time, but the results are worth the effort.
Now that you have learned the step-by-step instructions, it’s your turn to try and bring this beautiful swan rug to life. We would love to hear your sincere opinion and suggestions about this tutorial. Share your thoughts and let us know how your own swan rug project turns out!