If you’re looking for a fun and creative way to enhance your quilting skills, the Whirligig Quilt Sew Along – Free Tutorial is the perfect opportunity! This engaging project not only allows you to explore the intricate beauty of whirligig quilt designs but also provides an excellent platform to connect with fellow quilting enthusiasts. Whether you’re a seasoned quilter or a beginner eager to dive into the craft, this tutorial will guide you step by step to create a stunning quilt that you’ll cherish for years.
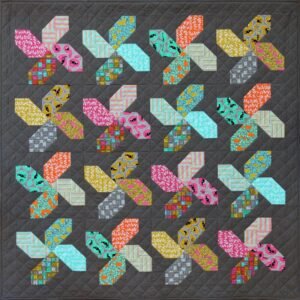
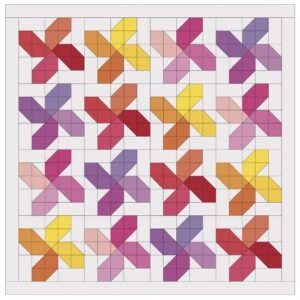
A whirligig quilt is a vibrant and dynamic pattern featuring spinning pinwheels, making it an eye-catching choice for any home decor. In this free tutorial, we’ll break down the process into manageable steps and share tips to make your quilting journey seamless. The best part? This sew-along provides a free pattern, ensuring everyone can participate without barriers. Get ready to unleash your creativity and bring this delightful design to life.
Before we dive into the steps, let’s discuss why a sew-along is a fantastic way to learn. It offers a sense of community, allowing participants to share progress, troubleshoot challenges, and celebrate completed projects together. Now, let’s get started!
1. What is the Whirligig Quilt Sew Along?
The Whirligig Quilt Sew Along is a structured, interactive quilting event where participants follow a set schedule to complete a whirligig quilt together. This sew-along is designed to make the quilting process enjoyable and accessible to everyone. Here’s what you can expect:
- Community Engagement: One of the biggest benefits of joining a sew-along is connecting with others who share your passion. Participants often share tips, tricks, and encouragement in online forums or social media groups.
- Guided Instructions: The tutorial provides detailed instructions, including a free pattern that simplifies the process. Each step is broken down into easy-to-follow segments.
- Skill Development: Whether you’re learning to piece fabrics, handle intricate cuts, or use a sewing machine more effectively, this sew-along is an excellent opportunity to enhance your skills.
- Creative Freedom: While the pattern provides a guideline, you can choose fabrics and colors to make the quilt uniquely yours.
- Support System: If you’re stuck on a step or unsure about a technique, the community and tutorial resources are there to help you out.
- Sense of Accomplishment: Completing a quilt is no small feat! The whirligig pattern’s intricate design ensures a rewarding finish.
2. Materials and Tools You’ll Need
Before starting your Whirligig Quilt Sew Along, gather all the necessary materials and tools. Preparation ensures a smooth sewing experience and helps avoid interruptions.
- Fabric Selection: Choose high-quality quilting cotton in a mix of solids and prints. The pattern’s spinning effect looks best with contrasting colors.
- Cutting Tools: A rotary cutter, cutting mat, and quilting ruler are essential for precise cuts.
- Sewing Machine: A reliable sewing machine with a 1/4-inch seam allowance setting is ideal for piecing.
- Thread: Use high-quality thread in a neutral or coordinating color to ensure durability and a clean finish.
- Pins and Clips: These help secure your pieces as you sew.
- Iron and Ironing Board: Pressing your fabric ensures crisp seams and a polished look.
3. Step-by-Step Guide to Making Your Whirligig Quilt
This free tutorial is designed to simplify the quilting process. Follow these steps to create your masterpiece:
- Cut Your Fabric: Begin by cutting your fabric according to the free pattern provided. Ensure accuracy, as precise cuts are crucial for aligning the pieces.
- Assemble the Blocks: Piece together the smaller units to form the whirligig design. This step requires patience and attention to detail.
- Press the Seams: After assembling each block, press the seams open or to the side, depending on the pattern instructions.
- Join the Blocks: Once all blocks are complete, sew them together to create the quilt top. Lay them out beforehand to ensure your design flows seamlessly.
- Add Borders: Borders can enhance the quilt’s appearance and bring balance to the design. Measure carefully and attach them evenly.
- Quilt and Bind: Layer your quilt top, batting, and backing fabric. Quilt the layers together using your preferred method and finish with a binding.
4. Tips for Success in Your Whirligig Quilt Sew Along
To ensure a smooth and enjoyable experience, consider these helpful tips:
- Stay Organized: Keep your workspace tidy and label fabric pieces to avoid confusion.
- Follow the Schedule: If the sew-along has a timeline, adhere to it to stay on track and enjoy the group’s momentum.
- Ask for Help: Don’t hesitate to reach out to the community or tutorial resources if you encounter challenges.
- Test Your Sewing Machine: Ensure your machine is in good working condition and adjust settings as needed.
- Practice Patience: Some steps may be time-consuming, but the results are worth it. Take breaks as needed.
- Have Fun: Remember, quilting is a creative and enjoyable process. Celebrate your progress at every step.
FAQ: Whirligig Quilt Sew Along – Free Tutorial
Q: What is a whirligig quilt?
A: A whirligig quilt features a pattern resembling spinning pinwheels, creating a dynamic and visually appealing design.
Q: Is this tutorial suitable for beginners?
A: Yes! The tutorial provides step-by-step instructions, making it accessible to beginners and experienced quilters alike.
Q: Where can I find the free pattern?
A: The free pattern is included in the tutorial, ensuring you have everything needed to participate.
Q: What fabrics work best for this quilt?
A: High-quality quilting cotton in contrasting colors enhances the whirligig effect.
Q: How long does it take to complete the sew-along?
A: The timeline depends on your pace and the sew-along’s schedule, but most participants complete it within a few weeks.
Q: Can I customize the pattern?
A: Absolutely! Feel free to experiment with fabrics and colors to make the quilt uniquely yours.
The Whirligig Quilt Sew Along – Free Tutorial offers an exciting way to create a beautiful quilt while connecting with a supportive community. By following the steps and tips outlined in this article, you’ll not only improve your quilting skills but also craft a piece you can be proud of. We hope this guide has been helpful and inspires you to embark on your quilting journey.
Let us know your thoughts and suggestions in the comments below. We’d love to hear about your experience and see your completed quilts. Happy quilting!


