Welcome to Week 4 – Present Block, an exciting stage in your quilting journey where creativity meets precision. Whether you’re following a seasonal quilt-along or simply love patchwork blocks that evoke festive cheer, this tutorial is designed to walk you through the entire process of creating the Present Block, a fun and visually striking design that resembles a beautifully wrapped gift.
The Week 4 – Present Block tutorial is not just about stitching fabric pieces together — it’s about adding charm and a story to your quilt. Perfect for holiday-themed quilts or birthday projects, the Present Block offers a great opportunity to play with colors, ribbons, and bows in fabric form. The result? A joyful and eye-catching block that will quickly become a favorite.
In this comprehensive tutorial, you’ll learn all the steps required to construct the Present Block, from cutting fabric to final assembly. Whether you’re a beginner quilter or an experienced stitcher looking for a fresh design to try, this block is beginner-friendly yet full of character. We’ll cover layout planning, piecing tips, pressing advice, and more.
1. Understanding the Week 4 – Present Block Structure
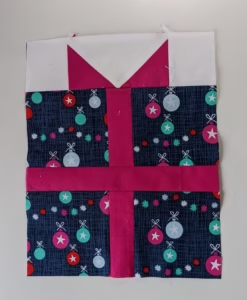
The Week 4 – Present Block typically features a rectangular or square “gift box” shape, wrapped with a ribbon-like strip down the middle and accented with a bow at the top. It gives a three-dimensional illusion through strategic fabric placement.
To start, consider the size of your block. A standard size might be 12″ x 12″, but you can scale up or down depending on your quilt’s layout. Always pre-wash your fabric if needed and press it before cutting for crisp and accurate piecing.
This block works best when you contrast the “present” fabric with the “ribbon” fabric. High contrast between these two will make the design pop. A bold red paired with a white or gold ribbon fabric is classic, but feel free to get creative.
The bow detail can be constructed with simple piecing or appliqué, depending on your comfort level. This tutorial will focus on a pieced bow, keeping everything in line with traditional block construction techniques.
Fabric selection is key to capturing the festive or celebratory spirit of the Week 4 – Present Block. Think beyond Christmas: birthdays, baby showers, weddings — each theme can inspire a unique color palette and layout.
2. Cutting and Preparing the Fabric Pieces
Accurate cutting is one of the most important parts of creating a polished Week 4 – Present Block. Use a rotary cutter, acrylic ruler, and self-healing mat to ensure precision.
Start by cutting the “box” fabric into two rectangles for the top and bottom. For example, two 5″ x 4″ rectangles work well in a 12″ block. These will sit on either side of the vertical ribbon strip.
Next, cut a contrasting strip for the vertical ribbon. A 1.5″ x 8″ strip is often suitable. This will be sandwiched between the box pieces. Make sure the fabric edges are straight and even before sewing.
Then, cut a horizontal ribbon strip, which will span the full width of the block. Again, a 1.5″ x 12″ piece is common. This ribbon adds depth and creates the wrapped effect of the present.
For the bow, you’ll need four small squares and four rectangles to piece a bow that sits at the intersection of the ribbon strips. Try 2″ squares and 2″ x 3″ rectangles as a starting point.
Lay all your pieces out on your work surface before you begin sewing. Visualizing the full block can help identify fabric direction and ensure the final composition is well balanced.
Take a moment to label each section with a small sticky note if you’re creating multiple Present Blocks at once. It saves confusion and helps keep your workflow smooth and organized.
3. Piecing the Block Together
Start piecing by sewing the vertical ribbon between the top and bottom box pieces. Pin before stitching to prevent shifting, and sew with a ¼” seam allowance — a standard in quilting.
Press the seams toward the darker fabric or according to how flat the block lays best. Seams that nest together (pressing in opposite directions) will make your final assembly easier.
Now attach the horizontal ribbon across the center. This piece may intersect your vertical ribbon, creating the “wrapped gift” look. Line it up carefully so the cross aligns neatly.
Add the bow by assembling its four smaller components. Stitch the bow pieces into two mirrored halves, then join those halves into a square. Finally, sew this square to the center where the ribbons meet.
Once all components are joined, trim the block if necessary to make sure it finishes at your desired size. Always square up carefully to avoid skewed edges.
Double-check your seams and press one final time. The Week 4 – Present Block should now be clean, crisp, and visually balanced — a perfect addition to your quilt.
4. Customizing the Week 4 – Present Block for Any Occasion
One of the most enjoyable aspects of the Week 4 – Present Block is how easy it is to personalize. By swapping out fabric prints and colors, you can create themed gifts for any celebration.
For birthdays, use colorful confetti prints, balloon designs, or solid brights for a fun and lively look. The bow can even be glitter or metallic fabric for extra festivity.
Holiday-themed blocks are extremely popular. Christmas versions often use red and green with gold or silver ribbons. Add a tiny appliquéd tag or bell to complete the effect.
Baby-themed quilts can incorporate soft pastel prints with gingham or polka dot ribbons. Add an embroidered initial or heart motif on the bow for an extra touch of love.
Weddings or anniversaries are ideal for elegant fabrics such as lace overlays, satins, or monochrome tones. Think blush and ivory or classic navy and white pairings.
You can also create a modern look using geometric or abstract fabrics with neutral tones. Gray and mustard, teal and white, or even black and gold create chic combinations.
If you’re making a memory quilt, use meaningful fabric scraps from clothing or heirloom linens. Each Present Block becomes a wrapped keepsake of a cherished moment.
FAQ – Frequently Asked Questions About the Week 4 – Present Block
Q: What size should I make my Week 4 – Present Block?
A: A common size is 12″ x 12″, but you can easily scale it up or down depending on your quilt pattern or preferences. Just adjust the proportions of your ribbon and bow elements accordingly.
Q: Can I use fusible appliqué for the bow instead of piecing it?
A: Absolutely! Fusible appliqué is a great option if you prefer faster assembly or more intricate bow designs. Just ensure you follow manufacturer’s instructions and secure the edges with stitching.
Q: What type of fabric works best for the Present Block?
A: 100% quilting cotton is ideal. It presses well, holds its shape, and is easy to sew. However, feel free to incorporate specialty fabrics like metallics, velvets, or lace for added texture and style.
Q: Is this block suitable for beginners?
A: Yes, the Week 4 – Present Block is beginner-friendly. With basic sewing skills, a rotary cutter, and careful attention to seam allowances, anyone can master this design.
Q: How can I keep my ribbon lines straight and aligned?
A: Use careful measuring and pinning. Mark your seam allowances if needed. Pressing after each seam and trimming units before final assembly also helps keep everything lined up properly.
Q: Can I make a full quilt using only Present Blocks?
A: Definitely! A quilt of all Present Blocks is festive, thematic, and ideal for holiday décor or gift-giving. Try varying the fabrics and bow styles for visual interest throughout the quilt.
Final Thoughts and Conclusion
In this tutorial, we explored how to create the beautiful and festive Week 4 – Present Block, a versatile quilt block that can be adapted for any special occasion. From selecting the perfect fabrics to piecing the bow and ribbons with precision, each step brings your project closer to a stunning finish.
We discussed how to customize your Present Block for birthdays, holidays, weddings, and more. Whether you choose bold colors, soft pastels, or modern neutrals, the block’s design leaves plenty of room for personal expression.
This block not only adds charm and personality to your quilt but also allows you to experiment with fabric textures and piecing techniques. It’s a wonderful opportunity to grow your quilting skills while creating something meaningful and joyful.
I hope you enjoyed learning how to make the Week 4 – Present Block and feel inspired to include it in your next project. If you found this tutorial helpful, please leave a sincere comment below with your thoughts, suggestions, or even a photo of your finished block — I’d love to hear from you!


