If you’re on the hunt for a fun and creative quilting project, this Twister Block Tutorial is exactly what you need. Whether you’re a beginner or an experienced quilter, the Twister Block is a beautiful and dynamic design that adds movement and dimension to any quilt. In this guide, we’ll explore how to make a Twister Block step by step, using simple techniques that even novice quilters can follow.
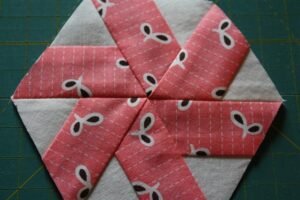
The Twister Block creates an optical illusion of pinwheels that twist and turn throughout your fabric. With its unique look and relatively easy assembly, it’s no wonder this block has become a favorite in the quilting world. The best part? You don’t need to worry about cutting perfect triangles—instead, you’ll use a clever template that transforms squares into whirling designs.
This comprehensive Twister Block Tutorial will guide you through the entire process, from choosing fabrics to sewing the final pieces. Not only will you learn how to make this eye-catching block, but you’ll also gain confidence in cutting, piecing, and assembling quilt blocks with precision and creativity.
1. Understanding the Twister Block
The Twister Block is made using a special ruler or template that transforms a grid of squares into rotating pinwheel-like shapes. This technique is both fun and a little magical—seeing your fabric twist into a design is incredibly satisfying.
One of the key aspects of making a successful Twister Block is understanding how the template works. You first sew together large squares into a simple patchwork grid. After pressing the seams, you use the Twister template to recut the fabric, creating new squares that, when sewn together, form the twisting effect.
Choosing high-contrast fabrics helps the design pop. Consider pairing bold prints with solids or complementary colors. The twisting illusion works best when there’s a clear distinction between the background and the “twisting” fabrics.
You’ll also need to prepare for a bit of fabric waste due to the trimming process, so be generous when selecting your fabric sizes. Using pre-cut squares like charm packs (5″ x 5″) or layer cakes (10″ x 10″) makes the initial layout much faster and easier.
The Twister Block can be used in a variety of projects—wall hangings, table runners, pillows, or full-sized quilts. Its versatility makes it a popular choice for seasonal or themed decor, as you can easily adapt the colors to suit any occasion.
Finally, always take your time during the trimming and piecing stages. Accuracy here ensures that your pinwheels align properly and the twisting illusion is preserved throughout your finished block.
2. Materials and Tools You’ll Need
To begin your Twister Block Tutorial, you’ll need to gather the right tools and materials. Having everything on hand will make the process smoother and more enjoyable.
Start with fabric. Choose at least two contrasting fabrics—a background and a foreground for the twister shapes. Pre-cut squares like charm packs are ideal for this type of block and save time on cutting.
You’ll also need a Twister ruler or template. These are specifically designed to create the twist effect and are available in various sizes. The size of your finished block will depend on which version of the ruler you use.
Basic quilting tools are a must: a rotary cutter, cutting mat, and quilting ruler. These help ensure clean cuts and precise measurements, which are crucial for achieving accurate twists in your design.
Don’t forget your sewing machine, thread, and an iron. Pressing each seam as you go makes a big difference in the final alignment of your block. An iron with steam is especially useful for getting crisp seams.
Optional but helpful: fabric markers or pins to keep your layout in place before trimming. Since the twisting process involves rearranging small pieces, keeping track of your layout helps avoid mistakes.
Lastly, have a design wall or table space to lay out your pieces before trimming. This gives you a visual overview and allows you to play with the layout before committing to your final design.
3. Step-by-Step Instructions
This section of the Twister Block Tutorial will walk you through each step needed to create your first block. With a little patience and attention to detail, you’ll have a stunning twister quilt block ready in no time.
Step one is laying out your squares in a simple grid. For example, if you want a small project, start with a 5 x 5 layout of 5″ squares. Alternate background and focus fabrics to create a balanced design.
Sew all your squares together in rows, then join the rows to form your full grid. Press the seams—alternate pressing direction row by row to help them nest later. A flat layout makes the trimming process more precise.
Now, place your Twister ruler over each square intersection according to the template’s markings. Carefully cut around the template and set each trimmed square aside. Be precise—this determines how well the block aligns.
Once all your new squares are cut, arrange them in the order indicated by your original layout. The twisting pattern will start to emerge. Take a moment to admire how your simple patchwork transformed!
Sew the new smaller squares together row by row, pressing as you go. The new layout will be smaller than the original, due to the trimming process, but it will reveal a vibrant twister design.
Complete the block by trimming edges if needed and adding borders if desired. Your finished Twister Block is now ready to be part of a larger project or stand alone as a mini quilt or decorative piece.
4. Tips for Success and Creative Ideas
To get the most out of this Twister Block Tutorial, here are a few expert tips and creative ways to use your blocks in unique projects.
Always test the process with a few scrap squares before committing to your final fabric. This helps you become familiar with how the template works and avoids surprises during trimming.
Use a consistent ¼” seam allowance throughout. Even small inconsistencies can affect the alignment of the twisting pattern. A quilting foot on your sewing machine can help maintain accuracy.
Consider using themed fabric collections for a cohesive look. Twister blocks are ideal for holiday projects like Christmas wall hangings, Halloween table runners, or patriotic placemats.
Experiment with gradients or ombré fabric layouts to create motion and flow within your twister blocks. This technique adds a sophisticated touch and keeps the viewer’s eye moving across the quilt.
Combine multiple Twister Blocks to form a larger quilt top. The more blocks you assemble, the more impressive the twisting effect becomes. Add sashing or borders to frame your blocks beautifully.
Finally, try different sizes! Use mini twister templates for small projects like mug rugs or coasters, or go large for bed quilts. The technique is flexible and works well with various scales.
Twister Block Tutorial
What is a Twister Block in quilting?
A Twister Block is a quilt block made using a special template that turns simple square layouts into twisting pinwheel shapes. It’s known for its eye-catching movement and easy construction.
Do I need a special tool to make a Twister Block?
Yes, you will need a Twister ruler or template to trim your initial patchwork into the shapes that create the twist effect. These are available in several sizes for different project needs.
Can beginners try the Twister Block Tutorial?
Absolutely! This Twister Block Tutorial is beginner-friendly, especially if you’re comfortable with basic sewing and cutting. Just follow the steps carefully and take your time with trimming.
How much fabric should I buy for a Twister quilt?
It depends on your project size, but be sure to buy extra fabric to account for the trimming process. Starting with pre-cut squares like charm packs is a good way to simplify planning.
Can I make Twister Blocks without a template?
Technically yes, but it’s much harder and less precise. The template is designed to simplify the process and ensure all pieces align correctly, which is critical for the twist effect.
What projects can I make with Twister Blocks?
You can use Twister Blocks in table runners, wall hangings, pillow covers, tote bags, and full-size quilts. They’re especially great for decorative projects thanks to their unique look.
We hope you enjoyed this comprehensive Twister Block Tutorial and now feel confident to try this exciting quilting technique. From understanding the block structure to step-by-step cutting and piecing, we’ve walked you through everything you need to know to make a successful Twister Block.
This block is not only fun to create but also a fantastic way to showcase bold fabrics and add movement to your quilting projects. Whether you’re making a gift or a showpiece for your home, Twister Blocks will never disappoint.
If you found this tutorial helpful, please leave a sincere opinion or suggestion in the comments below. We’d love to hear how your project turned out or answer any other questions you may have. Happy quilting!


