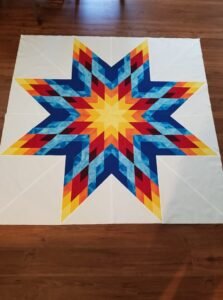
The tutorial Lone Star do nahst du diesen faszinierenden Stern introduces quilters to one of the most visually captivating and intricate designs in the quilting world. This traditional Lone Star pattern, enriched by its European phrasing, has fascinated crafters across generations due to its radiant symmetry and vibrant potential for color play. Whether you are an experienced quilter or a passionate beginner, this tutorial will guide you through creating your own version of this stunning quilt block.
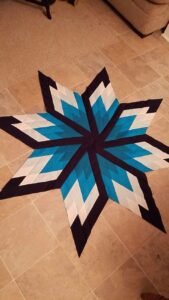
The Lone Star is known for its eight-pointed star that radiates from the center, typically assembled using diamond-shaped fabric pieces. What makes this tutorial Lone Star do nahst du diesen faszinierenden Stern especially unique is its structured breakdown of complex techniques into manageable steps. By following this free tutorial, you’ll discover how to blend traditional craftsmanship with creative expression.
In this article, you’ll explore fabric selection tips, precision cutting and piecing strategies, and techniques to ensure alignment without puckering or distortion. Our goal is to help you master this pattern while ensuring your project aligns with professional standards and creative fulfillment. Let’s get started with the first phase of the process.
1. Choosing Fabrics and Tools for the Lone Star Pattern
When starting your tutorial Lone Star do nahst du diesen faszinierenden Stern, selecting the right fabrics is essential. The star’s geometry shines brightest with high-contrast color schemes. You can choose bold solids or vibrant batiks to emphasize the design’s depth and movement. Consider using gradient or ombré fabrics for an even more dramatic effect.
A reliable rotary cutter and acrylic ruler are indispensable tools for this pattern. The accuracy of your cuts will greatly influence the star’s symmetry. A 45-degree angle ruler can also be incredibly helpful in preparing the diamond shapes needed for each ray of the star.
Make sure to pre-wash your fabrics. This helps to prevent shrinkage and color bleeding later, which is especially important in multi-color patterns like this one. It also softens the fabric, making it easier to work with.
Use a starch spray or pressing aid while ironing your fabric before cutting. This stiffens the fabric slightly, helping with precise cutting and maintaining the sharp angles in the diamonds.
When selecting thread, go with a neutral or coordinating color that won’t distract from the design. Use a high-quality cotton thread for durability and ease of sewing through multiple fabric layers.
Finally, always test your sewing machine tension and stitch length on a scrap piece of fabric. Proper tension ensures that your star will lie flat and your seams will remain secure over time.
2. Cutting and Piecing Diamond Units Accurately
The most critical part of the tutorial Lone Star do nahst du diesen faszinierenden Stern is cutting and piecing your diamonds with absolute accuracy. To begin, cut strips of fabric in your chosen widths, then subcut those strips into 45-degree diamonds. Accuracy here will impact your overall result.
Lay out your diamond pieces according to your desired color layout. You can play with gradients or alternate bold and soft hues for added dimension. Planning your layout beforehand ensures balance and symmetry in the final quilt.
Sew the diamonds together in sets of four to create the “blades” of the star. Use a consistent ¼-inch seam allowance, and press your seams open for a flatter finish. This helps reduce bulk when joining multiple points later.
Always check alignment at each stage. If the tips of your diamonds do not match precisely, the overall star shape may become skewed. Take your time pinning carefully before stitching each seam.
Use a design wall if possible to lay out the star as you go. This visual tool helps you spot inconsistencies early and adjust before final assembly. It’s also a great way to preview how your fabric choices come together in real scale.
Once all eight points of the star are complete, set them aside and prepare for the background assembly. It’s important not to stretch or distort the diamonds, so handle them gently to maintain integrity in the angles.
3. Assembling the Star and Inserting the Background
Assembling the full star in this tutorial Lone Star do nahst du diesen faszinierenden Stern requires patience and attention to detail. Begin by joining star points into quadrants of two or four, depending on your comfort level. Use pins at key intersection points for precise joining.
The star is typically inset into a square background, requiring Y-seams (or set-in seams). These seams are not as intimidating as they sound when approached methodically. Always stop your stitching ¼ inch from the edge at each Y-seam junction to allow fabric movement during insertion.
Cut your background fabric into squares and triangles that will frame each point of the star. These should be accurately measured and cut to maintain the square shape of the final quilt block.
Attach the background pieces by working in segments—first add to one star point, then slowly work around the shape. Be patient and do not rush this step. Iron carefully after each seam is sewn, using minimal steam to avoid distortion.
Pressing the seams away from the star can help the central motif pop visually. However, in areas of heavy seam intersection, press seams open for a smoother surface.
Once the full background is attached, square up the block. You may need to trim slightly to ensure all sides are even. Now you’ll have a completed Lone Star block ready for quilting or integration into a larger project.
4. Quilting, Binding, and Finishing Touches
Quilting brings your tutorial Lone Star do nahst du diesen faszinierenden Stern to life, enhancing the geometry and guiding the viewer’s eye. Use quilting lines that echo the diamond shapes to emphasize the starburst effect.
Consider using free-motion quilting for a more organic look or stick to straight-line quilting for a traditional feel. Match the thread color to your background or star fabrics to create cohesion or contrast as desired.
For batting, choose a low-loft option if you want the star to lay very flat, or a slightly higher loft to add dimension. Secure your quilt sandwich with safety pins or basting spray before quilting.
The binding is your project’s frame. Choose a fabric that complements the star but doesn’t overpower it. Use a double-fold binding method for durability and a clean finish, especially at the corners.
Label your quilt with the title, date, and your name. A hand-sewn or embroidered label gives a personal touch and preserves the history of your work.
Finally, display your quilt proudly! Whether you use it as a wall hanging, a table topper, or a centerpiece in a larger quilt, the Lone Star design is always a showstopper.
Tutorial Lone Star do Nahst du diesen faszinierenden Stern
What does “nahst du diesen faszinierenden Stern” mean?
It’s a German phrase meaning “do you sew this fascinating star,” referencing the intricate beauty of the Lone Star quilt design.
Is the Lone Star pattern suitable for beginners?
While it’s not the easiest pattern for first-time quilters, beginners with basic sewing skills and patience can follow this tutorial and succeed.
What type of fabric works best for the Lone Star quilt?
High-contrast solids or batiks work best to highlight the star’s structure. Pre-washing fabrics is highly recommended.
Do I need special tools to cut the diamonds?
A rotary cutter, quilting ruler, and 45-degree ruler are essential for precision cutting in this pattern.
How do I avoid puckering when sewing the star points together?
Use pins strategically, maintain a consistent seam allowance, and press seams open to reduce bulk and puckering.
Can I resize the Lone Star block for different projects?
Yes, by adjusting the size of your diamond cuts, you can scale the block up or down for various uses like pillows, wall hangings, or full quilts.
In this comprehensive tutorial Lone Star do nahst du diesen faszinierenden Stern, we’ve explored everything from fabric selection and diamond cutting to assembling, quilting, and finishing your masterpiece. This pattern may be intricate, but with the right guidance and attention to detail, you can achieve stunning results that stand the test of time.
We hope you enjoyed this step-by-step journey and feel empowered to create your own mesmerizing Lone Star quilt. If you found this tutorial helpful or have suggestions for improvement, please leave your honest opinion and share your thoughts below. Your feedback helps us create better content for the quilting community!


