The Traditional Starburst Quilt Block – Free Tutorial is a timeless treasure in the world of quilting. Beloved by beginners and seasoned quilters alike, this pattern features radiant points and dynamic shapes that seem to burst from the center of the block—hence the name “Starburst.” This tutorial will walk you through every step of making this stunning block, offering clear instructions, helpful tips, and creative inspiration.
Whether you’re creating a full quilt or just exploring a few blocks for a sampler, the Traditional Starburst Quilt Block offers endless creative possibilities. Its versatility makes it a favorite in both modern and classic quilt designs. By the end of this tutorial, you’ll feel confident incorporating this bold and brilliant pattern into your next quilting project.
This free tutorial is designed to guide you with precision and clarity. It’s perfect for anyone wanting to expand their quilting skills while enjoying a beautiful result. The Traditional Starburst Quilt Block – Free Tutorial is easy to follow and visually rewarding, with each completed block showcasing symmetry and flair. Let’s begin stitching this radiant beauty together!
1. Preparing Your Materials and Tools
To start your Traditional Starburst Quilt Block, preparation is key. Gathering the right materials ensures a smoother and more enjoyable experience. Choose high-quality cotton fabrics in contrasting or complementary colors for the best visual impact. Solid fabrics allow the starburst design to shine, while prints can add personality.
You’ll need basic quilting tools like a rotary cutter, self-healing cutting mat, quilting ruler, and a sewing machine with a quarter-inch foot. Accuracy in cutting and stitching is crucial, especially for a design as sharp and symmetrical as the starburst block.
Make sure your iron is ready—pressing is an essential part of quilting. Press seams as you go to maintain precision and keep your pieces flat. This reduces bulk and enhances the finished look of your quilt block.
Print or draw your block layout ahead of time. Having a visual reference will keep you on track and help you avoid placement mistakes. Consider using a design wall if you’re planning to assemble multiple blocks into a full quilt.
Before sewing, double-check your measurements. The Traditional Starburst Quilt Block – Free Tutorial relies on crisp, clean lines, so take your time with each piece. Small inaccuracies can add up and affect the overall symmetry of the block.
Lastly, choose thread colors that match or blend with your fabrics. Neutral colors work well, but if you’re feeling adventurous, a contrasting thread can emphasize your seams and add an extra design element.
2. Cutting and Piecing the Block
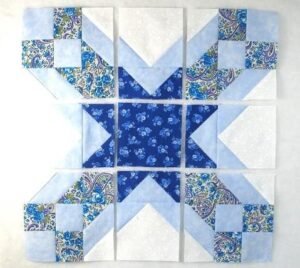
The Traditional Starburst Quilt Block typically consists of multiple triangles and diamond shapes that converge at the center, forming a radiating star. Cutting these shapes accurately is vital to achieving the classic starburst effect.
Start by cutting your background and starburst fabrics into precise strips and subcutting them into triangles or diamonds, depending on your chosen method. Use templates or specialty rulers designed for starburst or compass blocks to simplify the process.
For beginners, paper piecing can be a great way to ensure accuracy. If you’re familiar with this technique, consider printing out a foundation pattern for each block section. This approach minimizes distortion and keeps your points aligned.
Begin assembling your block by sewing smaller units together—typically starting with the central diamonds or triangles that form each starburst ray. Always use a consistent seam allowance and press your seams carefully.
After assembling the rays, sew them into halves or quarters before joining them into the full block. Take care at the center point where all sections meet; this is the focal point of the design, and precise alignment makes a big impact.
Trim your block to size once it’s fully assembled. This final trimming step ensures that all your blocks will fit together neatly if you’re planning a quilt top. The Traditional Starburst Quilt Block – Free Tutorial is all about that crisp, professional finish.
3. Color Placement and Design Variations
Color is where the magic of the Traditional Starburst Quilt Block truly comes alive. Choosing the right palette will transform a simple block into a vibrant work of textile art. High contrast between the starburst rays and the background helps the pattern pop.
You can use a monochromatic scheme, where each ray is a shade of the same color, to create a gradient effect. Alternatively, rainbow or ombre fabric placements can add a playful or modern twist to the classic design.
Scrap fabric enthusiasts will love how well this block accommodates variety. Each ray of the starburst can feature a different fabric, making it ideal for using up small leftovers and creating a unique, scrappy quilt.
For a more dynamic layout, consider rotating alternating blocks within your quilt to create a spinning illusion across the entire quilt top. This technique adds visual motion and depth to your finished piece.
The Traditional Starburst Quilt Block – Free Tutorial also works well with fussy-cut fabrics. Position motifs strategically within each ray for a personalized and detailed look. This is a fun option for novelty fabrics or themed quilts.
Don’t be afraid to experiment. The traditional design lends itself beautifully to reinterpretation. Whether you stick to the classic eight-point star or modify the number of rays, the result will always be eye-catching.
4. Finishing Your Starburst Quilt Block
Once your block is sewn and pressed, it’s time to think about how to use it. The Traditional Starburst Quilt Block can be incorporated into many projects beyond quilts, such as pillows, table runners, wall hangings, or tote bags.
If you’re assembling multiple blocks for a quilt top, consider using sashing or alternate blocks to separate each starburst and give your quilt breathing room. This allows each intricate design to shine individually.
For a bold quilt, you can sew your blocks edge-to-edge with no sashing. This creates a kaleidoscope-like pattern, with the points of one block leading into the next. It’s a striking and cohesive look, especially in larger quilts.
Consider adding borders around your finished block. A narrow inner border in a contrasting color can frame the starburst and make it pop even more. Then, a wider outer border can balance the composition.
Once your quilt top is complete, layer it with batting and a backing fabric, then quilt as desired. Echo quilting around each ray of the starburst can highlight the design. Free-motion quilting within the background adds texture without distracting from the central motif.
Finally, bind your quilt or project with a coordinating fabric. Binding in a dark or vibrant tone can provide a strong finish that frames your entire piece. Congratulations—your Traditional Starburst Quilt Block – Free Tutorial is now complete!
FAQ – Traditional Starburst Quilt Block
What size is a standard Traditional Starburst Quilt Block?
The size can vary, but a common finished size is 12 inches square. Adjust your templates and cutting measurements based on your desired block size.
Is the Starburst Block beginner-friendly?
It can be suitable for confident beginners, especially with paper piecing or detailed templates. Precision is key, so taking your time is essential.
Can I use scrap fabric for this block?
Absolutely! The Traditional Starburst Quilt Block is perfect for using up scraps. Just ensure your fabrics contrast enough to highlight the starburst pattern.
Do I need special rulers or templates?
They’re helpful but not required. You can create your own templates or use printable patterns to achieve accurate cuts and alignment.
What’s the best quilting design for a starburst block?
Echo quilting or straight-line quilting around the rays enhances the design. Avoid heavy quilting directly over the star to let the shape shine.
How many blocks do I need for a full quilt?
It depends on the block size and your quilt dimensions. For a throw quilt using 12-inch blocks, you’ll typically need 20 to 30 blocks.
The Traditional Starburst Quilt Block – Free Tutorial empowers quilters of all skill levels to create striking, radiant blocks full of movement and charm. From precise cutting to thoughtful color placement and finishing, this tutorial covered every essential step to ensure your starburst blocks turn out beautifully.
We explored material preparation, piecing techniques, creative color options, and ways to incorporate the block into various projects. Whether you’re making a single statement piece or a full quilt, this timeless design offers endless creative possibilities.
If you enjoyed this tutorial, please leave a sincere comment with your thoughts and suggestions. Your feedback helps build a supportive quilting community—and inspires future tutorials just like this one!


