The Traditional Arrowheads Quilt Block – Free Tutorial for this Classic Block is a timeless and versatile design that has captured the hearts of quilters for generations. With its strong geometric shape and visually dynamic appearance, this block is a favorite among beginners and seasoned quilters alike. Whether you are creating a full quilt or incorporating the block into a sampler, the Arrowheads block offers both tradition and creativity in one powerful package.
This free tutorial is designed to help you master every step of creating this classic block, from cutting and piecing to pressing and assembling. We’ll walk through fabric choices, cutting techniques, and piecing strategies to ensure that your finished quilt block is crisp, aligned, and beautiful. The Traditional Arrowheads Quilt Block – Free Tutorial for this Classic Block will serve as your go-to guide whenever you want to add a bold and elegant touch to your quilting projects.
If you’ve ever wanted to learn how to create a quilt block that looks complex but is surprisingly simple to construct, this tutorial is for you. You’ll be amazed at how satisfying it is to watch the arrowhead design come together with just a few well-placed seams and smart fabric selection. This comprehensive guide focuses on technique and clarity, so even if you’re new to quilting, you can confidently create a beautiful Arrowheads block.
1. Understanding the Arrowheads Block Design
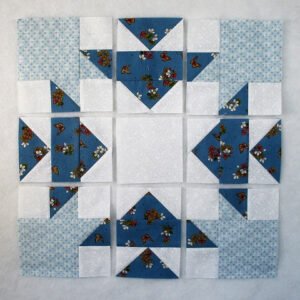
The Traditional Arrowheads Quilt Block – Free Tutorial for this Classic Block centers around a symmetrical triangle-based layout, often forming a square-in-a-square illusion. This block’s structure relies on strong directionality, making it ideal for quilts that need a sense of flow or motion.
The block is typically made using half-square triangles and solid squares. These shapes create the arrowhead motif that points outward or inward, depending on how they are arranged. This adds a dynamic flair to the overall quilt layout.
A great advantage of this block is its scalability. You can make it small for mini quilts or large for bold modern layouts. Whether you’re working with charm packs or cutting from yardage, the Arrowheads block adapts beautifully.
Color selection plays a major role. High contrast between your background and triangle fabrics will emphasize the arrowhead effect. Traditional fabrics offer a vintage aesthetic, while modern prints create a contemporary twist.
Most patterns for this block require only basic tools: rotary cutter, cutting mat, quilting ruler, sewing machine, and an iron. That simplicity makes it perfect for at-home quilters.
Once you’ve learned how to construct one Traditional Arrowheads Quilt Block, you’ll find it incredibly rewarding to create more. It’s a block that offers both visual complexity and technical ease.
2. Fabric Choices and Cutting Tips
Choosing fabric for the Traditional Arrowheads Quilt Block – Free Tutorial for this Classic Block is a delightful process. Start by selecting two contrasting fabrics: one for the background and one for the arrowhead. Solid colors or small-scale prints work best to maintain clarity in the design.
Use pre-washed and ironed cotton quilting fabric to avoid shrinkage and distortion. Crisp, flat fabric leads to more accurate cuts and cleaner seams, which are crucial for blocks with precise geometry like the Arrowheads block.
Cut your squares carefully using a sharp rotary blade and acrylic ruler. If your pattern calls for 5” squares, double-check your measurements. A slight miscut can affect the entire block’s alignment.
Marking diagonal lines on your squares is an essential step, especially when making half-square triangles. Use a fabric-safe pencil or marker and make light marks to guide your stitching.
Always cut your pieces in batches if you’re making multiple blocks. This ensures consistency across the quilt and saves time during piecing.
If you’re a beginner, consider making a test block before cutting all your fabric. This helps you spot any measurement or construction issues early in the process.
3. Sewing and Pressing for Perfect Points
Piecing the Traditional Arrowheads Quilt Block – Free Tutorial for this Classic Block involves accurate seam allowances and deliberate pressing. Begin by sewing your diagonal seams for half-square triangles, ensuring that your stitching follows your marking line precisely.
After sewing, trim away the excess triangle from each square, leaving a 1/4″ seam allowance. This prevents bulk in the final block and improves the overall appearance.
Press your seams carefully. For this block, pressing seams open often yields the flattest result, especially at intersection points where multiple fabrics meet.
Lay out your pieces before stitching them together to ensure correct placement. The direction of the arrowhead relies on proper orientation of each triangle unit.
Join rows together slowly and align seams by nesting them or using pins. Accurate alignment is crucial for maintaining the symmetry and directionality of the block.
Once the block is assembled, give it a final press. Use steam if necessary, and avoid stretching the fabric. A well-pressed block is easier to join with others in a quilt top.
4. Creative Layout Ideas for Arrowheads Blocks
The Traditional Arrowheads Quilt Block – Free Tutorial for this Classic Block lends itself to a variety of layout styles. When repeated, the arrowhead shape can create striking geometric effects or radiating designs.
One popular layout is the “pointing in” style, where all arrowheads face the center of the quilt. This creates a mandala-like visual that draws the viewer’s eye inward.
Alternatively, alternating the direction of the arrowheads results in a zigzag or chevron-style layout, perfect for modern quilts or children’s bedding.
Mixing different colors for each block gives a scrappy quilt look while maintaining unity through block shape. Use consistent background fabrics to ground the design.
You can also combine Arrowheads blocks with other classic quilt blocks such as Log Cabin or Nine Patch for a more eclectic quilt design. The arrow shape adds contrast and interest.
Don’t forget to play with negative space. Using solid sashing between blocks can help highlight the unique arrowhead motif and make each block stand out.
Experimenting with borders, color gradients, or rotation will help you make a quilt that feels truly yours, even when using such a traditional block design.
FAQ – The Traditional Arrowheads Quilt Block
What size is a standard Arrowheads quilt block?
The most common sizes are 8”, 10”, or 12” finished, but the block can be scaled up or down depending on your project. Just make sure to adjust your cutting measurements accordingly.
Is this block suitable for beginners?
Yes! The Traditional Arrowheads Quilt Block is beginner-friendly. It uses basic shapes and straightforward piecing techniques, making it an excellent starting point for new quilters.
Can I use pre-cuts like charm packs or layer cakes?
Absolutely. Charm packs (5″ squares) are especially useful. Just match your pattern’s dimensions and trim accordingly. Layer cakes offer more options for larger blocks or multiple blocks.
How do I avoid stretching or warping the triangles?
Always press, never iron (drag the iron), and handle bias edges carefully. Starching your fabric lightly before cutting can also help stabilize the pieces.
Do I need to use special thread or needles?
Standard 100% cotton thread and a universal 80/12 sewing machine needle are sufficient. Use neutral thread for piecing so it won’t show through your fabrics.
What quilts can I make with Arrowheads blocks?
These blocks are great for lap quilts, bed quilts, wall hangings, and table runners. You can adapt the block count and arrangement to suit any size or style.
The Traditional Arrowheads Quilt Block – Free Tutorial for this Classic Block brings together timeless design, easy construction, and endless creative potential. With just a few simple shapes and some thoughtful fabric choices, you can create a quilt block that speaks to both history and personal expression.
In this tutorial, we explored how to choose fabric, cut pieces accurately, sew and press with precision, and experiment with creative layouts. Whether you’re making one block or many, this guide will help you feel confident and inspired as you sew.
I hope this tutorial has helped demystify the process and inspired you to include the Traditional Arrowheads Quilt Block in your next quilting project. I’d love to hear your honest thoughts—please share your feedback, questions, or ideas for future tutorials in the comments!


