The Beautiful Block Makes a Lovely Little Quilt is not just a charming phrase—it captures the heart of quilting enthusiasts around the world. Whether you’re a beginner just learning to sew your first patchwork block or a seasoned quilter looking for a weekend project, this delightful pattern offers a cozy, satisfying creation. With just a few carefully selected fabrics and a bit of time, you’ll soon see how the beautiful block makes a lovely little quilt that’s as functional as it is decorative.
The reason this project is gaining popularity lies in its simplicity and the joyful results it brings. Even a single beautiful block can become a work of art when repeated with thoughtful color placement. Assembling several of these blocks into a cohesive design transforms your efforts into a lovely little quilt—perfect as a baby gift, wall hanging, or accent for your favorite armchair. It’s a wonderful reminder that big beauty can come in small sizes.
In this article, we’ll walk through what makes the beautiful block so appealing, how to piece it together, and why it remains a timeless favorite in the quilting community. By the end, you’ll understand how easy it is to turn scraps of fabric into something that warms the body and soul. You’ll also learn tips and tricks that help ensure your version of a lovely little quilt stands out as a treasured handmade piece.
1. What Makes the Beautiful Block So Special?
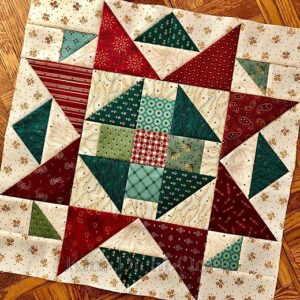
At the core of this design is the idea that beauty doesn’t have to be complex. The beautiful block makes a lovely little quilt because it balances visual interest with construction ease. Often based on traditional motifs such as stars, hearts, or geometric grids, this block showcases contrast and symmetry in a way that captures the eye immediately.
Each block is designed to highlight color harmony. Whether you’re using a muted pastel palette or bold jewel tones, the structure of the block allows each shade to shine. This characteristic is especially helpful for stash-busting, as small pieces of fabric from previous projects can be repurposed into new artistic combinations.
Another important factor is how beginner-friendly the block is. There are no complicated curves or tricky angles. Most patterns for the beautiful block rely on squares, half-square triangles, and simple strips, making it a stress-free option for learning or relaxing. Even better, it’s easy to correct minor mistakes without affecting the overall design.
Time efficiency is also a plus. While some quilts take weeks or even months to complete, a lovely little quilt built from these blocks can be finished over a weekend. This makes it a great choice for gifts or last-minute home décor projects that don’t compromise on style or quality.
There’s also a great deal of personal satisfaction that comes from creating a piece that looks polished but was crafted with your own two hands. Each block is an opportunity to tell a story, whether that’s through fabric choices, arrangement, or personal touches like embroidery.
Lastly, this block pattern is highly adaptable. You can resize it, rotate it, or mix it with other blocks to make your quilt truly unique. That creative flexibility ensures you’ll never tire of revisiting this timeless motif.
2. How to Piece the Beautiful Block Together
Let’s explore the construction process behind the beautiful block and see how it contributes to making a lovely little quilt. One of the most rewarding aspects is how quickly each piece comes together, allowing visible progress that boosts motivation.
Start by selecting three to five complementary fabrics. The charm of this design lies in contrast and balance. Choose a mix of prints and solids, or blend light and dark tones for a more dramatic effect. Cut your fabrics into squares, rectangles, or triangles based on your chosen pattern.
Before sewing, lay out your block components on a flat surface or design wall. This step allows you to visualize the layout and experiment with placement. Even a small adjustment can completely change the block’s visual impact.
When it’s time to sew, use a consistent seam allowance—typically ¼ inch. This precision ensures that each block lines up perfectly when assembled. Press seams as you go, either open or to one side, to reduce bulk and keep the block crisp and flat.
As each unit is stitched together, check for alignment at corners and edges. Minor adjustments are easy to make, and it’s better to correct them early than to wait until the entire block is finished. A well-pressed, well-aligned block sets the foundation for a lovely little quilt with professional appeal.
Once your first block is complete, use it as a template for the rest. Chain piecing—sewing multiple components at once—can save time and ensure uniformity. Continue until you have enough blocks to match your desired quilt size.
Finally, arrange the blocks into rows and columns. Play with layout options—straight set, on-point, or even offset—to enhance the final design. Once you’re happy with the layout, sew the rows together, and soon your beautiful quilt top will come to life.
3. Assembling and Finishing Your Lovely Little Quilt
With your blocks complete, the next phase is assembling them into a lovely little quilt. This process turns individual art pieces into a warm, cohesive creation. It’s incredibly satisfying to see everything come together into a finished quilt top.
Begin by sewing the blocks into rows. Take care to align corners and seams, as this contributes to the polished look of your final product. Pin frequently if needed to keep everything in place, especially when joining rows that contain points or intersections.
Once all rows are joined, you’ll need to add borders. A simple border can frame your quilt and enhance its design, while more complex ones add decorative flair. Choose coordinating fabric and press the quilt top well after attaching the border strips.
Next, create your quilt sandwich by layering the quilt top, batting, and backing. Spray adhesive or safety pins help keep the layers stable. Smooth out any wrinkles before basting to ensure an even finish when quilting.
Quilting can be done by machine or hand, depending on your preference. Straight-line quilting enhances the geometry of the blocks, while free-motion adds texture and personality. Keep the quilting balanced so each block contributes equally to the overall aesthetic.
After quilting, trim the edges of your project and prepare to bind it. Binding provides a clean finish and protects the edges from fraying. Choose a fabric that complements your quilt’s colors and sew it carefully around the perimeter.
Give your finished quilt a final press, and it’s ready to be displayed, gifted, or snuggled under. The fact that the beautiful block makes a lovely little quilt becomes a testament to your creativity, patience, and passion for fabric art.
4. Creative Variations and Personal Touches
Now that you know how to construct the beautiful block, let’s explore how to make your quilt even more personal. Small tweaks in fabric, layout, and quilting style can transform the same block into many different interpretations.
One idea is to use themed fabrics. Whether it’s holiday prints, florals, or vintage reproductions, your choices tell a story. A quilt made with children’s fabrics becomes the perfect baby gift, while seasonal colors bring festive charm to your home.
Try rotating or mirroring the blocks to create secondary patterns. When placed strategically, blocks can form stars, diamonds, or zigzag effects. This simple technique adds a layer of visual interest without requiring additional sewing skills.
You can also scale the block up or down. A larger block makes a faster quilt, great for last-minute projects. Smaller blocks create intricate, detailed designs that are perfect for wall hangings or table toppers.
Consider mixing this block with other traditional ones for a sampler quilt. Alternating block styles adds variety and allows you to experiment with contrast and composition while keeping the project cohesive.
Don’t forget about embellishments. Appliqué, embroidery, or even fabric paint can be used to personalize your blocks. These extras turn a lovely little quilt into a treasured keepsake, rich in character and charm.
Finally, sign your quilt. Add a label or stitched name and date on the back. This gives your quilt history and identity, honoring the care and intention behind every block you made.
Frequently Asked Questions
What size should I make the beautiful block?
Most versions of the beautiful block are 6″ to 12″ square, but you can scale up or down depending on your quilt size and purpose.
Can I use scrap fabric for this pattern?
Absolutely! This block is perfect for using up leftover fabric, especially coordinated scraps from past projects. It’s a fantastic stash-buster.
Is this block suitable for beginners?
Yes! The simplicity of the cuts and the clear layout make it ideal for beginners. It’s also a great confidence booster for those new to quilting.
What kind of quilt can I make with these blocks?
You can make anything from a baby quilt to a wall hanging or even a bed-sized quilt by repeating and joining the blocks.
What’s the best fabric choice for this block?
100% cotton quilting fabric is recommended for durability and ease of use. Choose contrasting colors to highlight the block design.
Can I quilt it by hand instead of using a machine?
Yes, hand quilting adds a beautiful personal touch. Just ensure your fabric layers are secure and evenly basted before starting.
How many blocks do I need for a small quilt?
Depending on the block size, 9 to 16 blocks usually make a great lap or baby quilt. Layout options will determine the final dimensions.
Do I need a quilting frame to finish the project?
Not necessarily. Many small quilts can be quilted using just a flat surface and safety pins or adhesive spray to hold the layers.
What’s the best way to bind the quilt?
Double-fold binding is a popular choice for durability. Use coordinating fabric, and take your time stitching it evenly for a neat edge.
How can I make my quilt unique?
Play with fabric choices, block arrangement, or quilting patterns. Add personal touches like a hand-written label, embroidery, or themed fabrics.
As you’ve seen, the beautiful block makes a lovely little quilt that’s filled with creative possibility and heartfelt charm. From the first cut to the final stitch, every step in this project offers an opportunity to create something meaningful. Whether you’re sewing for yourself or a loved one, the process brings joy, relaxation, and a finished piece that tells a story.
If you’ve made this quilt or plan to try it soon, we’d love to hear from you! Please share your honest thoughts, experiences, and suggestions. Your feedback inspires others and helps keep the tradition of quilting alive and thriving.


