If you’re passionate about quilting, then you’re going to fall in love with the Super Card Trick FREE Block Pattern! This dynamic and visually impressive block offers a clever illusion of layered cards and is a must-try for both beginners and experienced quilters. With its playful geometry and layered look, it’s one of those quilt blocks that makes people stop and say, “Wow! How did you do that?”
In this tutorial, we’re going to walk through everything you need to know to create the Super Card Trick FREE Block Pattern! We’ll guide you step by step, from fabric selection and cutting to precise assembly techniques. Whether you’re sewing it into a sampler quilt, a table runner, or a mini wall hanging, this block will shine in any project.
By the end of this article, you’ll not only know how to make your own Super Card Trick FREE Block Pattern!, but you’ll also be inspired by the endless design possibilities it offers. Let’s get started with the foundational steps and move our way up to mastering this eye-catching block.
1. Understanding the Super Card Trick Quilt Block
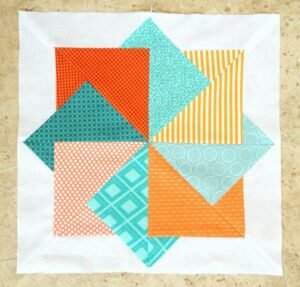
The Super Card Trick FREE Block Pattern! is a play on visual perspective, giving the illusion of overlapping cards arranged in a rotating square. It’s built on a 4×4 grid and uses half-square triangles (HSTs), squares, and strategic color placement to create its unique optical effect.
This block is a fantastic skill-builder, teaching you the art of visual contrast and how to use colors effectively. With the right selection of fabrics, this pattern can pop with energy or create a more subdued, elegant tone. The key is all in the planning.
You’ll typically use four main fabrics plus a background fabric to create the illusion. Each “card” will require a distinct fabric to ensure the visual trick is noticeable. High contrast between each fabric and the background is crucial.
Traditional versions stick to solid fabrics, but you can play with prints and textured fabrics to give your block extra flair. Just make sure the prints aren’t too busy, as that may distract from the overall illusion.
Color placement is everything in this design. You’ll want to map it out before you start cutting. It’s helpful to sketch your layout or use a digital quilt design tool to plan your block in advance.
This block measures 12.5” unfinished and finishes at 12” in a quilt. However, it can easily be resized depending on your project needs. Smaller versions work beautifully in mini quilts and potholders.
2. Materials and Fabric Selection
To make the Super Card Trick FREE Block Pattern!, you’ll need basic quilting supplies, a cutting mat, rotary cutter, and your favorite fabrics. The choice of colors plays a significant role in achieving that distinctive overlapping look.
You’ll need four different colored fabrics—each representing a “card”—plus a background fabric. The background should contrast strongly with the other fabrics to ensure each section of the card trick stands out.
Stick to high-quality quilting cottons for best results. These fabrics have the perfect balance of softness and stability, which helps your seams lay flat and your blocks stay square.
A light-colored background fabric works well when using dark or bright “cards.” Conversely, if you’re working with light-toned fabrics for the cards, try a dark or bold background to help the pieces pop.
Pre-washing your fabrics is optional but recommended. This helps prevent shrinkage and color bleeding, especially with deep or saturated hues.
If you’re unsure about your color choices, try laying them out on a design board or taking a black-and-white photo. This helps you see the contrast and make any necessary adjustments before you start cutting.
3. Cutting and Piecing Instructions
Now let’s dive into the construction of your Super Card Trick FREE Block Pattern! The key to this block is accurate cutting and careful piecing. Let’s break it down step by step for a perfect result.
Cut four 3.5” squares from each of your four card fabrics. From the background fabric, cut eight 3.5” squares and several triangles for the HSTs. Double-check your measurements before cutting to avoid waste.
Next, pair up your fabrics to create the necessary HSTs. Use the two-at-a-time HST method: place two squares right sides together, draw a diagonal line, stitch ¼” on both sides of the line, then cut and press open.
Make sure your seam allowance is accurate. The Super Card Trick FREE Block Pattern! relies on points and angles meeting precisely, and even a small mistake can throw off the illusion.
Assemble the block row by row, pressing your seams after each row. Alternate your pressing direction to help the seams nest. This ensures flatter blocks and less bulk at the intersections.
Once your rows are complete, join them together carefully, pinning where necessary to keep your lines straight. Take your time—precision here is more important than speed.
After sewing the final seams, press the entire block and square it up to 12.5” if necessary. Now you’ve completed your Super Card Trick FREE Block Pattern! and are ready to add it to a project or begin another block.

4. Project Ideas and Creative Variations
Once you’ve mastered the Super Card Trick FREE Block Pattern!, it’s time to get creative. This block is versatile and works beautifully in a variety of quilting projects, from bed quilts to smaller home décor items.
A sampler quilt is an ideal way to showcase this block alongside others. Its striking design makes it a great centerpiece or feature block. Combine it with simpler blocks to let it stand out.
Try creating a table runner using three or five Super Card Trick blocks in a row. With coordinated fabrics, this makes an eye-catching and elegant centerpiece for your dining table.
You can also turn this block into a stunning mini quilt or wall hanging. Add a border and some simple quilting, and you’ve got a quick project that showcases your skills.
For a modern twist, experiment with negative space. Use a light background and low-volume prints for the “cards,” then quilt it with bold geometric lines to accentuate the trick.
Consider using batik fabrics or ombré gradients to give the illusion a new dimension. These fabrics naturally transition in tone and can make your cards appear to shift or fade.
And don’t be afraid to scale it down! Mini versions of the Super Card Trick FREE Block Pattern! are perfect for mug rugs, pouches, and more. Just adjust the measurements proportionally.
Super Card Trick FREE Block Pattern!
Q: What size is the finished Super Card Trick block?
A: The finished block typically measures 12 inches square (12.5 inches unfinished).
Q: Is this block beginner-friendly?
A: Yes! With basic knowledge of half-square triangles and precise cutting, beginners can absolutely make this block.
Q: Can I use scraps to make the Super Card Trick block?
A: Absolutely. This is a great block for using up fabric scraps, as each “card” only requires a small amount of fabric.
Q: What’s the best way to ensure color contrast?
A: Lay your fabrics side by side and take a black-and-white photo to check for contrast. High contrast is key to creating the visual “trick.”
Q: Can I use prints or should I stick to solids?
A: You can use prints, but avoid busy patterns that may distract from the design. Tone-on-tone or subtle prints work best.
Q: How can I include this block in a quilt?
A: It works beautifully in sampler quilts, table runners, or as a centerpiece block surrounded by simpler designs.
The Super Card Trick FREE Block Pattern! is an exciting and visually captivating block that adds flair and illusion to any quilting project. With the right fabrics, attention to detail, and a bit of creativity, you can transform this clever pattern into a quilting masterpiece.
We’ve explored how to understand the block’s structure, select the right materials, cut and assemble it accurately, and even brainstorm project ideas to bring it to life. Whether you’re a beginner eager to try a new technique or a seasoned quilter looking to spice up your work, this block is a fantastic addition to your repertoire.
We’d love to hear what you think! Have you tried the Super Card Trick FREE Block Pattern!? Share your thoughts, tips, or even photos of your project in the comments. Your feedback helps us create even better tutorials for the quilting community.


