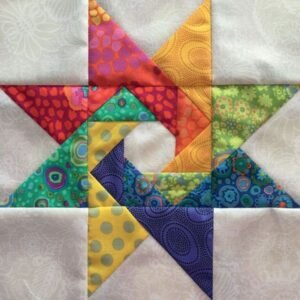
The Spinning Star Quilt Block is one of the most eye-catching and dynamic designs in the quilting world. Its elegant rotation effect gives the illusion of movement, turning simple geometric pieces into a mesmerizing pattern that captivates both beginner and experienced quilters alike. Known for its symmetry and versatility, this block has become a staple in modern and traditional quilting projects. Whether you are crafting a cozy throw or a stunning wall piece, the Spinning Star Quilt Block adds timeless charm and a touch of sophistication to any quilt.
What makes this block so special is its ability to combine simplicity with visual complexity. At first glance, the design looks intricate, but when broken down into smaller components, you’ll find that it’s constructed from basic shapes—triangles, squares, and strips—arranged in a strategic layout that creates a spinning star effect. With patience, precision, and creativity, even a beginner can master this captivating design. The key lies in color placement, fabric contrast, and accurate piecing.
Creating a Spinning Star Quilt Block also provides an excellent opportunity to explore color theory in quilting. The rotating pattern allows you to play with gradients, light and dark contrasts, and complementary hues. This balance between structure and creativity makes the process not only enjoyable but also deeply rewarding. As you stitch each section together, you’ll see how every small decision—every fabric, every seam—contributes to the overall harmony of the spinning star illusion.
The History and Significance of the Spinning Star Quilt Block
The Spinning Star Quilt Block has roots that trace back to traditional American quilting in the 19th century. Early quilters often used stars as symbols of guidance, faith, and unity. The spinning variation represented motion and progress—values deeply tied to the pioneer spirit and the evolving journey of everyday life. Over time, this design has evolved from a humble block pattern into an artistic statement piece found in both rustic and contemporary quilts.
Historically, quilting was not just about warmth or decoration—it was storytelling through fabric. The Spinning Star symbolized the idea that life, like a star, keeps turning and shining despite darkness. Many families passed down this block pattern through generations, adapting it to new fabrics, color palettes, and cultural influences. This is one reason why the design remains relevant even in modern times.
In modern quilting, the Spinning Star Quilt Block represents a bridge between tradition and innovation. It showcases how timeless techniques can be combined with modern materials, digital patterns, and sewing machines. Many contemporary quilters incorporate bold color schemes, modern prints, and minimalist aesthetics to breathe new life into this classic block.
Cultural influence also plays a significant role in its popularity. Across different quilting communities, the Spinning Star Block has been reinterpreted through unique lenses—sometimes in bright patchwork cottons, other times in subtle tone-on-tone fabrics that emphasize the motion of the star. Each adaptation tells a different story, yet all share the same dynamic beauty.
Even quilting competitions and exhibitions often highlight this pattern for its technical challenges and visual appeal. The alignment of points, the precision of seams, and the symmetry of rotation require careful craftsmanship. Completing one successfully is a mark of skill and artistry in the quilting world.
Most importantly, this block connects quilters to a shared creative heritage—a reminder that quilting is both an art form and a cultural legacy that keeps evolving with each stitch.
Materials and Tools Needed to Make a Spinning Star Quilt Block
Before you begin, gather all the essential materials to ensure a smooth quilting process. For a single Spinning Star Quilt Block, you will need high-quality cotton fabric, a rotary cutter, a self-healing cutting mat, quilting rulers, pins, and a reliable sewing machine. Using quality materials not only makes your project easier but also ensures your final piece lasts for years.
Start by choosing fabrics with strong contrast. Since the Spinning Star design relies heavily on visual rotation, picking fabrics that differ in tone or shade will make the star pop. You can use complementary colors, like blue and orange, or stay within one color family for a subtle gradient effect.
Next, prepare your tools carefully. A sharp rotary cutter ensures clean, accurate cuts, which are essential for precise alignment. Dull blades can fray fabric edges, leading to uneven seams. A 1/4-inch seam allowance foot on your sewing machine will also make a huge difference in accuracy, helping your star come together seamlessly.
You’ll also need a reliable iron and pressing surface. Pressing after each seam helps your Spinning Star Quilt Block lay flat and ensures crisp, professional results. Remember, pressing is not the same as ironing—press gently rather than sliding the iron to avoid stretching your fabric.
Optional tools like fabric marking pens, seam rippers, and quilting clips can make your process easier. While some quilters prefer pinning, others find clips faster and more efficient. Choose whichever method feels most comfortable for you.
Lastly, don’t forget your batting and backing fabric if you plan to turn your block into a finished quilt. Once all materials are ready, you can begin the rewarding process of cutting, piecing, and assembling your Spinning Star masterpiece.
Step-by-Step Guide to Creating a Spinning Star Quilt Block
Making a Spinning Star Quilt Block may look challenging, but by breaking it down into steps, the process becomes manageable and enjoyable. Start by cutting your fabric into the required shapes—typically squares and half-square triangles. Precision here is crucial to ensure all your points align correctly.
Arrange your pieces on a flat surface before sewing. This allows you to visualize how the star will spin and make any color adjustments before stitching. The layout stage is where creativity shines—experiment with light and dark placement to enhance the star’s motion.
Next, sew your smaller units together. Begin with the half-square triangles, pressing the seams open for a flatter finish. Once these are assembled, join them into larger sections according to your chosen pattern layout. Always double-check alignment before sewing final seams.
Once the main sections are ready, sew them into a complete block. The Spinning Star will start to reveal itself as you join the quadrants together. Precision is key—take your time and avoid rushing the process. A slow, steady stitch ensures cleaner results.
After completing the block, press it well to set the seams. A light spray of starch can help keep everything crisp and smooth. At this stage, you can square up your block to ensure it matches the intended size—this step is vital if you plan to join multiple blocks in a larger quilt.
Finally, step back and admire your work. Each Spinning Star Quilt Block tells its own story of patience, precision, and artistic flair. With every block you complete, your quilting confidence will grow, and so will your appreciation for this timeless design.
Creative Variations and Design Ideas
One of the most exciting parts about the Spinning Star Quilt Block is its versatility. You can adapt it to different color palettes, fabrics, and sizes, making it perfect for personalized quilting projects. For a modern twist, consider using solid fabrics with bold contrasts. This gives your star a clean, contemporary appearance that suits minimalist interiors.
If you prefer a traditional look, use patterned fabrics with soft, vintage hues. Floral prints, ginghams, and reproduction fabrics can give your Spinning Star a warm, nostalgic charm reminiscent of classic Americana quilts. Adding a sashing or border around each block can enhance the design and give it a framed, finished look.
Another creative approach is to play with scale. Try making a large Spinning Star Block as a focal point for a wall hanging or reduce the size to create multiple smaller stars for a bed quilt. The effect of multiple spinning stars creates an incredible sense of movement across the entire quilt surface.
For a truly unique project, mix different star blocks together. Combining a Spinning Star with other traditional patterns like the Ohio Star, Sawtooth Star, or Lone Star can create visually stunning quilt compositions. This type of fusion design showcases your creativity while celebrating quilting heritage.
You can also experiment with quilting techniques. Consider hand quilting for a rustic finish, or use free-motion quilting to add swirling or radiating designs that enhance the illusion of spin. Even the choice of thread color can influence the final appearance of your Spinning Star Quilt Block, making it shimmer and come alive.
Lastly, remember that quilting is about expression and joy. There’s no single right way to create a Spinning Star Quilt Block. Let your imagination guide you and enjoy every step of bringing your star to life.
FAQ: Common Questions About the Spinning Star Quilt Block
1. What is the easiest way to make a Spinning Star Quilt Block for beginners?
Start with pre-cut fabric squares or kits. Follow a simple pattern that includes half-square triangles, and focus on accurate seam allowances for best results.
2. What size should each block be?
Most Spinning Star Quilt Blocks measure between 10 to 12 inches finished, but you can resize the pattern depending on your project.
3. How many fabrics do I need for this block?
Typically, two to four fabrics work well—one for the background and the others for the star’s rotating segments. Contrast is key for creating the spinning illusion.
4. Can I sew this block by hand instead of a sewing machine?
Yes, you can! Hand sewing gives a traditional touch, though it takes more time. Use small, even stitches and press carefully after each step.
5. How do I make sure my points line up perfectly?
Precision cutting, consistent seam allowances, and pressing after each seam are the main secrets to aligning points perfectly in the Spinning Star Quilt Block.
6. Can I use scraps to make this pattern?
Absolutely! This block is excellent for using leftover fabric scraps. The varied textures and colors can add a lively and artistic charm to your design.
Video Tutorial
The Spinning Star Quilt Block remains a timeless favorite among quilters for good reason. It combines artistic design, technical skill, and emotional expression all in one pattern. From its deep historical roots to its endless modern adaptations, this block continues to inspire creativity and community within the quilting world.
If you’ve followed this guide, you now have the knowledge and confidence to create your own stunning Spinning Star Quilt Block. Experiment with colors, embrace imperfections, and most importantly, enjoy the process of bringing fabric to life.
We’d love to hear your thoughts! Share your honest opinion and suggestions below—your feedback helps keep the quilting tradition spinning bright for generations to come.