The Shooting Star Quilt Block is one of the most eye-catching and timeless quilt patterns loved by quilters around the world. Known for its striking star-shaped design that seems to radiate movement and light, this block is ideal for both beginners and experienced quilters who want to create something visually stunning. By understanding the history, construction techniques, and design possibilities of the Shooting Star Quilt Block, you can add a touch of celestial beauty to your quilting projects.
Quilting enthusiasts often gravitate toward the Shooting Star Quilt Block because of its unique combination of sharp angles and dynamic symmetry. This pattern can transform even the simplest fabrics into a dazzling masterpiece. Whether you’re creating a single block for a sampler quilt or a full quilt made entirely of shooting stars, mastering this block opens up countless creative opportunities. Its bold geometric lines make it an ideal candidate for experimenting with color placement and fabric textures.
The Shooting Star Quilt Block also carries a symbolic meaning. Stars have long been associated with guidance, hope, and inspiration, making this quilt block an excellent choice for gifts, commemorative projects, or personal keepsakes. In this article, you’ll learn more about the history of this block, how to create it, how to choose the best fabrics and color combinations, and tips for customizing it to suit your style.
History and Symbolism of the Shooting Star Quilt Block
The Shooting Star Quilt Block is deeply rooted in the American quilting tradition. Star patterns have appeared in quilting for centuries, often symbolizing direction and protection. As communities evolved and quilting became both a practical and artistic pursuit, quilters adapted these traditional motifs into new variations like the shooting star. This particular block conveys movement and energy, echoing the imagery of a star streaking across the night sky.
Many historians believe that star-shaped quilt blocks were used not just for decoration but also for storytelling. In early American history, quilt designs often reflected the maker’s experiences, values, or aspirations. The Shooting Star Quilt Block could represent a wish, a journey, or even a tribute to someone special. This gives modern quilters a chance to infuse their own meanings into the block, making each quilt a personal narrative.
The evolution of the Shooting Star Quilt Block also reflects advancements in quilting tools and techniques. Early quilters drafted the pattern by hand, carefully measuring and cutting each piece. Today, quilters have access to templates, rotary cutters, and digital patterns, making it easier than ever to achieve precision. This means you can create a quilt block that is not only beautiful but also perfectly aligned.
When you incorporate the Shooting Star Quilt Block into your quilt, you’re connecting with a long line of artisans who valued craftsmanship and creativity. This sense of tradition can be a powerful motivator, inspiring you to experiment with colors, fabrics, and layouts while honoring the classic design. Many quilting guilds even feature star blocks in their challenges to celebrate the skill and artistry of their members.
Another reason for the block’s popularity is its versatility. It can be scaled up or down depending on your project, from a small decorative pillow to a large bedspread. The Shooting Star Quilt Block fits beautifully into both traditional and modern quilts, allowing you to adapt the design to match your personal style or home décor. This flexibility makes it a staple for quilters of all skill levels.
Finally, the shooting star motif carries universal appeal. Whether you’re inspired by the night sky, mythology, or simply the aesthetics of geometric patterns, the Shooting Star Quilt Block offers a canvas for creativity. Its striking shape draws the eye, making it an ideal focal point in any quilt.
How to Make a Shooting Star Quilt Block
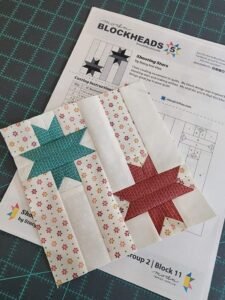
Creating a Shooting Star Quilt Block is easier than it looks when you break it down into simple steps. The block typically consists of a central star with radiating points and smaller background pieces. While different variations exist, most share a similar structure that’s built from squares, triangles, and diamonds.
First, start by gathering your materials. You’ll need high-quality quilting fabric, a rotary cutter, a cutting mat, and a sewing machine. Choosing the right tools will ensure that your pieces are accurate and your seams line up perfectly. The Shooting Star Quilt Block relies on precise cutting and stitching, so taking the time to measure carefully will pay off in the final result.
Next, cut your fabric pieces according to the pattern you’re using. Most Shooting Star Quilt Block patterns will include templates or measurements for each shape. Pay close attention to the grain of the fabric, as this will affect how the pieces hold their shape. Once everything is cut, lay out the pieces on a flat surface to get a sense of how the colors and shapes interact.
As you begin sewing, start with the smaller units, like half-square triangles or diamond segments. Press each seam as you go to keep the block flat and neat. Then, assemble the larger sections by joining the smaller units. This step-by-step approach helps maintain accuracy and makes the construction process more manageable.
One helpful tip is to use a scant quarter-inch seam allowance. This small adjustment can make a big difference in ensuring that your Shooting Star Quilt Block measures exactly the right size. Accurate seams also make it easier to join multiple blocks together when creating a larger quilt.
Finally, give your finished block a good press with a hot iron. This will set the seams and make the block look crisp and professional. At this stage, you can trim any uneven edges to square up the block, ensuring it’s ready to be incorporated into your quilt.
Choosing Fabrics and Colors for the Shooting Star Quilt Block
Fabric and color selection play a crucial role in the impact of the Shooting Star Quilt Block. Because the design features sharp angles and bold shapes, your choices will either emphasize or soften the star’s appearance. Understanding color theory can help you create a block that truly shines.
Begin by selecting a color palette that matches the mood you want to convey. For a traditional look, opt for rich, deep colors like navy, burgundy, or forest green contrasted with cream or white backgrounds. For a modern aesthetic, choose bright, high-contrast fabrics or even solids in bold hues. The Shooting Star Quilt Block is especially striking when made with gradient or ombré fabrics that mimic the movement of a real shooting star.
The background fabric is just as important as the star itself. A light background will make dark star points pop, while a dark background creates a dramatic, night-sky effect. Experimenting with different combinations can yield surprising and beautiful results. Don’t be afraid to try unconventional pairings for a fresh twist on a classic block.
Texture and print also add depth to your design. Small-scale prints can give the star a delicate, detailed look, while large-scale prints may create a bolder impression. Mixing solids and prints within one Shooting Star Quilt Block can enhance the sense of movement and make the design more dynamic.
Another approach is to use scraps from other projects. Because the block is made of relatively small pieces, it’s perfect for using up leftover fabric. This not only adds variety but also makes your quilt more eco-friendly. A scrappy Shooting Star Quilt Block can look vibrant and full of character.
Finally, consider the overall layout of your quilt. Will you repeat the same color scheme in every block, or vary it for each star? Consistency creates a harmonious look, while variation adds visual interest. Both approaches can work beautifully depending on your vision for the project.
Tips for Customizing the Shooting Star Quilt Block
Once you’ve mastered the basic construction of the Shooting Star Quilt Block, you can begin to customize it in countless ways. Customization allows you to put your personal stamp on the design and create a quilt that’s truly one of a kind.
One easy way to customize the block is by changing its size. Enlarging the block makes it a dramatic centerpiece for a quilt, while shrinking it allows you to create intricate patterns with multiple small stars. Most patterns can be scaled up or down with a bit of math and careful measuring.
You can also experiment with fabric placement. Instead of making all the star points the same color, try alternating colors or using a gradient effect. This gives the Shooting Star Quilt Block a sense of depth and movement, making it even more eye-catching.
Another customization option is to add embellishments. Hand embroidery, appliqué, or decorative stitching can highlight certain parts of the star and add texture. Metallic threads, for example, can give the impression of a twinkling night sky.
If you’re making a quilt for a special occasion, consider incorporating meaningful fabrics. A baby’s quilt could include pieces of outgrown clothing, or a commemorative quilt could use fabrics tied to significant memories. The Shooting Star Quilt Block serves as a beautiful framework for telling a personal story through fabric.
You can also play with the block’s orientation. Rotating the blocks or arranging them in different layouts can create unique secondary patterns across the quilt top. This kind of experimentation often leads to exciting new designs that go beyond the traditional layout.
Lastly, don’t forget the quilting itself. The way you quilt the finished project—whether by hand or machine—can enhance the shooting star effect. Radiating lines or echo quilting around the star points can emphasize the design’s movement and add a professional touch.
FAQ About the Shooting Star Quilt Block
Q: Is the Shooting Star Quilt Block suitable for beginners?
A: Yes, with careful cutting and piecing, beginners can successfully make this block. Starting with a simple pattern or larger pieces can make it even easier.
Q: What size should I make the block?
A: Common sizes range from 8 to 12 inches, but you can scale the Shooting Star Quilt Block to fit your project. Larger blocks are easier to assemble, while smaller blocks create more intricate designs.
Q: What fabrics work best for this block?
A: Quilting cotton is the most popular choice because it’s easy to cut and sew. Mixing solids and prints can give the Shooting Star Quilt Block more visual interest.
Q: How do I ensure my points match up neatly?
A: Accurate cutting and a scant quarter-inch seam allowance are key. Pressing your seams as you go also helps keep the block flat and precise.
Q: Can I make a whole quilt using just this block?
A: Absolutely! Many quilters create entire quilts using the Shooting Star Quilt Block repeated across the surface. You can also mix it with other star blocks for variety.
Q: How can I make my block look more dynamic?
A: Experiment with color gradients, bold contrasts, or different block orientations. These techniques will enhance the sense of movement in the Shooting Star Quilt Block.
Video Tutorial
The Shooting Star Quilt Block is more than just a quilting pattern; it’s a timeless symbol of creativity, tradition, and inspiration. By learning about its history, construction methods, fabric choices, and customization options, you can create a quilt that reflects your personal style and tells a unique story. Whether you’re making one block or an entire quilt, the shooting star design offers endless possibilities for expression.
We hope this article has given you the guidance and confidence to try the Shooting Star Quilt Block for yourself. If you found this information helpful, please leave your honest opinion and share any suggestions you have for improving or expanding on this topic. Your feedback helps keep the quilting community vibrant and full of new ideas.