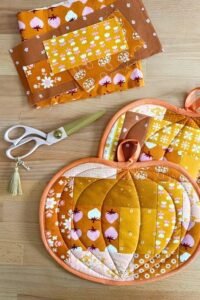
Starting a Scrappy Quilted Pumpkin Pot Holder Tutorial is one of the most delightful ways to celebrate fall while putting leftover fabric scraps to good use. Quilters of all levels love projects that combine creativity with functionality, and a quilted pumpkin-shaped pot holder fits perfectly into that category. Not only is this a practical kitchen accessory, but it also becomes a seasonal decoration that brightens up your home. With a little patience and some basic quilting techniques, you can transform small scraps of fabric into a stunning piece of handmade art.
The beauty of following a Scrappy Quilted Pumpkin Pot Holder Tutorial lies in its flexibility. You don’t need to purchase expensive fabric or stick to one color palette. Instead, you can mix and match scraps, old fabric pieces, or even repurpose materials from previous quilting projects. The result is always unique, full of charm, and a reflection of your personal creativity. This makes it an ideal project for beginners who want to practice quilting skills as well as for experienced quilters who enjoy a quick and rewarding project.
Another reason why this quilt pattern is so popular is its seasonal appeal. Autumn and pumpkins go hand in hand, and having a quilted pumpkin pot holder in your kitchen adds warmth and coziness. It’s also an excellent handmade gift idea for friends and family who appreciate thoughtful, handcrafted items. Whether you want to keep it for yourself or share it as a present, this tutorial will guide you step by step, ensuring you create something both beautiful and functional.
Gathering Materials for Your Scrappy Quilted Pumpkin Pot Holder
When beginning a Scrappy Quilted Pumpkin Pot Holder Tutorial, the first step is gathering the right materials. Luckily, you don’t need much to get started, and most of what you need might already be in your sewing room. Look for fabric scraps in shades of orange, brown, or even patterned prints that remind you of pumpkins. These fabrics will give your pot holder character and charm.
You will also need batting, which provides thickness and heat protection. Batting is essential for a pot holder since it ensures safety when handling hot dishes. Cotton batting is recommended because it can withstand high temperatures. If possible, use two layers for extra protection.
In addition to fabric and batting, you’ll need basic sewing tools: a rotary cutter, cutting mat, quilting ruler, pins, and of course, a sewing machine. Hand sewing is possible but can be more time-consuming. If you have quilting clips, they will make handling small fabric pieces easier.
Don’t forget thread in matching or contrasting colors. The thread you choose can either blend with your fabric or add decorative contrast. Many quilters like using a darker thread for stitching details that stand out, especially on pumpkin shapes.
Another important item is a heat-resistant layer such as Insul-Bright. This special batting adds extra insulation, making your pot holder safer for everyday kitchen use. While it’s optional, it’s highly recommended if you plan to use the pot holder frequently.
Finally, consider adding embellishments. A small fabric stem at the top, a touch of green fabric to resemble leaves, or decorative stitching patterns can all enhance the final look. These details make your quilt pattern unique and memorable.
Cutting and Piecing Your Fabric Scraps
One of the most enjoyable parts of the Scrappy Quilted Pumpkin Pot Holder Tutorial is cutting and piecing fabric scraps. Since this project is scrappy, perfection is not required. In fact, uneven shapes and various textures add to the charm. Start by sorting your fabric scraps into colors that fit your pumpkin design.
Cut the scraps into manageable squares, rectangles, or strips. Consistency in size helps, but feel free to mix small and large pieces for a more rustic look. The goal is to create a “scrappy” effect, so don’t worry if some edges don’t align perfectly.
Once your fabric pieces are ready, begin arranging them into a pumpkin shape. Think of it as building a puzzle where each fabric piece contributes to the whole design. Try different combinations until you are happy with the layout. This step is all about creativity and fun.
When piecing the fabric together, use a quarter-inch seam allowance. This standard quilting seam ensures durability and neatness. Sew two pieces together, press the seams flat, and continue adding more until the pumpkin shape emerges. Pressing is crucial as it keeps your work flat and easier to handle.
To give your pumpkin pot holder structure, sew your pieced fabric into a larger block that will later be trimmed into a round or oval shape. The pieced block should be slightly larger than your intended pot holder size to allow trimming and seam allowances.
Adding a stem and leaf section from green and brown fabric scraps completes the pumpkin design. These little accents make the quilt pattern recognizable and festive. Once everything is pieced, you’re ready to move to the quilting stage.
Quilting and Assembling the Pumpkin Pot Holder
The quilting stage of the Scrappy Quilted Pumpkin Pot Holder Tutorial is where the project really comes to life. Begin by layering your quilt sandwich: place the backing fabric right side down, add the batting (and optional Insul-Bright), then top it with your pieced pumpkin fabric right side up.
Secure the layers with quilting pins or clips to prevent shifting while sewing. Quilting lines can be simple or decorative. Many quilters choose straight-line quilting to mimic the ridges of a real pumpkin, while others experiment with free-motion quilting for added texture.
As you quilt, make sure your stitches are even and consistent. Quilting not only holds the layers together but also adds durability and visual appeal. Don’t hesitate to get creative with your quilting pattern—it’s what makes each pot holder one of a kind.
After quilting, trim the edges of your layered fabric into a pumpkin shape. Use a rotary cutter for smooth, clean edges. Keep in mind that round shapes may require careful cutting to maintain balance.
The next step is binding, which finishes the edges neatly. Cut bias binding strips from fabric scraps or use pre-made binding. Sewing binding around curved edges can be challenging, so take your time and use plenty of pins or clips.
Finally, add a hanging loop at the top. This small detail allows you to display your quilted pumpkin pot holder when not in use. It’s both practical and decorative, making your finished project ready to shine in your kitchen.
Tips, Variations, and Creative Ideas
The Scrappy Quilted Pumpkin Pot Holder Tutorial leaves plenty of room for personalization. One great tip is to experiment with color. While traditional pumpkins are orange, you can make your pot holder in white for a “ghost pumpkin” look, or even mix unconventional colors for a whimsical style.
Another variation is size. You can make larger pot holders for baking trays or smaller ones as mug rugs. Adjusting the dimensions gives you flexibility depending on your kitchen needs.
Try mixing different fabric textures for added interest. Cotton works best for quilting, but incorporating linen or textured scraps can add depth. Just be sure they are safe for heat use in the kitchen.
If you want to make your pot holder extra special, consider adding hand embroidery. Stitches around the pumpkin segments or a small embroidered vine can transform a simple pot holder into a true piece of art.
Don’t forget functionality. While decorative pot holders look great, remember their main purpose is handling hot dishes. Always use batting layers thick enough for safety. Function and beauty should work together.
Lastly, use this quilt pattern as a starting point for other shapes. Once you master the pumpkin design, try making seasonal pot holders in shapes like leaves, apples, or even Christmas trees. It’s a fun way to expand your quilting skills while creating festive items year-round.
FAQ
1. What is the best fabric for making a quilted pumpkin pot holder?
Cotton fabric is ideal because it withstands heat well, is easy to quilt, and comes in endless patterns and colors.
2. Do I need special batting for a pot holder?
Yes, regular batting works, but adding heat-resistant batting like Insul-Bright makes your pot holder safer for handling hot cookware.
3. Can I sew the pot holder by hand?
It’s possible, but using a sewing machine is faster and ensures stronger seams. Hand sewing works best for small details or embellishments.
4. How do I keep the edges neat on curved shapes?
Using bias binding makes it easier to sew around curves. Pin or clip the binding carefully and sew slowly for smooth results.
5. Is this project suitable for beginners?
Absolutely! The Scrappy Quilted Pumpkin Pot Holder Tutorial is perfect for beginners since it uses fabric scraps and doesn’t require perfection.
6. Can I wash my quilted pot holder?
Yes, you can wash it in cold water with mild detergent. Air drying is recommended to maintain its shape and durability.
Video Tutorial
The Scrappy Quilted Pumpkin Pot Holder Tutorial – Quilt Pattern is more than just a sewing guide; it’s an invitation to turn fabric scraps into something practical, decorative, and full of personality. From gathering materials to quilting and finishing, each step offers room for creativity and learning. This project is perfect for quilters of all levels and makes a thoughtful handmade gift.
Now that you’ve learned how to create your own scrappy quilted pumpkin pot holder, I’d love to hear from you. Share your thoughts, give your honest opinion, and leave suggestions for future quilting tutorials. Your feedback helps keep the quilting community inspired and connected
