The Scrappy Hunter’s Star Tutorial is the perfect introduction to one of the most beloved and visually striking quilt blocks in the patchwork world. Whether you’re a beginner or a seasoned quilter looking to use up those colorful fabric leftovers, this technique offers a rewarding blend of tradition and creativity. With its captivating design and infinite color possibilities, the Hunter’s Star becomes even more dynamic when done the scrappy way.
In this detailed Scrappy Hunter’s Star Tutorial, you’ll learn how to transform simple fabric pieces into a dazzling star-filled quilt top. The method relies on strategic cutting and sewing, giving the illusion of complicated piecing, while remaining quite approachable with some guidance and practice. Plus, using scraps adds charm, warmth, and sustainability to your quilting project.
The Scrappy Hunter’s Star quilt block is more than just a project—it’s an opportunity to bring personality into every inch of your quilt. Each star you create tells a story of fabric pieces repurposed, colors harmonized, and creativity unleashed. Keep reading to unlock the step-by-step secrets to crafting your very own Scrappy Hunter’s Star masterpiece.
1. Understanding the Scrappy Hunter’s Star Pattern
The Scrappy Hunter’s Star is based on a traditional quilt pattern that gives the illusion of interlocking stars and diamonds. While the original block required complex angles and templates, modern approaches have simplified the process considerably.
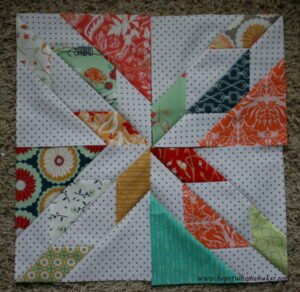
This block is made up of half-square triangles (HSTs) and diamonds arranged to create star points radiating from a central square. When repeated, these blocks form a quilt full of secondary patterns and mesmerizing symmetry.
A scrappy version of this pattern involves using various fabric scraps instead of a planned color scheme. This adds visual interest and reduces fabric waste, making it an eco-friendly and budget-conscious choice.
One of the joys of working with a Scrappy Hunter’s Star is the unpredictable beauty it creates. You can arrange your colors randomly or organize them into light and dark values to enhance the star effect.
Many quilters enjoy using fabric from previous projects in their scrappy quilts. This gives each star a nostalgic, patchwork story full of personal meaning.
When choosing scraps, remember to include a good balance of lights and darks. This contrast is essential for making the star pattern stand out clearly in your finished quilt.
2. Materials and Tools You’ll Need
To follow this Scrappy Hunter’s Star Tutorial, you’ll need a variety of tools and supplies that most quilters likely already have on hand. The magic happens when you bring them all together in harmony.
First, gather your fabric scraps. Aim for pieces at least 5” square in size. This will give you enough material to cut and match various block sections.
You’ll also need a rotary cutter, a cutting mat, and a quilting ruler. Accuracy in cutting is key to achieving clean points in your Hunter’s Star block.
Basic sewing supplies such as thread, pins or clips, and a reliable sewing machine are essential. A quarter-inch presser foot is highly recommended to maintain consistent seam allowances.
Don’t forget an iron and ironing board. Pressing seams properly throughout the process ensures flat blocks and sharp edges in your quilt top.
Optional but helpful tools include a design wall or board where you can lay out your blocks and preview your layout. This can be very useful when working with so many fabric variations.
Lastly, it’s helpful to have some background fabric if you want a more structured look in your quilt. A solid or neutral background can help your scrappy stars pop even more.
3. Step-by-Step Instructions for Sewing the Block
This section of the Scrappy Hunter’s Star Tutorial will guide you through creating one 8” finished block. Once you understand the method, you can easily repeat it for a full quilt.
Start by selecting two contrasting fabrics: one light and one dark. From each fabric, cut two 5” squares and one 4.5” square. These will form the foundation of your block.
Next, create your half-square triangles (HSTs). Pair one light and one dark 5” square, place them right sides together, and draw a diagonal line from corner to corner. Sew 1/4” away from each side of the line and cut along the line to create two HSTs.
Press your HSTs open, with seams going toward the darker fabric. Trim them to 4.5” square if needed to match the size of your center square.
Now, lay out your four HSTs and one center square in a plus-sign arrangement. The dark halves of the HSTs should point outward to form the star tips.
Sew the top row of two HSTs, the center row with one HST, the square, and another HST, and the bottom row of two HSTs. Press the rows and then sew all rows together to complete the block.
Repeat this process using different scrap combinations. With just a few blocks, you’ll start to see how the Scrappy Hunter’s Star pattern evolves beautifully with each addition.
4. Assembling the Quilt Top and Final Touches
Once you’ve sewn a desired number of blocks, it’s time to plan your layout. The Scrappy Hunter’s Star Tutorial shines at this stage, as it’s when the quilt’s final visual impact starts to come together.
Lay your blocks on a flat surface or design wall. Play with the placement to balance colors, lights, and darks throughout the quilt top.
You can choose to alternate light and dark backgrounds to create a more dramatic effect or stick with one consistent background for unity.
Once satisfied with the layout, begin sewing the blocks into rows. Press the seams of each row in alternating directions to help them nest together neatly.
Sew the rows together to form your quilt top. Take your time aligning star points for a professional-looking finish.
Add a border if you’d like to frame the quilt or bring it up to a specific size. Then prepare your quilt sandwich: quilt top, batting, and backing.
Finish your quilt with quilting stitches and binding. Whether you quilt by hand or machine, this final step brings your Scrappy Hunter’s Star to life as a cozy, usable piece of art.
FAQ – Scrappy Hunter’s Star Tutorial
What size scraps do I need for the Scrappy Hunter’s Star block?
Ideally, use scraps that are at least 5” square. This gives enough room to create half-square triangles and center squares with proper seam allowance.
Can I make this quilt as a beginner?
Yes! This Scrappy Hunter’s Star Tutorial is beginner-friendly, especially using modern methods that avoid tricky templates. It’s a great introduction to traditional blocks.
What makes it “scrappy”?
A scrappy quilt uses various fabric remnants or leftovers from other projects, often without a strict color plan. The mix of patterns and shades adds charm and personality.
How many blocks do I need for a full quilt?
That depends on the desired size. A lap quilt may need 25 blocks (5×5), while a bed-size quilt could require 64 or more. Each block finishes at around 8” square.
Should I use a design wall?
While not mandatory, a design wall can be incredibly helpful in planning your layout. It helps you visualize how your scrappy blocks interact with each other.
Do I need to prewash my fabric scraps?
If your scraps come from different sources or collections, prewashing is a good idea to prevent shrinkage or dye transfer during future washes.
The Scrappy Hunter’s Star Tutorial offers a creative and fulfilling quilting experience that blends tradition with personal expression. Through simple steps and thoughtful scrap selection, you can transform leftover fabrics into stunning star blocks that shine with charm and history.
We covered everything from understanding the Hunter’s Star layout, gathering tools, cutting and sewing the blocks, to assembling the final quilt top. Whether you’re making a mini wall hanging or a full-sized bed quilt, the scrappy method adds a touch of heart to every piece.
If you’ve enjoyed this Scrappy Hunter’s Star Tutorial, we’d love to hear your thoughts! Leave a sincere comment or suggestion below—your feedback helps improve our tutorials and inspire future quilting projects.


