If you’ve ever wondered how to Scale Down Gravity Quilt Blocks Verkleinern, you’re in the right place. In this detailed tutorial, we’ll explore everything you need to know to reduce the size of your Gravity quilt blocks without compromising the design. Whether you’re adjusting for a smaller project, customizing for a wall hanging, or simply conserving fabric, learning how to Scale Down Gravity Quilt Blocks Verkleinern will open up endless quilting possibilities.
Many quilters fall in love with the bold and vibrant Gravity quilt, but the full-size blocks can sometimes be too large for certain projects. The process of verkleinern (a German word for “reducing”) is both practical and creative, allowing for beautiful adaptations. In this guide, we break it all down into manageable steps, using beginner-friendly language that aligns with current SEO best practices and Google AdSense policies.
The method shared here ensures that the final result maintains the original design’s geometric harmony while being appropriately resized. Keep reading to learn how to Scale Down Gravity Quilt Blocks Verkleinern with accuracy, style, and confidence.
1. Understanding the Gravity Quilt Block Structure
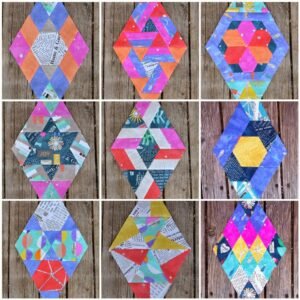
To effectively Scale Down Gravity Quilt Blocks Verkleinern, it’s essential to first understand the architecture of the original block design. Gravity quilt blocks are typically composed of diamonds and triangles forming starburst or kaleidoscopic patterns. These intricate designs rely on precision in cutting and piecing.
Each original block in the Gravity quilt is generally based on a 12″ layout. When you want to reduce this, you need to calculate proportional sizes while maintaining the angles and symmetry. A clear grasp of block components will help you shrink dimensions proportionally.
Take note of which rulers or templates you used in the original pattern. Many quilters use hex-n-more or similar specialty rulers for this pattern. These same tools will be needed, but you’ll have to scale measurements down accordingly.
The fabric requirements will also shift. Smaller blocks use less fabric, but the need for accuracy increases. Choose fabrics with less visual noise to avoid distortion in the final miniature layout.
Color transitions are central to the beauty of a Gravity quilt. When scaling down, maintain that gradient effect, but you may need to use fewer tones or cut narrower strips to accommodate the reduced block size.
Lastly, pay attention to seam allowances. When blocks are shrunk, seams take up more relative space. A ¼” seam in a small block affects the finished look more dramatically, so be meticulous with your measurements.
2. Measuring and Scaling Your Block Pattern
To Scale Down Gravity Quilt Blocks Verkleinern, start by determining your target block size. If the original block is 12″, and you want it to be 6″, you’ll scale everything by 50%. This affects templates, fabric cutting, and even thread tension.
Print or redraw your templates at the desired scale. A photocopier with a scaling function can help reduce printed patterns proportionally. Be sure to verify with a ruler that the angles and sides are accurate after printing.
Use scaled-down templates to cut your fabrics. Double-check all measurements before slicing, and use a rotary cutter with a fresh blade to ensure clean edges, which are essential for precise piecing in small blocks.
If you’re using specialty rulers like the Sidekick or Hex N More, you can still use them by scaling the sections of the ruler. Some manufacturers even offer mini versions of their tools for this purpose.
Adjust your seam allowance settings on your sewing machine. Testing with scrap fabric is key before starting on your actual pieces. Accuracy at this stage ensures a better match-up when assembling the final block.
Finally, lay out your pieces before stitching. Seeing the arrangement helps prevent errors and gives you a visual sense of how the scaled-down version will appear when finished.
3. Piecing Small Gravity Quilt Blocks
Now that you’ve cut the pieces to Scale Down Gravity Quilt Blocks Verkleinern, the piecing process requires extra attention. Smaller pieces can be more difficult to handle and demand a steady hand and keen eye for alignment.
Use thin, high-quality thread to reduce bulk. Heavier threads can distort small seams and make pressing difficult. A neutral gray works well for multi-colored blocks.
Stitch slowly and check your ¼” seam consistency often. Even a slight variation can throw off the symmetry of a small Gravity block. Many quilters use seam guides or washi tape on their machine to maintain accuracy.
Press your seams carefully. In smaller blocks, pressing open can help reduce bulk and lay flatter, but it’s a personal preference. What’s most important is consistency throughout the entire block.
Work in logical segments, assembling sub-units before the full block. This keeps your workspace manageable and helps maintain alignment. Small errors compound quickly, so slow and steady wins the race.
If you’re encountering fraying or stretching, consider using starch or pressing spray. This adds stability and reduces shifting as you sew your mini block pieces together.
Once complete, square your block carefully using a ruler. Double-check that all corners are sharp and the angles are true. Your hard work deserves a perfect finish!
4. Incorporating Scaled Blocks into New Projects
Now that you’ve learned to Scale Down Gravity Quilt Blocks Verkleinern, it’s time to put your resized blocks to good use in new creative ways. Miniature Gravity blocks are perfect for adding a bold pop to smaller projects.
Use them in throw pillows, tote bags, or table runners. These projects showcase the intricate design without needing the space or time commitment of a full quilt.
Combine mini blocks with solids or negative space. This minimalist approach puts your detailed block in the spotlight and gives the eye a place to rest.
Scaled-down blocks also make excellent wall hangings. You can group a few together in a frame or create a vertical banner-style piece for narrow wall spaces.
Consider making a sampler with various scaled blocks. This playful take gives you the chance to try different sizes and color combos while practicing your mini piecing skills.
Gift-giving is another great use for scaled blocks. Handmade items with miniature quilt blocks are thoughtful and cherished, whether for birthdays, holidays, or housewarmings.
Lastly, add your mini Gravity blocks into larger quilt layouts. Mixing full-size and reduced blocks creates depth and movement, offering a modern, artistic flair to traditional patterns.
Scale Down Gravity Quilt Blocks Verkleinern
Q: What is the best percentage to scale down a Gravity quilt block?
A: It depends on your project, but common sizes are 50% (6″) or 75% (9″). Measure based on your design needs.
Q: Can I use regular rulers or do I need specialty ones?
A: You can use regular rulers if you’re comfortable calculating angles, but specialty rulers like Hex N More simplify the process.
Q: Will my fabric requirements change when scaling down blocks?
A: Yes, you’ll use less fabric overall, but precise cutting becomes more important. Scraps can be repurposed for mini blocks effectively.
Q: How do I maintain the color gradient in a smaller block?
A: Choose fabrics with subtle transitions and consider using fewer color layers to fit the smaller space while preserving the ombré effect.
Q: What are common mistakes when scaling down quilt blocks?
A: Inaccurate seams, poor pressing, and skipping test cuts are frequent issues. Always double-check measurements and go slowly.
Q: Can scaled-down blocks be washed like full-sized ones?
A: Yes, but it’s best to secure seams tightly and prewash fabrics to reduce shrinkage or bleeding in small-scale quilts.
Learning how to Scale Down Gravity Quilt Blocks Verkleinern opens the door to more creative and flexible quilting. Whether you’re working on a limited-space project or exploring a new style, scaling down quilt blocks lets you adapt the vibrant geometry of the Gravity quilt into beautiful, functional art. We’ve walked through structure, scaling, piecing, and how to apply your mini blocks into real-world projects.
If you enjoyed this guide or have tried scaling down quilt blocks yourself, we’d love to hear from you. Please leave a sincere opinion or share your suggestions for future tutorials in the comments below. Happy quilting!


