The Reindeer Block is a charming and festive quilting pattern that has captured the hearts of crafters and holiday lovers around the world. Whether you are a beginner quilter or a seasoned sewing enthusiast, this block brings the magic of the season into every stitch. With its adorable reindeer motif, it’s perfect for Christmas quilts, holiday wall hangings, or even handmade gifts that add a special touch to your décor.
Creating a Reindeer Block is not only a joyful experience but also a wonderful way to use up your holiday fabric scraps. You can personalize your project with playful prints, bold colors, or traditional Christmas tones. The versatility of the design means that each block can have its own personality — from classic Rudolph to modern minimalist reindeer — depending on your fabric choices.
In this article, we’ll guide you through everything you need to know about the Reindeer Block, from how to piece it together to the best ways to incorporate it into your holiday projects. Whether you plan to make a single block for a cushion or a full quilt, this tutorial will give you the inspiration and direction you need to get started.
1. Understanding the Reindeer Block Design
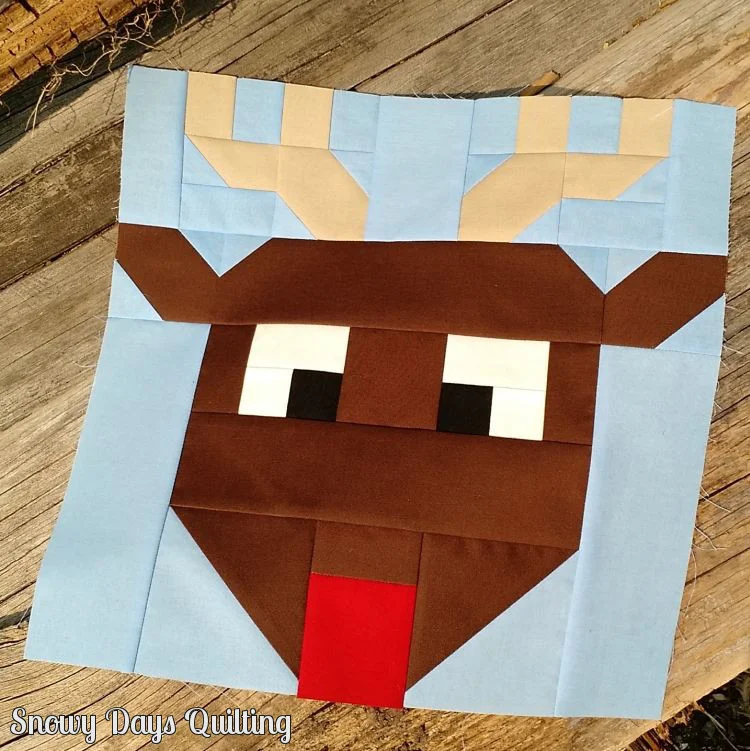
The Reindeer Block typically features a stylized reindeer face or full body, often using simple geometric shapes to construct ears, antlers, nose, and eyes. The charm lies in the simplicity of the design, making it beginner-friendly while still offering opportunities for creativity and detail.
You can make the Reindeer Block using traditional patchwork techniques. Common elements include half-square triangles, flying geese, and rectangles. These classic units come together to create a whimsical and balanced block that looks festive and fun.
Quilters often use neutral tones like browns, tans, and whites to represent the reindeer’s fur, but pops of red (for the nose) or green (for a festive bow) can add personality. The Reindeer Block is particularly adorable when combined with red and white candy stripe sashing or snowflake-themed backgrounds.
The finished size of a Reindeer Block can vary depending on your project. A 12.5″ square is a popular choice for quilts, but you can scale the design up or down to fit placemats, table runners, or even tree skirts.
One of the most enjoyable aspects of working with a Reindeer Block is experimenting with layout. By rotating or flipping the blocks, you can create interesting patterns, movement, or even reindeer “herds” that play across your fabric.
Because the block is built from basic shapes, it’s easy to modify the facial features. Adding buttons for eyes or stitching on a felt nose can elevate the block from simple patchwork to an adorable character that delights children and adults alike.
2. Materials and Tools for the Reindeer Block
Before you start your Reindeer Block, gather your essential quilting supplies. Good preparation ensures a smooth sewing experience and a polished final block.
You’ll need a selection of fabric in your chosen color palette. Cotton fabrics work best for piecing, especially when working with precise geometric shapes. Choose a medium brown for the reindeer’s face, cream or white for background areas, and a bold red for the nose if you’re creating a Rudolph-inspired look.
Cutting tools are crucial for accuracy. A rotary cutter, cutting mat, and quilting ruler will help ensure your fabric pieces are the correct size. Accurate cutting leads to neat seams and a professional-looking block.
Basic sewing supplies include pins, scissors, thread, and a reliable sewing machine. A quarter-inch presser foot is especially helpful in achieving the standard ¼” seam allowance used in quilt blocks like the Reindeer Block.
It’s also helpful to keep an iron and pressing mat nearby. Pressing your seams after every step keeps your block flat and helps the pieces fit together more easily. Pressing also gives your block a crisp, clean appearance.
Some quilters like to use fusible web or fabric glue for attaching details like noses or antlers, especially if you’re adding embellishments rather than piecing every element. This can save time and open creative possibilities.
Lastly, don’t forget a bit of patience and a playful mindset. The Reindeer Block is a lighthearted design, and it’s okay if every block has a little bit of personality. Embrace imperfections and enjoy the process.
3. Step-by-Step Assembly of the Reindeer Block
Start by cutting your fabric pieces according to the pattern measurements. Each section of the Reindeer Block corresponds to different parts of the reindeer, such as the face, ears, antlers, and background.
Begin with the center of the block, which is usually the reindeer’s face. Construct it using squares and rectangles, piecing them in rows and pressing the seams as you go. If you’re adding a red nose, now is a great time to attach it.
Next, assemble the antlers. These can be made with half-square triangles or more intricate piecing if you want a stylized look. Sew each side of the antlers and attach them to the top of the block, ensuring symmetry.
Create the background sections with contrasting fabric to make the reindeer stand out. Stitch the background units around the face and antlers, forming a square that completes the Reindeer Block.
Once the entire block is pieced, give it a final press. Trim it to the desired size, ensuring the edges are straight and the corners are square. A 12.5” x 12.5” unfinished size is common for quilt blocks.
Optional embellishments include eyes, bows, or holly leaves. You can sew on buttons, embroider little details, or even use fabric paint if you’re feeling adventurous. These extras make your Reindeer Block truly unique.
If you’re planning to make multiple blocks, repeat the process with different fabric combinations to create a lively, varied quilt. Each Reindeer Block can have a distinct personality!
4. Creative Projects Using the Reindeer Block
Now that you have your Reindeer Block, what can you do with it? There are so many fun and festive options to explore.
The most popular project is a holiday quilt. Combine multiple Reindeer Blocks with sashing and borders to create a cozy, seasonal masterpiece. Add snowflake or Christmas tree blocks for variety.
Another great idea is a table runner. Use three or five blocks in a row, bordered with a festive print, and quilted with swirls or stars. This is a quick project that makes a lovely gift or personal decoration.
For smaller gifts, turn a single Reindeer Block into a throw pillow. Add a border, back it with fabric, insert a cushion, and you have a charming accent for your holiday couch or bed.
Wall hangings are another wonderful use for this block. Hang one above the fireplace or in the entryway to greet guests with handmade cheer. Embroider your family name or a holiday greeting for a personal touch.
If you enjoy sewing bags or pouches, a Reindeer Block can be used as a panel on the front. This gives a basic tote or makeup bag a festive personality and makes it a perfect stocking stuffer.
You can even scale the design down and make a set of Reindeer Block coasters. Use small patchwork techniques, batting, and festive backing to create a coordinated holiday set.
FAQ – Frequently Asked Questions About the Reindeer Block
What size should I make a Reindeer Block?
A standard size is 12.5″ square (unfinished), which finishes at 12″ in a quilt. However, you can resize the block to suit different projects like placemats, pillows, or coasters.
Is the Reindeer Block suitable for beginners?
Yes! The block uses basic quilting techniques like half-square triangles and rectangles. Even beginners can enjoy making this block with a little patience and accurate piecing.
Can I personalize the Reindeer Block?
Absolutely. You can add eyes, a bow, a red nose, or even use novelty fabrics to give your reindeer unique charm. Personal touches make each block special.
How many Reindeer Blocks do I need for a quilt?
That depends on the quilt size. For a throw quilt, 12 to 20 blocks usually work well. Combine them with other holiday-themed blocks or sashing to complete your layout.
Do I need a pattern to make a Reindeer Block?
While following a pattern is helpful, experienced quilters can draft their own using graph paper and creativity. Many free and paid patterns are also available if you prefer guidance.
What fabrics work best for the Reindeer Block?
Cotton quilting fabric is ideal. Use medium to dark browns for the reindeer, white or cream for the background, and bright accents like red or green for festive details.
The Reindeer Block is a delightful way to bring holiday spirit into your quilting projects. Whether you’re crafting a cozy Christmas quilt, a festive pillow, or a whimsical table runner, this block adds warmth, creativity, and charm. Its beginner-friendly construction and potential for personalization make it a favorite for crafters of all levels.
Throughout this article, we explored the basics of the Reindeer Block, including design, materials, step-by-step instructions, and ideas for using it in creative ways. With over 1200 words of tips, techniques, and inspiration, you’re now ready to bring your own reindeer creation to life!
If you enjoyed this tutorial, we’d love to hear from you. Please leave a sincere comment with your thoughts, suggestions, or share how your Reindeer Block project turned out. Your feedback inspires future tutorials and helps our crafting community grow.


