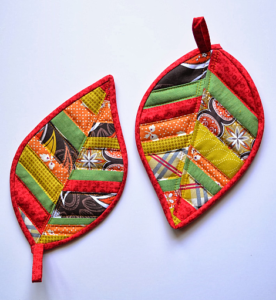
If you love sewing and enjoy practical, beautiful projects, you’ll be thrilled to know that Quilted Leaf Potholders Are So Easy to Make! These charming potholders not only brighten up your kitchen but also make thoughtful handmade gifts. Plus, they’re a fantastic way to use fabric scraps while practicing quilting techniques.
Whether you are a beginner or an experienced quilter, you’ll find that Quilted Leaf Potholders Are So Easy to Make! They are fun, quick, and require minimal materials. You can customize them with different fabrics, colors, and styles to match your kitchen decor or to celebrate the changing seasons.
In this step-by-step guide, we will walk you through the process of making these adorable leaf-shaped potholders. You’ll discover that Quilted Leaf Potholders Are So Easy to Make! once you learn the basics of cutting, quilting, and assembling them.
1. Materials Needed to Make Quilted Leaf Potholders
To get started, you’ll need just a few basic supplies. The great thing is that most of these items might already be in your sewing room.
First, select some cotton fabric for the front and back of the potholder. Cotton is heat-resistant and easy to work with.
Next, you’ll need batting. Use heat-resistant batting if you plan to use the potholder for handling hot pots and pans.
A marking pen or fabric chalk is essential for drawing the leaf pattern on your fabric before cutting.
Don’t forget your scissors or rotary cutter. These will help you cut out the fabric pieces cleanly and accurately.
A sewing machine is very helpful for assembling the potholder quickly, although it’s possible to sew it by hand if you prefer.
Lastly, prepare coordinating thread to match or contrast with your fabric. This will be used for both construction and quilting lines.
2. How to Cut the Fabric for Quilted Leaf Potholders
The first step is to create or find a simple leaf template. You can draw a leaf shape on paper or cardstock that fits the size you desire.
Fold your fabric in half and place the leaf template on top. Trace around the template using your marking pen or chalk.
Cut out two leaf shapes from your fabric—one for the front and one for the back of the potholder.
Next, cut a piece of batting using the same leaf template. This will be sandwiched between the front and back fabric layers.
If you want to add extra thickness, you can cut two layers of batting for better heat resistance.
Make sure to also cut a small rectangle of fabric to create a hanging loop, typically around 2 inches by 5 inches.
Once all pieces are cut, double-check that they align perfectly. This ensures a clean finish when you sew them together.
3. Simple Quilting Techniques for Leaf Potholders
Now comes the fun part: quilting! This is where you’ll see how Quilted Leaf Potholders Are So Easy to Make!
Start by creating a quilt sandwich with the front fabric on top, batting in the middle, and the back fabric on the bottom.
Pin or clip the layers together to prevent shifting while sewing.
Using your sewing machine, sew veins on the leaf by starting from the stem area and working out toward the edges. This reinforces the shape beautifully.
You can choose straight lines for a simple look or add curved lines for a more realistic leaf effect.
If you feel adventurous, try free-motion quilting to add swirls, waves, or other creative patterns.
Quilting not only adds texture and beauty but also keeps the layers securely held together, improving durability.
4. Assembling Your Quilted Leaf Potholders
Once your quilting is done, it’s time to assemble the potholder. This is another step where you’ll notice how Quilted Leaf Potholders Are So Easy to Make!
First, fold your small fabric rectangle in half lengthwise, then fold the raw edges toward the center. Stitch along the edge to create the hanging loop.
Position the loop at the top or side of the leaf, with the raw edges facing outward. Secure it with a pin.
Place the quilted leaf front and back pieces right sides together, with the loop sandwiched in between.
Sew around the leaf shape using a 1/4 inch seam allowance. Leave a 2-inch gap for turning the potholder right side out.
Carefully trim the seam allowances, especially around curves, to reduce bulk.
Turn the potholder right side out through the gap. Use a pointed tool to push out the edges for a crisp shape.
Press the potholder flat with an iron, then topstitch around the entire edge to close the opening and give a finished look.
5. Creative Variations for Quilted Leaf Potholders
There are so many ways to personalize this project! That’s another reason why Quilted Leaf Potholders Are So Easy to Make!
Try using autumn-themed fabrics like deep reds, oranges, yellows, and browns to create a fall-inspired potholder.
You can also choose bright greens to mimic spring leaves, or even batik fabrics for a more artistic appearance.
Add decorative stitching around the edges for an extra pop of color and texture.
If you enjoy embroidery, stitch initials, small flowers, or fun messages onto the front before assembling the potholder.
For a farmhouse-style kitchen, use gingham, linen, or ticking stripe fabrics to achieve a rustic look.
Experiment with leaf shapes beyond the typical maple—consider oak, ginkgo, or tropical leaves for variety.
6. Why Quilted Leaf Potholders Make Perfect Gifts
It’s easy to see why Quilted Leaf Potholders Are So Easy to Make! and why they make wonderful gifts for friends and family.
They are quick to sew, allowing you to make several in just a few hours.
Handmade gifts like these show care and thoughtfulness, especially when customized to the recipient’s favorite colors or kitchen style.
They are lightweight and easy to ship, making them great for sending to loved ones far away.
Pair them with matching kitchen towels, aprons, or even a jar of homemade jam for a thoughtful gift set.
You can also sell them at craft fairs, online shops, or local markets because they are practical and always in demand.
Plus, you’re reducing waste by using fabric scraps, which adds an eco-friendly element to your gift.
FAQ – Quilted Leaf Potholders Are So Easy to Make!
1. Do I need special fabric for quilted leaf potholders?
No, regular 100% cotton fabric works perfectly. It’s heat-resistant and widely available.
2. Is it necessary to use heat-resistant batting?
Yes, if you plan to use the potholder with hot pots or pans, heat-resistant batting like Insul-Bright is recommended for safety.
3. Can beginners really make quilted leaf potholders easily?
Absolutely! Quilted Leaf Potholders Are So Easy to Make! This is an ideal beginner sewing project with simple steps.
4. How big should I make the leaf potholder?
A typical size is around 8 to 10 inches tall, but you can adjust based on your needs or template.
5. Can I wash quilted leaf potholders in the machine?
Yes, they are machine washable. Use gentle cycles with cold water and air dry or tumble dry on low.
6. Can I add extra layers for more thickness?
Definitely! Adding an extra batting layer will provide better heat protection and make the potholder feel sturdier.
As you can see, Quilted Leaf Potholders Are So Easy to Make! This project is not only fun but also practical, sustainable, and perfect for gift-giving. You’ve learned how to choose materials, cut the fabric, quilt the design, assemble the potholder, and even personalize it with your own creative touches.
If you try this project, I’d love to hear your thoughts! Please share your experience, leave a sincere opinion, or suggest other patterns you’d like to learn about. Your feedback is very important and helps keep this creative community thriving!


