If you’re looking for a delightful and beginner-friendly quilting project, the Puzzle Mug Rug Pattern might be just what you need. Right from the first stitch, this project offers a creative twist on traditional quilting with a functional result: a small, practical mat perfect for holding your mug and snack. This fun and engaging sewing pattern combines charm, utility, and an opportunity to use your favorite fabric scraps.
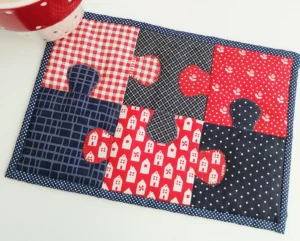
A Puzzle Mug Rug Pattern is exactly what it sounds like—a quilted mug rug that mimics the interlocking style of puzzle pieces. It’s a great option for quilters who want to try something new without committing to a full-size quilt. The finished mug rug is typically small, making it a perfect weekend project or handmade gift idea. You can personalize each one with unique fabrics, creating designs that are both playful and meaningful.
This article will guide you through the steps of making your own Puzzle Mug Rug Pattern, from choosing your fabrics to finishing the binding. Whether you’re an experienced quilter or just getting started, this project offers a satisfying balance of creativity and simplicity.
1. Choosing the Right Materials for Your Puzzle Mug Rug Pattern
Before you start stitching, gathering the right materials is essential for a successful Puzzle Mug Rug Pattern. Since mug rugs are small, you won’t need a lot of supplies, and it’s a great way to use up those treasured fabric scraps you’ve been saving.
First, select a mix of colorful, high-contrast cotton fabrics. These will help emphasize the puzzle effect and give your mug rug visual interest. Try combining solids, florals, or geometric prints for a lively look.
Next, you’ll need batting. A thin cotton batting works best for a mug rug. It adds just enough cushioning without being too bulky. Batting also helps insulate heat, making the rug perfect for holding hot mugs safely.
For backing fabric, choose something smooth and durable. You can use one of your front fabrics to coordinate or pick a complementary print to add a surprise on the flip side.
You’ll also need sharp fabric scissors or a rotary cutter, thread that coordinates with your fabric, and a sewing machine with a walking foot if available. This foot helps evenly feed all fabric layers, preventing bunching.
A quilting ruler and fabric-safe marking tool will help you create precise puzzle-piece shapes. If you don’t want to design your own puzzle shapes, you can draw inspiration from classic jigsaw outlines for consistency.
Finally, keep pins or fabric clips handy. They’re helpful for holding layers together, especially when aligning curved puzzle edges during assembly.
2. Cutting and Assembling Puzzle Pieces
Once you have your materials ready, it’s time to cut and assemble the puzzle pieces. This is the most creative and fun part of working with a Puzzle Mug Rug Pattern, as you can experiment with shapes and color placement.
Start by sketching your puzzle template on cardstock or paperboard. Keep it simple—around four to six pieces is perfect for a mug rug. The shapes should fit together like traditional jigsaw puzzle pieces, with rounded knobs and slots.
Trace the shapes onto the back of your fabric pieces using a marking tool. Be sure to leave at least a ¼-inch seam allowance around each piece for sewing. It’s also helpful to number the pieces on the back to keep track of their order during assembly.
Carefully cut out the pieces, keeping your curves smooth and consistent. Accuracy is key here so that the pieces align properly when sewn together.
Next, begin piecing them together two at a time. Place right sides together, aligning the curved edges, and sew slowly using a small stitch length. It may help to clip the curves slightly or use pins for better control.
Press each seam open as you go. This keeps the project flat and tidy, which is important for such a small quilting piece.
Continue joining pieces until the full puzzle is assembled. You’ll see the pattern come together like magic, and each unique fabric adds character to your Puzzle Mug Rug Pattern.
3. Quilting and Binding Your Puzzle Mug Rug
With the top completed, it’s time to quilt and bind your Puzzle Mug Rug Pattern. This final step brings everything together and adds durability and visual appeal.
Layer your project: backing fabric right side down, batting in the middle, and the puzzle top right side up. Smooth out any wrinkles and use fabric clips or pins to secure the sandwich.
You can quilt by hand or machine, depending on your preference. For beginners, straight-line machine quilting is easy and effective. Quilt along the puzzle seams or try echo quilting inside each puzzle shape for a whimsical effect.
Use thread that blends or contrasts with your fabric, depending on whether you want the quilting to stand out or disappear. A walking foot is especially helpful here to prevent shifting between the layers.
Once the quilting is finished, trim the edges of your mug rug, squaring it up as needed. This is a good time to check that all seams are secure and the shape is tidy.
Now it’s time to bind. Choose a binding fabric that complements your puzzle top. Cut 2½-inch wide strips, fold in half lengthwise, and sew it around the edges using a ¼-inch seam.
Fold the binding over to the back and either hand-stitch it in place for a clean finish or machine-sew it for durability. Take your time here—clean binding gives a professional look.
With the binding secure, give your mug rug a final press. Congratulations! You’ve completed a cheerful and practical Puzzle Mug Rug Pattern project.
4. Ideas for Personalizing and Gifting Puzzle Mug Rugs
One of the best things about the Puzzle Mug Rug Pattern is how easy it is to personalize. You can create meaningful and one-of-a-kind pieces for friends, family, or even for seasonal decor.
For gifts, consider using themed fabrics. Holiday prints make festive mug rugs for Christmas, Halloween, or Valentine’s Day. You could even create a set of four matching puzzle mug rugs as a thoughtful housewarming present.
If you’re sewing for kids, use playful, colorful fabrics featuring animals, cartoons, or favorite colors. The puzzle shape makes the mug rug feel like a toy as well as a practical item.
Add a monogram or embroidery to one of the puzzle pieces for an extra-special touch. A single letter, a short word like “Love” or “Tea,” or a simple heart adds a sweet, personalized flair.
You can also incorporate different textures. Use linen, denim, or corduroy in combination with cotton to add variety and tactile appeal to your Puzzle Mug Rug Pattern.
For home use, make a set that complements your kitchen decor. Choose fabrics in your kitchen’s color palette and use matching binding for a cohesive look.
Finally, you can turn your puzzle mug rug into a fun kids’ project. Let children help choose fabrics or even draw their own puzzle shape to use as a template. It’s a fantastic bonding activity and a great way to introduce sewing to young ones.
Frequently Asked Questions
What is a mug rug used for?
A mug rug is a small quilted mat used to hold a cup or mug and a snack. It’s larger than a coaster but smaller than a placemat and protects surfaces from heat and spills.
How big should a puzzle mug rug be?
A typical Puzzle Mug Rug Pattern is around 6 x 9 inches, but the size can vary depending on your puzzle design. Just make sure it’s large enough to hold a mug and a cookie or two.
Is this project suitable for beginners?
Yes! While sewing curves takes a bit of patience, the overall project is small and manageable. It’s a fun way for beginners to practice piecing, quilting, and binding skills.
Can I hand-sew a puzzle mug rug instead of using a machine?
Absolutely. Hand-sewing takes more time, especially on the curves, but it’s doable and can result in a very charming, handmade finish.
What kind of fabric works best for puzzle mug rugs?
100% quilting cotton is the best choice because it’s easy to work with, comes in a wide range of colors and prints, and washes well. You can also mix in other types for texture.
How can I make my puzzle pieces more precise?
Use a sturdy paper template and trace carefully. When cutting fabric, use sharp scissors or a rotary cutter, and make sure your seam allowance is consistent throughout.
Creating a Puzzle Mug Rug Pattern is a rewarding, fun, and creative quilting project. It allows you to experiment with fabric combinations, improve your sewing skills, and end up with a functional item you can use or gift. From cutting your puzzle pieces to quilting and binding, each step brings joy and satisfaction.
If you’ve enjoyed this tutorial, we’d love to hear from you! Please share your honest thoughts and feel free to leave suggestions or ideas for future tutorials. Your feedback inspires us to keep creating new and exciting sewing patterns just for you.


