Looking for a festive spring project? New Pattern: Hippity Hoppity Easter Mini Quilt – PatternTutorial is the perfect DIY quilting idea to brighten your home during the Easter season. Whether you’re a beginner quilter or someone with more experience, this cheerful mini quilt adds a whimsical touch of Easter charm to any room.
This New Pattern: Hippity Hoppity Easter Mini Quilt – PatternTutorial focuses on ease, color, and creativity. You’ll use simple techniques and playful Easter-themed fabrics to create something adorable and lasting. Even if you’re not a quilting expert, this project is entirely approachable, and it results in a finished mini quilt that’s both decorative and functional.
In this article, we’ll walk you through everything you need to know about this delightful mini quilt. From essential materials to step-by-step guidance and design ideas, we’ve got it covered. Follow along, and let’s make something special this Easter!

1. Gathering Your Supplies and Planning the Design
Before you begin creating your New Pattern: Hippity Hoppity Easter Mini Quilt – PatternTutorial, the first step is to gather all your necessary materials and decide on your layout. This part is essential to ensure a smooth and enjoyable quilting experience.
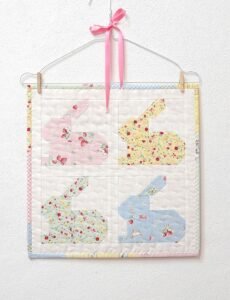
Start with your fabric selection. Look for pastel prints, bunnies, eggs, chicks, or florals that scream Easter. Choose a mix of patterns and solids for visual interest. The fabric is the soul of this quilt, so take time finding the perfect combination.
You’ll also need batting, backing fabric, coordinating thread, pins, and basic sewing tools. Using high-quality materials will ensure that your mini quilt lasts for many seasons. A rotary cutter and quilting ruler are extremely helpful for achieving straight, clean cuts.
Sketch your layout or use a printable Easter quilt block template. Mini quilts are great for practicing creativity in smaller spaces, so don’t be afraid to try something bold with your color palette or layout. This pattern invites fun experimentation.
Measure your fabric pieces according to the design you’ve chosen. Standard mini quilts range from 12″x12″ to 24″x24″, but you can scale it to fit your space. Be sure to pre-wash your fabrics to avoid shrinkage later.
Keep a checklist of supplies handy throughout the process. Staying organized saves time and reduces stress. Don’t rush—take time to enjoy planning this fun, seasonal project.
Lastly, make sure to label and organize your cut fabric pieces. This will help streamline your sewing process, keeping everything neat and tidy as you move into the construction phase.
2. Piecing Together the Quilt Top
Now that your supplies are prepped and your design is in place, it’s time to start piecing your New Pattern: Hippity Hoppity Easter Mini Quilt – PatternTutorial. This step transforms your vision into a patchwork of spring joy.
Begin by sewing smaller blocks together. If you’re working with bunny or egg appliqués, attach them to their blocks before joining them with others. Take care with seam allowances; accurate sewing ensures that the blocks line up perfectly.
Use a consistent ¼” seam throughout. Press seams flat with an iron as you go, either to one side or open depending on your preference. This keeps your quilt top smooth and professional-looking.
Continue assembling row by row. If your design includes sashing or borders, now’s the time to sew them in. Add these between the rows to create breathing space and enhance the final appearance.
As your quilt top comes together, step back and review your work. Make sure everything aligns properly and no blocks are upside down. Mistakes are easy to fix now but harder once the quilting begins.
If you’d like to add some dimension, consider embroidery or additional small appliqués on top of your blocks. These details can elevate your mini quilt to a charming decorative piece.
Finally, give your quilt top a good press with steam and flatten it carefully. This makes basting and quilting easier, and it gives you a sense of pride seeing your work come to life.
3. Quilting and Binding the Mini Quilt
The next step in the New Pattern: Hippity Hoppity Easter Mini Quilt – PatternTutorial is quilting your layers together and binding the edges. This process adds texture and finishes your mini quilt beautifully.
Create your quilt sandwich by layering the quilt top, batting, and backing fabric. Make sure each layer is smooth, flat, and aligned. Use quilting spray, basting pins, or hand-stitching to secure the layers together.
Choose your quilting design. You might go for simple diagonal lines, free-motion quilting, or a playful pattern like Easter eggs or hopping bunnies. Keep your stitching consistent for the best visual effect.
Quilt slowly and carefully, checking tension and stitch length as you go. This is where your quilt gains structure and texture, so enjoy watching your pattern pop with each line of stitching.
After quilting, trim the edges evenly to prepare for binding. Make sure all layers are aligned and smooth. Clean edges make binding much easier.
Cut binding strips from your chosen fabric. Double-fold bias tape works well, or you can make your own strips. Attach the binding to the front using your machine, then fold it over and hand-stitch it to the back for a neat finish.
Give the entire mini quilt a final press. The result should be crisp, colorful, and utterly delightful—a perfect reflection of Easter joy!
4. Display Ideas and Personalization Tips
Your New Pattern: Hippity Hoppity Easter Mini Quilt – PatternTutorial is complete! Now it’s time to think about how to display it and personalize it further. This quilt isn’t just for sewing—it’s for showing off!
One great display idea is to use it as a wall hanging in your living room, kitchen, or entryway. Use a wooden dowel or a small quilt hanger to showcase it as festive decor throughout the Easter season.
You could also use your mini quilt as a table topper or centerpiece mat. Add a vase of tulips or a basket of eggs on top, and you’ve got instant holiday vibes.
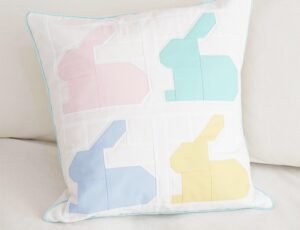
Make it into a pillow cover if you’re feeling adventurous. Sew a backing and add a zipper to transform your mini quilt into functional decor with a cozy touch.
Personalize your quilt with embroidered names, dates, or messages. This is especially meaningful if you’re giving it as a gift or making it a family keepsake.
If you’re crafty with Cricut or other vinyl-cutting tools, consider adding iron-on vinyl designs. Gold bunnies, glitter eggs, or sweet Easter phrases can take your quilt from cute to unforgettable.
Finally, don’t forget to share your finished piece on social media or in quilting communities. Inspire others and enjoy the satisfaction of spreading Easter cheer through your handmade creation.
New Pattern: Hippity Hoppity Easter Mini Quilt – PatternTutorial
Q: Is this pattern suitable for beginners?
A: Yes! The New Pattern: Hippity Hoppity Easter Mini Quilt – PatternTutorial is designed to be beginner-friendly with clear steps and easy techniques.
Q: How long does it take to complete this mini quilt?
A: Most crafters can finish it in a weekend or over a few evenings, depending on how much time you spend quilting and embellishing.
Q: Can I resize this mini quilt into a larger wall hanging or table runner?
A: Absolutely. You can scale the blocks or repeat the design to make it fit your desired space.
Q: What fabrics work best for this project?
A: Cotton quilting fabric in pastels or Easter prints works best. Look for soft colors and playful prints to match the holiday vibe.
Q: Is special equipment required?
A: No special tools are needed beyond standard sewing supplies, but a rotary cutter, quilting ruler, and walking foot can help with precision.
Q: Can I machine wash the finished quilt?
A: Yes, use a gentle cycle with cold water. Be sure all your fabrics are pre-washed to prevent shrinking or color bleeding.
We hope you loved exploring the New Pattern: Hippity Hoppity Easter Mini Quilt – PatternTutorial in this step-by-step guide. From fabric selection to finishing touches, we’ve walked through how to create a joyful Easter-themed mini quilt that’s perfect for home decor or gifting. Quilting is not just about stitching—it’s about expressing joy and creativity.
Did you enjoy this tutorial? Let us know your thoughts! We’d love to hear your feedback, see your finished creations, and receive your ideas for future patterns. Happy quilting and Happy Easter!


