If you’re looking to add a touch of whimsy and charm to your next quilting project, this Ladybird Quilt Block Pattern – Free Tutorial is exactly what you need. This delightful pattern features the beloved ladybird (or ladybug), making it a perfect fit for spring and summer quilts, children’s bedding, or even decorative wall hangings. Whether you’re an experienced quilter or just starting your sewing journey, this free tutorial is designed to walk you through each step in a simple, humanized way.
The Ladybird Quilt Block Pattern is not only cute and visually striking, but it’s also a fantastic opportunity to practice fundamental quilting techniques like piecing, appliqué, and color matching. This pattern combines playful design elements with structured geometric layouts, resulting in a finished block that feels both modern and classic. And best of all—it’s absolutely free, making it accessible for all skill levels and budgets.
As a quilter, finding free tutorials that offer high-quality instructions and stylish patterns can be a challenge. That’s why this guide is created to be comprehensive, easy to follow, and optimized to help your content rank well in search engines. From fabric choices to final stitches, every detail is here to help you succeed. Let’s dive into this creative adventure and stitch your very own Ladybird Quilt Block today.
1. Materials and Tools You’ll Need
Before beginning your Ladybird Quilt Block Pattern – Free Tutorial, it’s essential to gather the right materials and tools. This ensures a smooth sewing process and a beautiful final result.
Start with selecting quality fabrics. For the ladybird’s body, opt for a vibrant red fabric with small black or white dots. Black fabric will be used for the head and dots, and white or light pastel shades make a great background to highlight the ladybird.
You’ll need basic quilting tools such as rotary cutters, quilting rulers, a cutting mat, and an iron. Make sure your sewing machine is in good working order and threaded correctly with high-quality cotton thread.
Fusible web or fabric glue is useful for appliqué parts of the design. These allow you to temporarily fix the pieces in place before stitching, which increases precision and keeps the shapes stable.
Don’t forget pins or fabric clips to hold your pieces together while sewing. A small, sharp pair of scissors is great for snipping threads and trimming detailed shapes around the ladybird’s body.
Lastly, having a clear workspace, proper lighting, and a printed or digital copy of this Ladybird Quilt Block Pattern – Free Tutorial will set you up for success. Organization is key, especially when working with detailed patterns.
Now that your materials are ready, let’s start crafting your adorable ladybird block!
2. Step-by-Step Instructions for the Ladybird Quilt Block
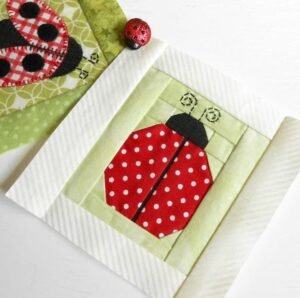
Following this Ladybird Quilt Block Pattern – Free Tutorial, you’ll create a finished 12” x 12” quilt block (or any size you prefer) that can be used alone or combined into a larger quilt.
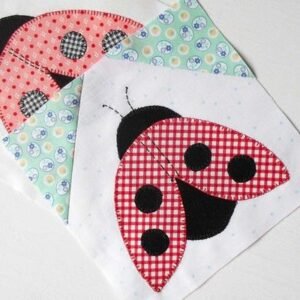
Begin by cutting out your fabric pieces. You’ll need one red semi-circle for the ladybird’s body, two black triangles for the wings, one black circle or oval for the head, and small circles for the spots. Background fabric should be cut into squares or rectangles, depending on your desired block size.
Next, arrange the red body piece onto the center of your background fabric. Use a fusible web to attach it temporarily. Then place the head at the top and the black triangles along the sides to simulate the wings.
Position the black spots over the red body. You can use a template for evenly sized circles or get creative with different sizes to add character.
Use a small zigzag stitch or blanket stitch to appliqué each piece onto the background. Be sure to backstitch at the beginning and end to secure your work.
Once your appliqué is complete, press the block with a warm iron to flatten any puckering. Make sure all your seams are smooth and clean for a polished finish.
Repeat the process for additional blocks if you’re creating a full quilt. Each block can feature a different color scheme or layout for added visual interest.
3. Tips for Customizing Your Ladybird Quilt Block
This Ladybird Quilt Block Pattern – Free Tutorial is flexible and encourages creativity. Whether you’re making a baby quilt or a decorative wall hanging, personalization makes your project stand out.
Change up the color palette to match seasonal themes. Try orange and black for a Halloween twist or pastel shades for spring. You can even swap the ladybird’s body color to create a fantasy insect.
Add embroidery details like little antennae, eyes, or even a stitched smile for extra charm. Hand embroidery adds a unique touch that brings personality to each block.
Use textured fabrics like corduroy, velvet, or linen to give depth and variety. Mixing textures is a great way to create visual interest, especially if the block is being used as a centerpiece.
Experiment with different background fabrics. Instead of plain white, try floral prints, polka dots, or soft gradients to make the ladybird pop.
If you want to add dimension, consider using batting or interfacing behind the ladybird shapes to create a slightly raised, 3D effect.
Incorporate borders, sashing, or other quilt blocks around the ladybird design to expand it into a full quilt or integrate it into a sampler quilt layout.
4. Finishing Touches and Assembly Tips
Once your ladybird blocks are complete, it’s time to think about how they’ll come together into a cohesive piece. This part of the Ladybird Quilt Block Pattern – Free Tutorial focuses on assembly and finishing techniques.
Lay out your blocks in a grid to determine the final arrangement. Consider alternating the orientation or background colors for variety and visual balance.
Use sashing (strips of fabric between blocks) to give each ladybird space to shine. Sashing also helps correct minor sizing inconsistencies between blocks.
Add borders around the entire quilt top to frame your design. Choose a fabric that complements your ladybird colors or go bold with a contrasting pattern.
Once your top is complete, create a quilt sandwich with your backing fabric and batting. Baste the layers together using pins, spray adhesive, or thread basting, depending on your preference.
Quilt your piece using straight lines, free-motion quilting, or echo quilting around the ladybird shapes. This not only adds texture but also secures the layers together.
Finish with a binding of your choice. You can match the binding to the background fabric or pick a bold color to frame the quilt. Don’t forget to label your quilt with your name and date!
Ladybird Quilt Block Pattern
1. Can I resize the Ladybird Quilt Block Pattern?
Yes, you can easily scale the pattern up or down depending on your project. Just adjust your fabric cuts accordingly and be mindful of proportions.
2. Is this pattern beginner-friendly?
Absolutely! The Ladybird Quilt Block Pattern – Free Tutorial is designed with clear steps suitable for beginners, especially those learning appliqué techniques.
3. What’s the best fabric for making the ladybird?
Cotton is ideal for beginners due to its ease of use. However, you can experiment with velvet, linen, or flannel for different textures.
4. Can I use hand-stitching instead of a sewing machine?
Yes, hand-stitching is a great option for those who prefer a slower, more meditative process. Use a small whipstitch or blanket stitch for appliqué.
5. How do I prevent my fabric from fraying?
Using fusible webbing helps reduce fraying. Also, choosing tightly woven fabrics and using a zigzag stitch along raw edges can help.
6. What are some other ideas to use the Ladybird block for?
Aside from quilts, this block works beautifully in tote bags, pillow covers, kids’ clothes, or framed fabric art pieces.
The Ladybird Quilt Block Pattern – Free Tutorial offers an enjoyable and creative way to bring the joy of quilting to your home. Whether you’re a seasoned quilter or just beginning, this fun and customizable block allows you to explore color, texture, and design in a meaningful way. We’ve covered everything from materials and tools to stitching techniques, customization tips, and assembly advice—all designed to help you succeed.
We hope you’ve found this tutorial helpful and inspiring! If you’ve tried this pattern, feel free to share your experience in the comments below. Let us know what you loved, what challenges you faced, and how you added your personal touch. Suggestions for future tutorials are always welcome—we love hearing from our creative community!


