If you’re a sewing enthusiast looking for a fun and practical project, this Kitty Pouch FREE sewing pattern is just what you need! This beginner-friendly tutorial guides you through creating an irresistibly cute cat-shaped pouch that is perfect for storing small items, organizing your purse, or gifting to a fellow cat lover. Whether you sew for fun, gifts, or even to sell handmade items, this Kitty Pouch FREE sewing pattern adds a playful charm to your creations.
The beauty of the Kitty Pouch FREE sewing pattern lies in its simplicity and charm. You don’t need advanced sewing skills or expensive materials. A few fabric scraps, a zipper, and some basic sewing tools are all it takes to bring this cheerful little pouch to life. It’s a delightful way to use up leftover fabric and try out new combinations of colors and textures.
Throughout this article, we’ll walk you step-by-step through the process of making this pouch using the Kitty Pouch FREE sewing pattern. From selecting materials to finishing touches, every step is detailed in a way that’s easy to follow, even if you’re a beginner. Let’s dive into the world of cute and functional sewing projects!
1. Materials and Tools You Will Need
Before starting your Kitty Pouch FREE sewing pattern, gather all the necessary supplies to ensure a smooth crafting process. Having everything ready will help you stay focused and enjoy each step of the creation.
Start with choosing your fabric. Cotton works best for beginners because it’s easy to sew and holds shape well. For a more professional finish, you can use interfacing to give your kitty pouch more structure. Consider using contrasting colors for the outer fabric and lining to make the interior pop.
You’ll also need a zipper, typically around 7 inches long. This will form the opening of the pouch. If you prefer a different size, you can adjust the pattern accordingly to match your zipper length. Don’t forget to gather scissors, pins or clips, a fabric marker, and a sewing machine.
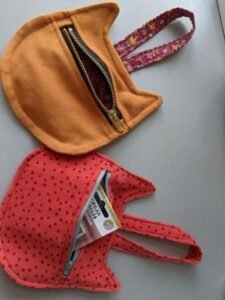
To create the iconic cat shape, the Kitty Pouch FREE sewing pattern includes templates for ears and rounded edges. Print the pattern at 100% scale and cut it out accurately. These features are what make the pouch look unique and charming.
Optional embellishments such as felt pieces, embroidery thread, or safety eyes can be added to create a cat face on the front of the pouch. This extra detail makes the pouch even more special and personalized.
Finally, a good ironing session after sewing will help your pouch look neat and crisp. Keep an iron nearby and press your seams as you go. It makes a big difference in the final look of your Kitty Pouch FREE sewing pattern project.
2. Cutting and Preparing the Fabric
Now that your materials are ready, it’s time to cut your fabric based on the Kitty Pouch FREE sewing pattern templates. Accurate cutting is essential for clean lines and a well-shaped pouch.
Lay out your fabric on a flat surface and place the pattern pieces over it. Secure them with pins or weights, then carefully cut around each shape. You’ll need two pieces for the outer fabric, two for the lining, and two pieces of interfacing if you’re using it.
Iron the interfacing to the wrong side of the outer fabric pieces. This step helps add stability and makes the pouch more durable. Make sure the adhesive side is facing the fabric and follow the iron’s temperature guidelines for the best results.
Next, mark the position of the zipper on the top edge of the pouch pieces. This helps ensure that your zipper is perfectly aligned during sewing. Mark the spot where the ears will be placed if you’re attaching them between the layers.
If you plan to add a cat face to your pouch, now is the time. Use a washable fabric pen to draw a simple face, or stitch it directly onto one of the outer pieces. This can include eyes, whiskers, and a cute little nose.
Attach the ears by placing them right side down on the top edge of the outer fabric. Baste them in place with a long stitch to prevent shifting during assembly. Ears can be made from felt or fabric and stuffed lightly for a 3D effect.
3. Assembling the Kitty Pouch
With the pieces prepped, it’s time to assemble your Kitty Pouch FREE sewing pattern. Sewing it together is fun and satisfying as your project begins to take shape.
Start by attaching the zipper. Place one outer piece right side up, then align the zipper face down along the top edge. Add the lining piece on top, right side down. Pin or clip the layers and sew them together with a zipper foot.
Flip the pieces right side out and press the fabric away from the zipper. Topstitch along the edge for a clean, finished look. Repeat this process with the other side of the zipper and the remaining outer and lining pieces.
Now you’ll have something that resembles a fabric sandwich, with the zipper in the center. Open the zipper halfway—this is crucial for turning the pouch later. Match the outer fabric pieces right sides together and the lining pieces together.
Sew all the way around the edges, leaving a 2-3 inch opening in the lining for turning. Take your time when sewing around the curved corners and make sure the ears stay in place if you’ve included them.
Trim the seam allowance and clip the curves carefully. This helps the pouch turn out smoothly without bulky corners. Be careful not to cut through your stitching, especially around the zipper.
Turn the pouch right side out through the opening in the lining. Push out the corners and shape the pouch. Once satisfied, sew the opening in the lining closed with a small hand stitch or by machine.
4. Finishing Touches and Customization
Congratulations, your Kitty Pouch FREE sewing pattern project is nearly complete! Now it’s time to add those final touches that make your pouch truly special and personal.
Give the entire pouch a good press with the iron to smooth out wrinkles and set the shape. Be careful around the zipper and any embellishments. This step gives your pouch a professional finish.
Consider adding a wrist strap or loop to one side of the pouch for easy carrying. Simply sew a fabric loop into the side seam before assembling the pouch, or add a keyring through a small tab sewn on afterward.
For a more decorative pouch, embellish the front with embroidery, fabric paint, or heat-transfer vinyl. You can even add a name or initial to make it a personalized gift.
Experiment with different fabrics to suit various themes. Use floral prints, denim, corduroy, or even faux leather for unique textures. Each version will look slightly different, making this pattern endlessly fun to revisit.
If you plan to gift or sell these pouches, consider packaging them with a ribbon or inside a gift bag. Handmade items always feel more special when they’re presented with care.
Lastly, share your finished project with other makers! Posting your Kitty Pouch FREE sewing pattern creations on social media or crafting groups can inspire others and spark creative conversations.
FAQ – Kitty Pouch FREE Sewing Pattern
What size is the finished Kitty Pouch?
The finished size typically measures around 6.5 x 5 inches, but you can easily scale the pattern up or down depending on your needs.
Is this Kitty Pouch pattern suitable for beginners?
Yes! The Kitty Pouch FREE sewing pattern is designed with beginners in mind. It uses basic stitches and a simple zipper technique, making it a great practice project.
Can I use fabric scraps for this project?
Absolutely. This pouch is perfect for using up scraps from previous sewing projects. It’s small and only requires minimal fabric pieces.
Do I need a sewing machine to make the Kitty Pouch?
While a sewing machine makes the process faster and neater, you can hand-sew this pouch if needed. Use strong backstitches and be patient—it’s worth the effort!
Can I sell pouches made from this free pattern?
Yes, you can sell handmade pouches created from this pattern, as long as you’re not selling the pattern itself. Always credit the source and add your personal touches.
How do I clean the finished pouch?
If made with cotton fabric, the pouch can be gently hand-washed or machine-washed on a delicate cycle. Be cautious with any decorative elements and air dry flat.
The Kitty Pouch FREE sewing pattern is a fun, functional, and beginner-friendly project that lets you express your creativity while making something practical. From selecting fabrics to adding the final stitch, every part of this process brings joy and satisfaction. Whether you’re making it for yourself, a loved one, or as a charming item to sell, this pattern is sure to become a favorite in your collection.
We hope this step-by-step tutorial inspired you to try this adorable pouch. If you’ve enjoyed this sewing project or have suggestions for future tutorials, please leave a sincere opinion and your creative ideas in the comments. We’d love to hear how your Kitty Pouch FREE sewing pattern turned out!


