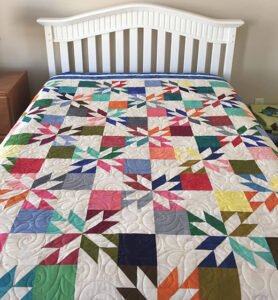
The Hunter’s Star Quilt is one of the most beloved and timeless patterns in the quilting world. Known for its striking star design that appears woven into the fabric, this pattern has captivated generations of quilters. Whether you are a beginner looking for a challenge or an experienced quilter wanting to create a classic masterpiece, the Hunter’s Star Quilt offers the perfect combination of tradition and beauty.
In this detailed guide, you’ll learn how to create your very own Hunter’s Star Quilt. From understanding the pattern to cutting, assembling, and finishing, this tutorial will walk you step by step through the process. You’ll also discover valuable tips and tricks to help you succeed in your quilting journey.
Using the Hunter’s Star Quilt pattern isn’t just about sewing fabric; it’s about telling a story through color, shape, and creativity. Let’s dive into the details and uncover how to bring this stunning quilt to life in your own unique way.
1. Understanding the Hunter’s Star Quilt Pattern
The first step in creating a Hunter’s Star Quilt is understanding the structure of the design. This quilt consists of star shapes that are formed by combining diamonds and triangles. While the pattern may look complex at first glance, it actually breaks down into manageable units.
The Hunter’s Star Quilt is traditionally created using two contrasting fabrics. This high contrast is essential for highlighting the star effect and ensuring that the design pops visually. You can choose light and dark tones, complementary colors, or even mix solids with prints.
One key feature of the Hunter’s Star Quilt is the illusion it creates. The stars seem to float or interlock depending on how you arrange your blocks. This versatility makes it an exciting project for quilters who love playing with layouts.
When planning your quilt, consider the size. The Hunter’s Star Quilt can be scaled to make anything from a wall hanging to a king-size bed quilt. The block size will determine how large your overall quilt will be.
Many modern quilters now use strip piecing and specialty rulers to simplify the process of creating the Hunter’s Star Quilt. These tools eliminate the need for tricky Y-seams and make the pattern much more beginner-friendly.
Lastly, choose quality fabrics and thread. Since the Hunter’s Star Quilt relies heavily on contrast, investing in fabrics that won’t bleed or fade will ensure your quilt looks beautiful for years to come.
2. How to Cut and Prepare Your Fabric
Proper preparation is the key to a successful Hunter’s Star Quilt project. Start by selecting two fabrics with high contrast. Solid colors work wonderfully, but bold prints can also add dimension and interest.
Begin by starching your fabrics. This step is optional but highly recommended because it adds body to the fabric, making precise cutting easier. The crispness from starch will help prevent stretching when working with bias edges.
Cutting for the Hunter’s Star Quilt involves creating a combination of squares, half-square triangles, and diamonds. Use a rotary cutter, acrylic rulers, and a self-healing mat to achieve clean and accurate cuts.
To make the diamond shapes, you can use a specialty Hunter’s Star ruler or templates. Accuracy is critical since these shapes form the star points. Even a slight misalignment can affect how the stars come together in the final layout.
It’s helpful to organize your cut pieces into labeled stacks. Keeping track of your light and dark fabrics ensures that you maintain the visual contrast essential to the Hunter’s Star Quilt design.
Before moving to assembly, double-check your measurements. A quick review now will save time later and prevent potential frustration during piecing.
3. Assembling the Hunter’s Star Quilt Blocks
Now comes the most exciting part—assembling the blocks of your Hunter’s Star Quilt. Begin by pairing your light and dark triangles to form the basic units. Pay attention to the direction of the cuts to maintain consistency throughout the quilt.
Press seams carefully after each step. For the Hunter’s Star Quilt, it’s generally best to press seams toward the darker fabric. This reduces bulk and enhances the sharp points of the stars.
Once your triangle units are complete, begin adding the diamond shapes. This is where the magic happens, as the star points start to form. Take your time to match points accurately for a clean, professional look.
Sew the units into rows first. Align each piece carefully, checking that the points line up precisely. Use pins or clips to secure pieces before stitching.
Join the rows together to complete the block. As the block comes together, you’ll see the star emerge. This is often the most rewarding moment in making the Hunter’s Star Quilt.
Repeat the process for as many blocks as needed to achieve the desired quilt size. Laying the blocks out on a design wall or floor will help you visualize the final layout before sewing them together.
4. Quilting and Finishing Your Hunter’s Star Quilt
With all your blocks completed, it’s time to assemble the full quilt top. Arrange the blocks in rows, making sure the stars align and the overall pattern flows cohesively across the quilt.
Sew the rows together, then press all the seams flat. The pressed quilt top should now showcase the iconic Hunter’s Star Quilt pattern in full glory.
Next, prepare the quilt sandwich: lay the backing fabric right side down, add the batting, and then place your quilt top right side up. Smooth out each layer to avoid wrinkles or puckers.
Baste the layers together using your preferred method—pins, spray adhesive, or thread basting all work well. Proper basting ensures that the layers stay aligned during quilting.
When it comes to quilting designs, the Hunter’s Star Quilt looks beautiful with both simple and elaborate stitches. You can echo quilt around the star points, use straight-line quilting for a modern touch, or add free-motion quilting for extra texture.
Finish your quilt by trimming the edges and adding binding. The binding frames your quilt beautifully and gives it a polished look. Hand-stitch or machine-stitch the binding in place according to your preference.
FAQ About Hunter’s Star Quilt
What size should I make my Hunter’s Star Quilt blocks?
Block sizes can vary from 6 inches to 12 inches or larger. The size depends on how big you want your finished quilt to be. Larger blocks mean fewer blocks needed overall.
Is the Hunter’s Star Quilt suitable for beginners?
Yes, especially with modern techniques that eliminate Y-seams. While it looks complicated, following step-by-step instructions makes it accessible even to confident beginners.
Can I use scrappy fabrics for the Hunter’s Star Quilt?
Absolutely! While the traditional version uses two contrasting fabrics, a scrappy version with consistent value contrast looks stunning and adds a unique charm.
Do I need a special ruler for the Hunter’s Star Quilt?
A specialty Hunter’s Star ruler simplifies cutting the diamond shapes, but templates work just as well if you don’t have the ruler.
How much fabric do I need for a Hunter’s Star Quilt?
The amount depends on the quilt size. A lap quilt typically requires about 2-3 yards each of light and dark fabrics, plus fabric for backing and binding.
What is the best quilting design for a Hunter’s Star Quilt?
Both minimalistic straight lines and intricate free-motion designs work well. Many quilters choose to highlight the star shapes by echo quilting around them.
Creating a Hunter’s Star Quilt is a rewarding project that combines tradition, beauty, and craftsmanship. From choosing fabrics to assembling precise blocks and adding beautiful quilting stitches, every step contributes to a stunning finished piece. Whether you’re making a wall hanging, lap quilt, or bedspread, the timeless appeal of the Hunter’s Star Quilt never goes out of style.
I hope this detailed guide has inspired you to try the Hunter’s Star Quilt pattern for yourself. If you’ve enjoyed this tutorial or have any questions, feel free to leave your sincere opinion and suggestions in the comments. Your feedback helps make future guides even better!


