Learning how to sew the Dandy Quilt Block is a rewarding journey for any quilting enthusiast, whether you’re a beginner or an experienced maker. This classic block has a delightful balance of simplicity and charm, making it a perfect addition to both modern and vintage-inspired quilt projects. By following a few well-structured steps, you can bring this beautiful block to life with precision and creativity.
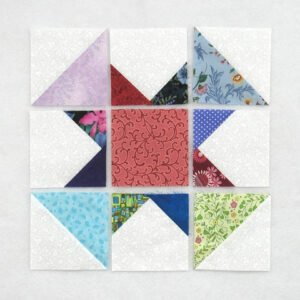
The Dandy Quilt Block features sharp angles, smooth transitions, and a star-like design that adds movement and depth to your quilt top. With its eye-catching layout, it’s no surprise this block has been a longtime favorite in patchwork history. Understanding how to sew the Dandy Quilt Block gives you the skills to master similar geometric layouts and opens the door to exploring new quilting designs.
In this tutorial, we’ll explore each step of the process, from choosing fabrics and preparing your templates to stitching and assembling the block with ease. Whether you’re sewing by machine or by hand, these clear instructions will help you confidently create a quilt block that’s crisp, clean, and visually striking.
1. Gathering Materials and Choosing Fabrics
Before diving into how to sew the Dandy Quilt Block, it’s essential to gather the right materials. Preparation ensures a smoother sewing experience and more precise results.
First, select a color palette that highlights the Dandy Block’s unique shapes. This design benefits from a strong contrast between background and foreground fabrics. Think solids, tone-on-tone, or small-scale prints.
You’ll need basic quilting supplies: a rotary cutter, self-healing cutting mat, quilting ruler, sewing machine (or hand sewing needle), thread, pins, and an iron. Choose 100% quilting cotton for best results, as it presses and cuts cleanly.
Print or draw your Dandy Quilt Block template, ensuring it’s sized correctly—typically a 12.5-inch unfinished block works well. If you’re a beginner, you can even label the sections for easier piecing.
Consider prewashing your fabrics to avoid shrinkage and color bleeding. It also makes the fabric easier to work with and more predictable when sewing and pressing.
Cut your fabric pieces according to the template instructions. For accuracy, lay your fabric flat and double-check your measurements before cutting. Always press pieces after cutting to ensure they lay completely flat.
Having all your materials organized will streamline the construction process. Take a moment to review each component before moving on to the stitching phase.
2. Cutting and Preparing the Pieces
Now that you’re ready to begin sewing the Dandy Quilt Block, it’s time to cut and prep each section of the block with care and precision.
Start with your largest background squares. These often form the foundation of the block and help maintain symmetry throughout the final design. Use your ruler and rotary cutter to ensure sharp, accurate lines.
Next, cut the triangular pieces that will form the inner and outer “star” points. Depending on your block pattern, you might use half-square triangles (HSTs) or quarter-square triangles (QSTs) for these areas.
Label your pieces if necessary. This is especially helpful if you’re using multiple shades of fabric in the same block. Marking the back lightly with pencil or chalk can avoid confusion later.
Use spray starch if your fabric is shifting or too soft. Light starching will help your fabric hold its shape through the piecing and pressing process.
Organize the cut pieces into layout groups. This will make it much easier to follow the sewing order without misplacing a component or attaching the wrong triangle.
Finally, press each piece before assembling. Pressing reduces puckering and helps the fabric lie flat, which is essential for maintaining clean seam lines during stitching.
3. Sewing the Dandy Quilt Block Units
The next step in how to sew the Dandy Quilt Block is assembling the block units in the correct sequence. Precision at this stage ensures a neat and balanced final design.
Begin by sewing the small triangle units together. These form the corners or points of your Dandy block, so make sure the seams align neatly and edges remain straight.
Press the seams open or to one side, depending on your preference. Open seams create flatter blocks but may be slightly more delicate, while side-pressed seams offer durability.
Next, attach the triangle units to the larger square or rectangular sections. Take your time and pin carefully to avoid shifting and uneven seams.
Assemble the block center if it includes a square or focal point. This area should be symmetrical, so double-check your measurements before stitching.
Stitch the top and bottom rows of the block separately. Then, attach them to the center row, forming the completed square. Keep your seam allowances consistent—typically 1/4 inch.
Once all parts are sewn, press the block from the back first, then lightly press the front to flatten and set the seams. This gives your Dandy Quilt Block a polished and professional look.
4. Tips for Accuracy and Finishing Touches
As you refine your skills in how to sew the Dandy Quilt Block, you’ll want to focus on the little details that make your quilting shine. Accuracy is key to a balanced and eye-pleasing quilt.
Always sew with a consistent 1/4-inch seam allowance. Consider using a quilting foot or seam guide to stay precise, especially when piecing multiple units.
Use pins or clips generously when aligning units. This prevents distortion and ensures points match correctly. Don’t rush the piecing process—slow and steady stitching yields better results.
Be mindful of your thread choice. A neutral, fine thread reduces bulk and won’t distract from your design. If you’re working with high-contrast fabrics, test your thread color before committing.
Press carefully between every stage of sewing. Set your seams by pressing them before flipping open. Use a hot iron and press, don’t drag, to avoid warping the fabric.
Square up your block once it’s assembled. A square and flat block will make quilting or joining other blocks much easier. Use a square ruler to check all corners and trim as needed.
Label or store your block flat if you’re not quilting immediately. Storing it gently preserves its shape and prevents stretching or fraying before final assembly.
Frequently Asked Questions
What size is a standard Dandy Quilt Block?
Most Dandy Quilt Blocks are designed to finish at 12 inches, but you can resize them depending on your quilt project. Just adjust the cutting measurements proportionally.
Is the Dandy Quilt Block beginner-friendly?
Yes! With straight seams and basic geometric shapes, it’s perfect for quilters just learning the ropes. Clear marking and careful pressing help simplify the process.
Can I sew the Dandy Quilt Block by hand?
Absolutely. Use small, consistent stitches and a strong cotton thread. Hand-sewing is more time-consuming but allows for better control over tricky seams.
What fabrics work best for this block?
High-quality quilting cottons are ideal. Choose fabrics with contrast to highlight the block’s design, such as light backgrounds with bold-colored star points.
Do I need to use a template or pattern?
While not required, using a template can improve accuracy and help beginners understand how the pieces fit together. Many quilters prefer printed patterns for consistent results.
How do I incorporate the Dandy Block into a full quilt?
This block can be repeated to create an all-over quilt top or combined with other star or geometric blocks for variety. Sashing between blocks can enhance the design further.
Now that you’ve learned how to sew the Dandy Quilt Block, you’re ready to bring a timeless design into your quilting projects. With its dynamic structure and clear steps, this block is both fun and satisfying to sew. Whether you’re making a full quilt or just adding it to a sampler, the Dandy Block offers visual interest and strong lines that never go out of style.
We’ve covered everything from choosing the right fabrics to piecing with precision and finishing with flair. This guide is a reliable companion as you sew your first—or fiftieth—Dandy Quilt Block.
If this tutorial helped you, please leave a sincere opinion or a suggestion for future topics. Your feedback helps create more content tailored to passionate makers like you!


