If you’re looking for a creative and seasonal addition to your quilting projects, the Falling Leaves Quilt Block – Free Tutorial is the perfect way to bring autumn’s charm into your work. This pattern offers a delightful combination of simplicity and elegance, making it ideal for both beginners and experienced quilters. Whether you’re crafting a cozy quilt for yourself or a gift for a loved one, this tutorial will guide you step-by-step through the process of creating a stunning quilt block inspired by the beauty of falling leaves.
The Falling Leaves Quilt Block is not just about capturing the essence of autumn but also a great opportunity to play with colors and textures. You can choose vibrant fall tones like oranges, reds, yellows, and browns to give your quilt a warm, inviting look. This tutorial ensures that even if you’re new to quilting, you’ll have all the guidance you need to succeed. Plus, with the free tutorial, you don’t need to worry about expensive patterns or complicated instructions.
In this article, we will break down the process into manageable steps, providing tips and tricks to make your quilting experience enjoyable and stress-free. Get ready to dive into the world of quilting and create your own Falling Leaves Quilt Block with our comprehensive tutorial.
1. Understanding the Falling Leaves Quilt Block Pattern
The Falling Leaves Quilt Block pattern is inspired by the natural beauty of autumn leaves gently cascading to the ground. This quilt block typically features leaf-like shapes pieced together in various fall-inspired colors, creating a stunning visual effect that brings warmth and nostalgia to any quilt.
- What makes this pattern unique? The intricate leaf design adds a layer of sophistication to your quilt while remaining beginner-friendly. The block’s versatility allows you to experiment with different fabrics and colors to match your desired aesthetic.
- Choosing the right materials: To achieve the best results, opt for high-quality cotton fabrics in rich autumn hues. Pre-washed fabrics prevent shrinkage and ensure the longevity of your quilt.
- Tools you’ll need: Basic quilting tools like a rotary cutter, cutting mat, ruler, and sewing machine are essential. For precise piecing, consider using a quarter-inch presser foot.
- Cutting the fabric: Accurate measurements are crucial for this pattern. Use your rotary cutter and ruler to cut fabric pieces according to the tutorial’s specifications.
- Piecing techniques: The Falling Leaves Quilt Block involves both straight and diagonal seams. Practice these techniques beforehand to ensure clean and professional-looking blocks.
- Pressing seams: Press your seams as you go to reduce bulk and maintain the block’s shape. This step is often overlooked but is vital for a polished finish.
- THE BEST QUILT PATTERNS
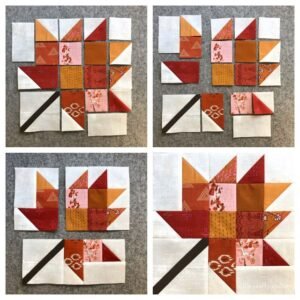
2. Step-by-Step Guide to Sewing the Falling Leaves Quilt Block
Creating the Falling Leaves Quilt Block involves several straightforward steps that, when followed carefully, yield beautiful results. Let’s break down the process.
- Step 1: Preparing your fabric Before starting, ensure your fabrics are clean and wrinkle-free. Iron them thoroughly and organize them by color.
- Step 2: Cutting the pieces Refer to the free tutorial for exact dimensions and shapes. Use your cutting tools to achieve precise cuts for each piece.
- Step 3: Laying out your design Arrange your fabric pieces on a flat surface to visualize the leaf pattern. This step helps you identify any adjustments needed before sewing.
- Step 4: Assembling the pieces Start sewing the smaller pieces together to form individual leaf units. Then, connect these units to complete the block.
- Step 5: Pressing your seams Press each seam after sewing to ensure a crisp and flat block. Use a pressing cloth to avoid damaging your fabric.
- Step 6: Final trimming Once the block is assembled, trim any excess fabric to achieve clean edges and a uniform size.
3. Tips and Tricks for Perfecting Your Quilt Block
Achieving a flawless Falling Leaves Quilt Block requires attention to detail and some helpful tips. Here are some suggestions to elevate your quilting skills.
- Use a design wall: A design wall lets you arrange your blocks and view the overall layout before committing to a design.
- Chain piecing: This technique saves time and thread by sewing multiple pieces in a continuous chain.
- Mark your seams: Use a fabric-safe marker to draw seam lines for accurate stitching.
- Check your tension: Ensure your sewing machine’s tension is set correctly to avoid puckered seams.
- Mix fabrics: Experiment with prints and solids to add depth and interest to your quilt.
- Practice patience: Take your time to ensure precision at each step. Rushing can lead to mistakes and frustration.
4. Bringing It All Together: Using the Quilt Blocks
Once you’ve mastered the Falling Leaves Quilt Block, it’s time to incorporate your blocks into a larger project. Here are some creative ideas for using your blocks.
- Create a full quilt: Combine multiple blocks to craft a stunning fall-themed quilt. Arrange them in rows or experiment with different layouts.
- Make a table runner: Use a few blocks to design a seasonal table runner that adds charm to your dining area.
- Sew decorative pillows: Turn individual blocks into throw pillow covers for a cozy autumn look.
- Design wall hangings: Showcase your blocks as standalone art pieces by turning them into wall hangings.
- Gift your creations: Handmade quilts and accessories make thoughtful and heartfelt gifts for loved ones.
- Combine with other patterns: Mix the Falling Leaves Quilt Block with other quilt patterns for a unique and personalized project.
Q: Is the Falling Leaves Quilt Block suitable for beginners? A: Absolutely! This pattern is designed to be beginner-friendly while still offering room for creativity and skill development.
Q: What size is the finished Falling Leaves Quilt Block? A: The size can vary depending on the tutorial, but most blocks are around 12” x 12”. Always check the tutorial for specific measurements.
Q: Can I use non-traditional colors for this pattern? A: Yes! While autumn hues are popular, feel free to experiment with other color schemes to match your style.
Q: Do I need a sewing machine to make this quilt block? A: A sewing machine is recommended for precision and efficiency, but you can sew the block by hand if you prefer.
Q: How long does it take to complete one block? A: The time varies based on experience, but most quilters can complete a block in 1-2 hours.
Q: Where can I find the free tutorial? A: The tutorial is available online. Follow the link provided in this article to access it.
The Falling Leaves Quilt Block – Free Tutorial is a wonderful way to celebrate the beauty of autumn while honing your quilting skills. This versatile pattern allows for endless creativity, making it perfect for a variety of projects. Whether you’re a beginner or an experienced quilter, this tutorial provides all the guidance you need to succeed.
We hope this article has inspired you to create your own Falling Leaves Quilt Block. Share your thoughts and suggestions in the comments below—we’d love to hear about your quilting journey and see your finished projects!


