DIY Sewing Bag – Pattern is the kind of topic that attracts both beginners and seasoned crafters, and starting this article with the exact keyword helps set the tone for what follows. When you make your own sewing bag, you create something functional, personal, and perfectly tailored to your crafting style. Throughout this guide, you’ll find detailed explanations, plenty of inspiration, and a structure that helps you understand every step of creating your own project. The goal is to show you how accessible and enjoyable the process can be, even if you’re new to sewing.
Working with a DIY Sewing Bag – Pattern is a great way to sharpen your sewing skills because it involves several useful techniques: cutting fabric, assembling pockets, adding zippers, stitching linings, and finishing edges cleanly. Each part of the project teaches you something new. This kind of project also makes a wonderful gift, since handmade bags are always unique and thoughtful. Whether you prefer minimalist styles or colorful, bold patterns, the method remains the same—you simply adjust the fabric choices to your taste.
Before diving into the step-by-step explanations, it’s important to understand why the DIY Sewing Bag – Pattern has become so popular. People love projects that balance creativity and function. A sewing bag keeps all your tools organized and easy to carry around, making your crafting routine smoother. It also serves as a canvas for your favorite colors, textures, and techniques. In the next sections, you’ll learn how to choose materials, follow the pattern, assemble the structure, and customize the final look.
Choosing the Right Materials for Your Sewing Bag
The first step in making your DIY Sewing Bag – Pattern come to life is selecting materials that suit the purpose of the bag. If you want a lightweight organizer, thin cotton fabrics work well. For a sturdier project, canvas, denim, or upholstery fabric offer durability. The lining should complement the exterior while providing structure and reinforcing the seams.
When choosing fabrics, consider color coordination and pattern scale. Large prints create a bold look, while small prints give a delicate touch. Since a sewing bag usually has multiple compartments, using contrasting fabrics can help identify each pocket more easily. This also adds charm and personality to the project.
Interfacing is another crucial component. It stabilizes the fabric and helps your bag hold its shape. For a structured sewing bag, medium-weight fusible interfacing is usually the best choice. Some crafters like to add quilted layers for extra padding, especially if they plan to store scissors or metal tools.
Zippers, snaps, Velcro, or magnetic buttons are also part of the essential materials list. A bag designed to store sewing tools needs secure closures to prevent items from falling out. Choose high-quality hardware to ensure longevity, especially if you use the bag frequently.
Thread should not be overlooked. A strong polyester thread is ideal for sewing bags because it handles tension better than cotton thread. Make sure the thread color blends well with the exterior fabric or creates a decorative contrast if you prefer.
Before starting the project, gather everything in one place. Having all your materials organized makes the sewing process smoother and allows you to follow the DIY Sewing Bag – Pattern without interruptions.
Understanding and Cutting the Pattern Pieces
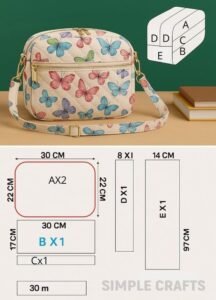
When working with a DIY Sewing Bag – Pattern, properly cutting the pieces is crucial. Patterns typically include the main body, pockets, lining, gussets, and straps. Carefully reading the measurements prevents mistakes later in the assembly stage. Always double-check fabric orientation, especially if your print has a directional design.
Using a rotary cutter helps achieve precise cuts with smooth edges. If you prefer scissors, make sure they’re sharp to avoid frayed or uneven lines. Mark all notches and fold lines as indicated on the pattern. These small details play a big role when assembling the bag.
Laying out the pattern efficiently helps reduce fabric waste. Before cutting, place all pieces on the fabric to visualize the best arrangement. This is particularly helpful when working with limited fabric or when trying to match prints across seams.
Labeling the pieces can help keep everything organized. Write small notes on masking tape and attach them to each cut piece. This simple step avoids confusion when you reach the sewing stage.
If your bag includes pockets, decide whether you want to add interfacing to them as well. Interfaced pockets are more durable and maintain their shape longer. This is especially useful for pockets that hold scissors, rulers, or metal tools.
Once everything is cut, place all pieces together in the order recommended in the pattern. This saves time and gives clarity on how the DIY Sewing Bag – Pattern will be assembled step by step.
Sewing and Assembling the Main Structure
The assembly stage brings the DIY Sewing Bag – Pattern to life. Start by sewing the pockets, since they are usually attached before the main panels go together. Fold, press, and stitch the pockets neatly, ensuring straight seams and strong edges.
Next, attach the pockets to the interior lining. Sewing slowly helps keep the fabric from shifting, especially with slippery linings. Backstitching at the beginning and end of each seam reinforces the pockets, preventing them from coming loose with frequent use.
Once the pockets are secured, move on to sewing the exterior panels. Join the front and back pieces, align the edges carefully, and press the seams flat. If your bag includes side panels or gussets, sew them next to give the bag depth and shape.
Adding the zipper is the step many beginners fear, but with patience, it becomes simple. Use clips instead of pins to avoid distorting the zipper tape. Sew along the zipper slowly and evenly. Once done, test the zipper to ensure it moves smoothly.
After the zipper is attached, join the lining and exterior fabric. Leaving a small opening at the bottom of the lining allows you to turn the bag right side out. Once turned, press everything neatly and sew the opening closed with a hidden stitch.
Topstitching the edges gives the bag a professional finish. It also reinforces the seams and helps the bag maintain its structure. At this stage, your DIY Sewing Bag – Pattern project is close to completion.
Customizing and Adding Final Details
The final details are what make your DIY Sewing Bag – Pattern truly unique. Adding decorative stitching or embroidery can transform even the simplest design. You can also personalize the bag with fabric appliqués, labels, or contrasting binding.
If your pattern includes adjustable straps, sew them carefully to ensure safety and durability. Reinforcing strap attachments prevents them from tearing away from the bag, especially when carrying heavier tools.
You can add elastic loops or small compartments inside the bag to hold brushes, pencils, or small rulers. These details help keep your tools organized and accessible while you work.
Some crafters enjoy adding metal feet to the bottom of the bag. These protect the fabric when placing the bag on the floor and add a professional look. Though optional, they elevate the final result.
Pressing the bag thoroughly is essential. A well-pressed project looks cleaner and more polished. Make sure to press seams open where needed and smooth out all folds before finishing touches.
Once every detail is complete, step back and admire your work. Creating a sewing bag from a DIY Sewing Bag – Pattern requires patience, creativity, and attention to detail—qualities that make handmade projects incredibly rewarding.
FAQ – DIY Sewing Bag
1. Is a DIY sewing bag suitable for beginners?
Yes. A DIY Sewing Bag – Pattern is beginner-friendly as long as you follow the steps slowly and practice basic stitches beforehand.
2. What fabric is best for sewing a durable bag?
Canvas, denim, and upholstery fabrics give the strongest structure, while cotton is ideal for lightweight bags.
3. Can I sew a sewing bag without a sewing machine?
It’s possible but more time-consuming. A machine produces cleaner seams and faster results.
4. How do I choose the right interfacing?
Medium-weight fusible interfacing works well for most sewing bags, providing shape without stiffness.
5. Do I need a zipper?
Most patterns include zippers for security, but you can replace them with snaps or Velcro if preferred.
6. How long does it take to finish the project?
Depending on experience, a sewing bag typically takes between two and five hours to complete.
7. Can I resize the pattern?
Yes. Just adjust measurements proportionally to enlarge or reduce the bag.
8. Is it possible to add more pockets?
Absolutely. Sewing bags are easy to customize with extra pockets and compartments.
9. What tools do I need to begin?
Fabric scissors, pins or clips, a ruler, sewing thread, a sewing machine, and the printed pattern.
10. Can I wash my handmade sewing bag?
Yes, but choose washable fabrics and pre-wash them before sewing to prevent shrinkage.
Video Tutorial
This guide walked you through everything you need to create your own DIY Sewing Bag – Pattern, from material selection to final customization. By following the steps carefully, you can craft a beautiful and functional bag that keeps your tools organized and expresses your personal style.
I hope the explanations and tips helped you feel confident enough to start your own project. Feel free to leave a sincere opinion and suggestions so I can continue improving future guides and tutorials.