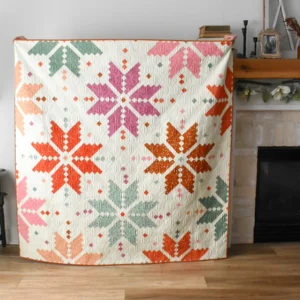
Creating a Knitted Star Quilt with Starry Fabrics is an ideal way to bring the night sky’s beauty into your home.
This pattern not only adds charm to any space but also serves as a perfect project for quilters who enjoy working with intricate designs and beautiful, celestial-inspired fabrics.
In this tutorial, we’ll cover every step you need to craft your own starry masterpiece. With simple instructions and recommended fabric measurements, even beginners can follow along and create a stunning Knitted Star Quilt. We’ll go over essential techniques, fabric choices, and helpful tips for assembling your quilt patterns.
Choosing the Perfect Starry Fabrics for Your Knitted Star Quilt
Selecting the right fabrics is a crucial first step in crafting your Knitted Star Quilt. Starry fabrics come in a variety of prints and colors, so consider a palette that reflects the night sky, with shades of navy, black, white, and silver accents.
When selecting fabrics for your quilt, choose high-quality cotton or a fabric blend suitable for quilting. Look for patterns with constellations, stars, or galaxies to bring out the celestial theme. These designs not only add visual interest but can also inspire you as you work on your quilt patterns.
You’ll need four main colors for this quilt: a dark base for the background (such as deep blue or black), a medium color (gray or navy), a lighter shade (light gray or white), and a fabric with a striking starry print. The color contrast will help highlight the star pattern and bring your quilt to life.
Cutting Your Fabrics: Preparing for the Knitted Star Pattern
Precise cuts are essential to achieving a clean, symmetrical design in your Knitted Star Quilt. Start by preparing the following cuts, which are tailored to fit a single quilt block. If you’re making a full-sized quilt, adjust quantities accordingly.
For the star quilt block, you’ll need to cut:
- Background Fabric (Dark): Cut four 4.5″ squares for the outer corners and four 3.5″ squares for the inner border.
- Medium Color Fabric: Cut eight 3.5″ squares for the center star points.
- Light Color Fabric: Cut one 6.5″ square for the center of the star.
- Starry Print Fabric: Cut four 3.5″ squares to create the outer star points.
Double-check each cut to ensure accuracy. Misaligned pieces can disrupt the pattern, so measure twice and cut once. These pieces will lay the foundation for your star quilt block, creating a stunning focal point in your final quilt.
Assembling the Star Quilt Block: Step-by-Step Guide
To start assembling your star quilt block, arrange your cut fabric pieces on a flat surface to visualize the final design. Begin by laying out the 6.5″ light-colored square in the center, surrounded by the star point pieces and the dark background squares.
Step one is to stitch together the smaller squares that form the outer star points. Use a quarter-inch seam allowance and press seams open as you go. Then, sew the four medium-color squares to form a star-like shape, connecting them with the light center square.
Next, add the starry print squares to the quilt block, carefully aligning each piece. Once all sections are joined, press the entire block flat with a steam iron. Repeat these steps to make additional blocks for a larger quilt, or keep it as a singular, eye-catching quilt piece.
Adding Borders and Binding for a Finished Look
Borders are essential to framing your Knitted Star Quilt and giving it a finished look. Choose a fabric that complements your star pattern without overpowering it; darker shades with minimal patterning work well for a cohesive design.
To add a border, measure the edges of your quilt top and cut strips of fabric 2-3 inches wide. Sew each border piece to the edges of the quilt block, ensuring even alignment and minimal seam overlap. A properly placed border will help accentuate the star design and keep the quilt balanced.
Once your border is sewn on, choose a coordinating fabric for the binding. Cut binding strips 2.5 inches wide, fold them lengthwise, and press. Carefully sew the binding around the quilt’s edges for a polished, professional finish. This step not only enhances durability but also adds a final decorative touch.
Quilting the Layers: Adding Texture and Definition
Now that your quilt top is complete, it’s time to add texture and depth by quilting the layers together. This process involves stitching through the top fabric, batting, and backing to hold everything in place. For a Knitted Star Quilt, echoing the star shapes with your quilting pattern is a great way to emphasize the celestial theme.
Start by layering your quilt top over batting and a backing fabric, securing the layers with quilting pins. Using a sewing machine or hand-quilting needle, stitch along the star shapes, creating radiating lines that resemble rays or constellations.
Once you’ve quilted the main star shapes, add some detail by stitching around the border or adding smaller stars for texture. This method not only brings out the design but also adds warmth and dimension to your quilt, making it a cozy, inviting piece.
Finishing Touches: Tips for Long-Lasting Quilt Care
After all your hard work, proper care will ensure your Knitted Star Quilt lasts for years. Before using, give it a gentle wash in cold water to prevent color bleeding and to soften the fabric.
When storing your quilt, avoid direct sunlight, which can fade colors over time. Roll it instead of folding to prevent creasing, and keep it in a breathable cotton bag or pillowcase. This will protect it from dust and allow it to “breathe,” keeping the fibers fresh.
Finally, consider displaying your quilt in a room where it can be admired. Whether draped over a bed or hung on a wall, your Knitted Star Quilt will add a celestial touch to any space, serving as both functional warmth and a beautiful work of art.
Conclusion: Embracing the Art of Quilting with Starry Quilt Patterns
Creating a Knitted Star Quilt using starry fabrics is a wonderful way to blend art, craftsmanship, and celestial inspiration. With the right fabric choices, precise cuts, and attention to detail, your quilt will shine just like the stars it’s inspired by.
Whether you’re an experienced quilter or a beginner exploring new quilt patterns, this project is sure to spark creativity and joy. Follow these steps, and you’ll soon have a beautiful, timeless quilt that reflects the wonder of the night sky.


