The Friendship Star is one of the most beloved classic quilt blocks, symbolizing unity and warmth. This simple yet elegant design has been used for centuries in quilting projects, making it an excellent choice for both beginners and experienced quilters.
In this free tutorial, we will explore different variations of the Friendship Star and guide you through the process of creating your own. Whether you’re looking to add a traditional or modern touch to your quilts, this guide will help you get started.
1. The History of the Friendship Star Quilt Block
The Friendship Star quilt block dates back to early American quilting traditions. This block was often exchanged among friends and community members, symbolizing goodwill and camaraderie.

- The design consists of a simple nine-patch layout featuring half-square triangles (HSTs) and solid squares.
- Historically, quilters would use leftover fabric scraps to create these stars, making each quilt unique.
- Many pioneer women crafted these quilts as gifts for departing friends or family members moving westward.
- This block was also popular in signature quilts, where friends and loved ones signed their names on each star.
- Over time, quilters have experimented with various fabrics, color combinations, and embellishments to personalize their Friendship Star quilts.
- Today, it remains a favorite for traditional and modern quilting projects alike.
2. Essential Materials and Tools for Making a Friendship Star Quilt Block
Before diving into the tutorial, gather the necessary materials and tools to ensure a smooth quilting experience.
- Fabric choices: Opt for high-quality cotton fabric in contrasting colors for the best visual effect.
- Cutting tools: A rotary cutter, self-healing cutting mat, and quilting ruler will help achieve precise cuts.
- Sewing machine: A reliable sewing machine with a quarter-inch foot ensures even seams.
- Thread: Use 100% cotton thread in coordinating colors for a seamless look.
- Iron and ironing board: Pressing each seam properly enhances accuracy and neatness.
- Marking tools: Fabric chalk or disappearing ink pens help mark sewing lines for better precision.
-
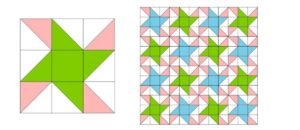
Image From Pinterest
3. Step-by-Step Guide to Making a Classic Friendship Star Quilt Block
Now, let’s walk through the process of making a Friendship Star quilt block step by step.
- Step 1: Cutting the fabric – You will need two contrasting fabric colors. Cut:
- 4 squares of background fabric (3.5″ x 3.5″)
- 1 square of a contrasting fabric for the center (3.5″ x 3.5″)
- 2 squares of each fabric (4″ x 4″) to make half-square triangles
- Step 2: Making the Half-Square Triangles (HSTs) – Draw a diagonal line on the back of the lighter fabric squares. Place right sides together and sew 1/4″ on both sides of the line. Cut along the drawn line and press open.
- Step 3: Assembling the block – Lay out the pieces in a 3×3 grid, ensuring the half-square triangles form the star shape.
- Step 4: Sewing the rows together – Sew the pieces in each row, pressing seams as you go.
- Step 5: Joining the rows – Align the seams carefully, then sew the rows together to complete the block.
- Step 6: Press and trim – Give the block a final press and trim any excess fabric for a clean finish.

4. Popular Variations of the Friendship Star Quilt Block
While the classic Friendship Star is stunning on its own, quilters often experiment with different variations.
- Double Friendship Star – This version features a secondary star shape, adding depth and complexity.
- Scrappy Friendship Star – Created using assorted fabric scraps, making each block unique and colorful.
- Spinning Star Variation – Adjusting the placement of half-square triangles creates a more dynamic, swirling effect.
- Modern Friendship Star – Incorporating negative space and asymmetry for a contemporary look.
- Framed Friendship Star – Adding a border around each block enhances the star’s visibility within a quilt.
- Friendship Star with Appliqué – Embellishing the center square with embroidery or appliqué adds a personal touch.
FAQ: Common Questions About the Friendship Star Quilt Block
Q1: What size should my Friendship Star quilt block be? A: The standard size is 9″ finished, but you can scale it up or down by adjusting fabric cuts proportionally.
Q2: Can I sew a Friendship Star quilt block by hand? A: Yes! Hand sewing is a great option for slow stitching enthusiasts. Use a backstitch for durability.
Q3: What color combinations work best for a Friendship Star? A: High-contrast colors, such as navy and white or red and cream, enhance the star’s visibility.
Q4: How do I make my seams match perfectly? A: Use pins to align seams before sewing and press them open to reduce bulk.
Q5: Can I use pre-cut fabric like charm squares? A: Absolutely! Pre-cut squares simplify the process, especially for beginners.
Q6: How do I make a full quilt using Friendship Star blocks? A: Arrange multiple blocks in a grid layout, alternating colors or orientations for variety.
The Friendship Star quilt block is a timeless and versatile pattern that can be customized in numerous ways. Whether you stick to the classic design or explore exciting variations, this free tutorial equips you with the knowledge to create a stunning quilt. We hope this guide inspires you to start your next quilting project! If you found this tutorial helpful, leave a comment below with your thoughts and suggestions. Happy quilting!


