Quilting during the holidays is not just about creating beautiful pieces; it’s about the joy of the process.
From selecting vibrant holiday fabrics to stitching them together, this tutorial will guide you through each stage. Along the way, we’ll explore helpful tips, creative ideas, and essential techniques to ensure your quilt turns out both professional and heartwarming.
In this article, we’ll delve into the best quilting practices, explore the unique elements of a Christmas quilt, and provide easy-to-follow instructions for assembling your masterpiece. Grab your fabrics, thread, and sewing machine, and let’s dive into the art of making a Charming Christmas Quilt Pattern that will become a cherished part of your celebrations.
1. Selecting the Perfect Fabrics for Your Christmas Quilt
The success of any quilt begins with the fabric selection. Choosing high-quality, festive materials ensures your quilt not only looks stunning but also lasts for years.
- Focus on Holiday Themes
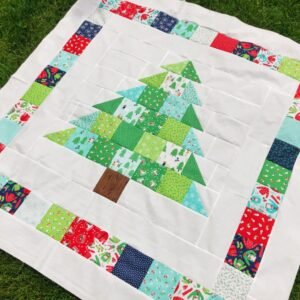
Choose fabrics with classic Christmas motifs such as snowflakes, candy canes, reindeer, and Christmas trees. These patterns will instantly evoke the holiday spirit and tie your quilt into the season’s theme. - Coordinate Colors Thoughtfully
Stick to a cohesive color palette. Red, green, white, gold, and silver are traditional choices, but you can also experiment with modern tones like navy and blush for a contemporary look. - Blend Solids and Patterns
Mix solid fabrics with prints for balance. Solid colors add structure, while printed patterns add charm and character to your quilt. - Opt for Durable Fabrics
Choose cotton or cotton blends for ease of sewing and durability. These materials are beginner-friendly and hold up well through washing and wear. - Pre-Wash Your Fabrics
Always wash and dry your fabrics before beginning. This step prevents shrinkage and ensures your quilt retains its shape over time. - Include a Backing Fabric
Don’t forget to choose a fabric for the quilt’s back. This can either match your front design or offer a contrasting surprise.
2. Essential Tools and Materials for Quilting
Before you start, gather all the tools and materials needed to make your quilting process smooth and enjoyable.
- Rotary Cutter and Cutting Mat
A rotary cutter ensures clean, precise cuts, and a self-healing cutting mat protects your surfaces and improves accuracy. - Quilting Ruler
A transparent quilting ruler helps you measure and cut your fabric accurately. Straight cuts are critical for a polished quilt. - Sewing Machine
While hand quilting is possible, a sewing machine speeds up the process. Ensure your machine is in good working order and equipped with a quilting foot. - Pins and Clips
Use pins or fabric clips to secure your pieces together before sewing. This prevents slipping and ensures clean seams. - Batting
Batting is the quilt’s inner layer, providing warmth and structure. Choose a batting material that suits your climate and intended use. - Iron and Ironing Board
Pressing your fabric pieces before and after sewing ensures neat, professional results.
3. Step-by-Step Tutorial for a Christmas Quilt
Follow this easy tutorial to create your Charming Christmas Quilt Pattern:
- Cut Your Fabrics
Begin by cutting your chosen fabrics into squares, rectangles, or triangles, depending on your desired quilt design. - Arrange Your Layout
Lay out the fabric pieces on a flat surface. Experiment with different arrangements until you’re satisfied with the design. - Sew the Pieces Together
Using a 1/4-inch seam allowance, sew the fabric pieces together row by row. Press the seams open as you go for a flat finish. - Assemble the Quilt Top
Join the rows together to complete the quilt top. Take your time to ensure the seams align correctly. - Layer the Quilt
Sandwich your quilt top, batting, and backing fabric. Secure the layers with quilting pins or basting spray. - Quilt and Bind
Quilt through all the layers using your preferred technique, then add a binding around the edges for a polished look.
4. Creative Ideas to Personalize Your Christmas Quilt
Adding personal touches makes your quilt unique and memorable. Here are some creative ideas:
- Incorporate Embroidery
Stitch names, dates, or festive phrases onto the quilt for a personalized touch. - Use Appliqué Techniques
Add appliqué shapes like stars, ornaments, or holly leaves to enhance the design. - Create a Photo Quilt
Print family photos onto fabric and incorporate them into your quilt for a sentimental piece. - Experiment with Textures
Mix in fabrics like velvet or flannel for added texture and coziness. - Add Decorative Stitching
Use decorative stitches or metallic thread for an extra festive flair. - Make It Interactive
Incorporate pockets or loops to hang small ornaments or attach keepsakes.
FAQ
1. What is the best fabric for a Christmas quilt?
Cotton is the most popular choice for its durability and ease of sewing. However, flannel or velvet can add warmth and texture.
2. Can I make a quilt without a sewing machine?
Yes, you can hand-stitch a quilt, but it will take more time. A sewing machine speeds up the process significantly.
3. How much fabric do I need for a Christmas quilt?
The amount depends on the quilt size. For a lap quilt, you’ll need about 2-3 yards of fabric for the top, plus batting and backing fabric.
4. What is the purpose of batting in a quilt?
Batting provides insulation and structure, making the quilt warm and comfortable.
5. How can I ensure my quilt stays in good condition?
Wash your quilt in cold water on a gentle cycle, and air-dry or use low heat. Store it in a cool, dry place.
6. What if I make a mistake while quilting?
Mistakes are part of the process! Use a seam ripper to undo stitches and try again. Practice makes perfect.
Conclusion
Creating a Charming Christmas Quilt Pattern is a rewarding way to celebrate the holiday season. By following this free tutorial, you’ll craft a beautiful, personalized quilt that will become a cherished part of your family traditions. We hope this guide inspires you to embrace quilting and express your creativity.
If you enjoyed this article, please leave a comment with your thoughts and suggestions. Your feedback helps us improve and share even better tutorials in the future. Happy quilting


