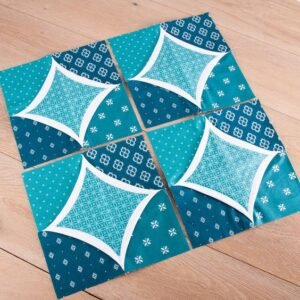
Creating a quilt can be a rewarding and fulfilling experience, and one of the most beautiful quilt patterns is the Cathedral Window.
This traditional design is known for its intricate, stained-glass window appearance, which is achieved without using batting. In this tutorial, we will walk you through the steps to create your own Cathedral Window Quilt, from fabric selection to the final stitches.
Whether you’re a beginner or an experienced quilter, this guide will help you create a stunning quilt that will be cherished for years.
Selecting Your Fabrics
When beginning your Cathedral Window Quilt, selecting the right fabrics is crucial. This pattern allows for a great deal of creativity, as you can mix and match colors and prints to create a unique look. Typically, you will need two types of fabric: a background fabric and a window fabric.
The background fabric should be a solid color or a subtle print, as this will frame the windows and form the majority of your quilt. Light colors are often used to create a contrast with the window fabric, but you can choose any color that suits your design. Cotton is the preferred material for quilting due to its durability and ease of use.
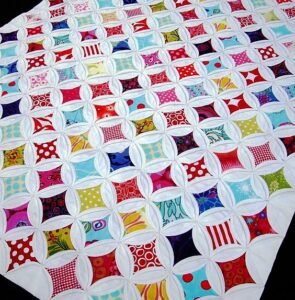
For the window fabric, choose vibrant, colorful prints. These fabrics will be showcased in the window panes, so feel free to experiment with different patterns and colors. Small prints work well because they fit within the small window spaces and provide a detailed appearance.
Preparing Your Fabric
Before you start cutting your fabric, it’s essential to wash and iron it to prevent any shrinkage or distortion in your quilt. Pre-washing your fabric ensures that any excess dye is removed, and ironing it will make cutting easier and more accurate.
After preparing your fabric, it’s time to start cutting. For the Cathedral Window Quilt, you will need to cut your background fabric into squares. A common size for the background squares is 9 inches by 9 inches. However, you can adjust this size depending on the overall size of the quilt you wish to create.
Next, cut your window fabric into smaller squares. These squares should be approximately 3.5 inches by 3.5 inches, which will fit nicely within the folds of your background fabric. The size of the window squares can also be adjusted based on your design preferences.
Assembling the Background
To begin assembling your quilt, take one of your background fabric squares and fold it in half diagonally, then fold it in half diagonally again. Press the folds with an iron to create a crisp, triangular shape. Repeat this process with all your background squares.
Once all your background squares are folded, start arranging them in rows. Align the open edges of the triangles so that they meet, forming squares again. Pin the squares together and sew along the edges to connect them. This will create the foundation for your quilt, with the folded edges forming a pocket for the window fabric.
After sewing your squares into rows, join the rows together to complete the quilt top. Make sure the edges align perfectly to maintain the symmetry of the pattern. This step is crucial as it ensures the overall appearance of your quilt is neat and orderly.
Adding the Windows
Now it’s time to add the window fabric to your quilt. Take one of your small window squares and position it inside the pocket created by the folded background fabric. Adjust the square so that it fits snugly and is centered within the background square.
Fold the edges of the background fabric over the window fabric, creating a frame. Pin the edges in place to secure the window fabric. Using a needle and thread, sew the folded edges down with small, even stitches. This technique is known as applique and is essential for the Cathedral Window Quilt pattern.
Repeat this process for each window square, working methodically across your quilt. This part of the process can be time-consuming, but the result is a beautiful, intricate design that resembles stained glass windows. The careful stitching will ensure that your quilt is durable and long-lasting.
Final Touches
Once all your windows are in place, take a moment to review your quilt for any loose threads or areas that need reinforcement. Carefully trim any excess threads and inspect the edges of your quilt to ensure they are neat and even.
The final step is to add a border to your quilt if desired. A border can frame your quilt beautifully and add an extra touch of color or pattern. Cut strips of fabric for your border, ensuring they are the correct length to fit each side of your quilt. Sew the border strips to the edges of your quilt top, making sure to miter the corners for a polished finish.
After adding the border, give your quilt one final press with an iron to smooth out any wrinkles and set the seams. Your Cathedral Window Quilt is now complete and ready to be displayed or gifted. The intricate design and careful craftsmanship make this quilt a true work of art.
Creating a Cathedral Window Quilt is a labor of love that results in a stunning, heirloom-quality piece. By following this tutorial, you have learned how to select fabrics, prepare and cut them, assemble the quilt top, add the window panes, and finish your quilt with a border. This quilt pattern, with its intricate design and beautiful window effect, is sure to impress and delight anyone who sees it.
Quilting is a wonderful way to express creativity and create something truly unique. The Cathedral Window Quilt pattern offers endless possibilities for color and design combinations, making each quilt one-of-a-kind. Enjoy the process of creating your quilt, and take pride in the beautiful piece you have crafted.


