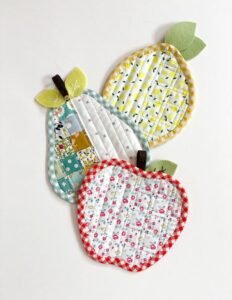
If you love functional, handmade crafts, then these Apple Pear Lemon Coasters are the perfect project to brighten your kitchen or dining space. From their vibrant colors to their charming fruit shapes, these coasters are not just practical but also add a cheerful decorative touch to your home. Whether you are an experienced crocheter or a beginner looking for an easy and rewarding project, creating Apple Pear Lemon Coasters will bring joy and satisfaction.
The beauty of making your own Apple Pear Lemon Coasters lies in the freedom to customize colors, sizes, and styles. These coasters make excellent gifts for friends, family, or even as items for craft fairs. They are environmentally friendly since they are reusable and washable, replacing disposable paper coasters.
In this detailed step-by-step guide, you will learn how to crochet beautiful Apple Pear Lemon Coasters using simple materials and beginner-friendly techniques. This tutorial will walk you through the materials needed, stitch techniques, assembly, and finishing touches to make your coasters look professionally made.
1. Materials Needed for Apple Pear Lemon Coasters
To start creating your Apple Pear Lemon Coasters, you’ll need a few basic materials that are affordable and easy to find. Gathering the right supplies ensures that your project will turn out beautiful and durable.
The first thing you will need is cotton yarn in colors representing apples (red or green), pears (light green or yellowish-green), and lemons (bright yellow). Cotton is highly recommended because it is absorbent, durable, and washable, making it ideal for coasters.
Next, choose a crochet hook that matches your yarn size, typically a 3.5 mm (E) or 4 mm (G) hook works best. Always check the yarn label for the recommended hook size to achieve the right tension.
You’ll also need scissors to cut your yarn cleanly and a yarn needle for weaving in ends and assembling any small details like leaves and stems on the Apple Pear Lemon Coasters.
Stitch markers are optional but helpful for keeping track of rounds, especially when working in continuous spirals, which are common in coaster patterns.
It’s helpful to have a tape measure or ruler nearby if you want to ensure your coasters are consistent in size, especially if you’re making a set of matching Apple Pear Lemon Coasters.
Lastly, consider a blocking mat and pins if you want your finished coasters to lay perfectly flat. Blocking helps set the shape of your crochet work and gives it a professional finish.
2. Crochet Techniques Used for Apple Pear Lemon Coasters
Before diving into the step-by-step process, let’s cover the basic crochet techniques you’ll use to make your Apple Pear Lemon Coasters look fabulous and functional.
The magic ring (also known as a magic circle) is commonly used to start round crochet projects. It allows you to close the starting hole tightly for a neat appearance, which is ideal for coaster centers.
You will primarily use single crochet (sc) stitches to create a dense and firm fabric. Single crochet ensures the Apple Pear Lemon Coasters are thick enough to protect surfaces from heat and moisture.
Increasing stitches evenly in the round is another essential technique. This method involves adding two stitches in one space at regular intervals to expand the circle smoothly without rippling.
For decorative edges, you may use slip stitches or crab stitches (reverse single crochet). These add a polished, finished look to the borders of your Apple Pear Lemon Coasters.
Color changes are a fun part of this project. You’ll switch yarn colors seamlessly to represent different parts of the fruits, such as red for apples, yellow for lemons, and green for pear leaves.
Finally, simple embroidery with a yarn needle may be used to add details like seeds, leaf veins, or highlights, enhancing the charm of your Apple Pear Lemon Coasters.
3. Step-by-Step Instructions for Apple Pear Lemon Coasters
Now that you understand the materials and techniques, let’s dive into creating your own set of Apple Pear Lemon Coasters with easy-to-follow steps.
Start with the apple coaster by making a magic ring and working single crochet stitches into it. Continue increasing each round until you reach the desired size, usually around 4 to 5 inches in diameter.
Switch to a contrasting yarn to crochet the apple leaf. Make a chain of about 6 stitches, then work back along the chain using single crochet, half-double crochet, and double crochet to form the leaf shape.
Attach the leaf to the edge of the apple circle with a slip stitch or yarn needle. Add a short brown stem by chaining a few stitches and securing it near the leaf.
For the pear coaster, begin similarly with a magic ring but shape it more oval than round. This is done by varying the number of increases on different sides of the circle.
Crochet a smaller leaf in light green or dark green and attach it at the top narrow part of the pear coaster, creating that classic pear silhouette.
When making the lemon coaster, start with bright yellow yarn. Form an oval shape by chaining a small foundation chain and working around it with increases at both ends to create the typical lemon outline.
4. Finishing Touches and Customization Ideas
Once all your Apple Pear Lemon Coasters are crocheted, it’s time to add the finishing touches that will make your pieces stand out.
Use a yarn needle to weave in all loose ends securely. This not only makes your coasters neat but also ensures durability during washing.
If your coasters are curling or not laying flat, block them by pinning them to a foam mat and spraying lightly with water. Allow them to dry completely to hold their shape.
For extra detail, consider embroidering small white stitches on the lemon coaster to mimic the texture of lemon skin or add little black stitches for apple seeds.
Experiment with yarn colors beyond the traditional fruit shades. Try pink apples, golden pears, or lime-green lemons to create a fun and whimsical set of Apple Pear Lemon Coasters.
You can also add a border to each coaster using a contrasting color to give it a framed look. A simple single crochet or scalloped edge works beautifully.
Finally, package your finished coasters with a ribbon for gifting or display them in a basket on your dining table for a bright, inviting look.
FAQ About Apple Pear Lemon Coasters
What yarn is best for Apple Pear Lemon Coasters?
Cotton yarn is the best choice because it is durable, absorbent, and machine washable, making it perfect for functional items like coasters.
Are Apple Pear Lemon Coasters beginner-friendly?
Yes! These coasters are ideal for beginners. They mainly use basic stitches like single crochet and simple increases, with some optional embroidery for details.
How big should Apple Pear Lemon Coasters be?
Most coasters measure between 4 to 5 inches in diameter for round shapes or slightly longer for oval shapes like the lemon and pear.
Can I wash these crochet coasters?
Absolutely. Using cotton yarn ensures the coasters are washable. Hand wash or machine wash on a gentle cycle, then lay flat to dry for best results.
Do I need to block Apple Pear Lemon Coasters?
Blocking is optional but recommended for a polished look. It helps the coasters stay flat and hold their shape better.
Can I sell coasters made from this tutorial?
Yes, you can sell the finished Apple Pear Lemon Coasters. Just avoid selling the pattern itself if it’s from another designer, and always credit if required.
Creating your own Apple Pear Lemon Coasters is a fun, relaxing, and rewarding project that combines creativity with practicality. These colorful fruit-themed coasters are not only useful but also bring a splash of joy to your table setting. Whether you make them for yourself, as gifts, or for sale, the satisfaction of crafting something handmade is priceless.
I hope this tutorial has inspired you to pick up your crochet hook and get started. If you’ve enjoyed this guide or have any suggestions, questions, or feedback, please share your thoughts. Your honest opinion helps me improve future tutorials and bring more creative projects to the crafting community!


