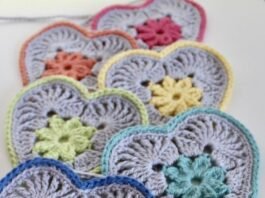
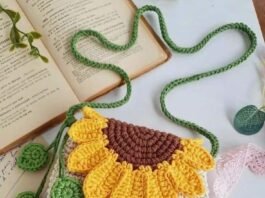
Granny squares are a timeless crochet pattern that can be used in various projects, from blankets to scarves. One of the most charming variations is the Sunflower Granny Square.
In this detailed tutorial, we will walk you through the steps to create your very own Sunflower Granny Square, perfect for adding a touch of floral elegance to any project.
By following this guide, you’ll master this crochet pattern and learn the techniques to create stunning crochet designs.

Materials Needed
Before diving into the crochet patterns, it’s essential to gather all the necessary materials. Having everything ready will make the process smoother and more enjoyable.
Yarn Selection Choosing the right yarn is crucial for any crochet project. For the Sunflower Granny Square, you’ll need three colors: yellow for the petals, brown for the center, and green for the square. Opt for a medium-weight yarn to ensure your squares are sturdy and well-defined.
Hook Size Selecting the appropriate hook size is vital to achieving the correct tension and stitch definition. For this project, a 4.0 mm (G-6) crochet hook is recommended. This size works well with medium-weight yarn and helps create neat, even stitches.
Additional Tools In addition to yarn and a crochet hook, you’ll need a few other tools: a tapestry needle for weaving in ends, scissors for cutting yarn, and a stitch marker to keep track of your rounds. Having these tools handy will streamline your crocheting process.
Creating the Center of the Sunflower
The center of the sunflower is the foundation of your granny square. It’s essential to start strong to ensure your square is perfectly shaped.
Magic Ring Technique Begin with a magic ring, which allows you to create a tightly closed center. To make a magic ring, wrap the yarn around your fingers to form a loop, insert your hook into the loop, yarn over, and pull through. This creates a loop where you’ll work your stitches.
Crocheting the Center Into the magic ring, crochet 12 double crochets (dc). To start, chain 2 (this counts as your first dc), then proceed with 11 more dc into the ring. Pull the tail of the magic ring to close the loop tightly, and join with a slip stitch to the top of the chain 2.
Fastening Off After completing the center, fasten off the brown yarn. Cut the yarn, leaving a small tail, and use your tapestry needle to weave in the ends securely. This will prevent any unraveling and give your square a neat finish.
Crafting the Sunflower Petals
Now that the center is complete, it’s time to create the vibrant sunflower petals. This section will add the characteristic charm to your granny square.
Attaching the Yellow Yarn Join the yellow yarn in any stitch around the center with a slip stitch. This will be the starting point for your petals. Chain 3 (this counts as your first dc), then proceed with crocheting around the center.
Forming the Petals To form a petal, work 2 double crochets (dc) in the same stitch, chain 1, and then work 3 dc in the next stitch. Repeat this pattern around the circle: 3 dc in one stitch, chain 1, 3 dc in the next. You should have 6 petals in total by the end of this round.
Securing the Petals After completing the round of petals, join with a slip stitch to the top of the starting chain 3. Fasten off the yellow yarn and weave in the ends securely. The sunflower should now have a beautiful set of petals framing the brown center.

Forming the Granny Square
With the sunflower complete, it’s time to transform it into a traditional granny square. This step will give your project its final shape.
Joining the Green Yarn Attach the green yarn in any chain-1 space between the petals with a slip stitch. Chain 3 (this counts as your first dc), then work 2 more dc into the same space. This will be the start of your first corner.
Creating the Corners To form a corner, chain 2, then work 3 dc into the next chain-1 space. Repeat this process around the sunflower: 3 dc in each chain-1 space, separated by chain-2 spaces to form the corners. You should have four corners by the end of this round.
Finishing the Square After completing the round, join with a slip stitch to the top of the starting chain 3. If you want to make your square larger, you can continue adding rounds, following the same pattern: 3 dc in each space between clusters, with chain-2 spaces at the corners. Fasten off the green yarn and weave in the ends securely.
Assembling Multiple Squares
Once you have several Sunflower Granny Squares, you can join them to create larger projects. This section will guide you on how to assemble your squares seamlessly.
Planning Your Layout Lay out your squares in the desired pattern before joining them. This helps you visualize the final project and ensures that the squares are arranged to your satisfaction. Whether you’re making a blanket, scarf, or any other item, planning is key.
Joining Techniques There are several methods to join granny squares. The whip stitch and the slip stitch join are two popular techniques. For the whip stitch, use a tapestry needle to sew the squares together. For the slip stitch join, use your crochet hook to join squares with slip stitches, working through both loops of each stitch.
Adding a Border To give your project a finished look, add a border around the entire piece. A simple single crochet border can provide a neat edge, or you can get creative with more intricate patterns. A well-chosen border can tie the whole project together and add an extra touch of elegance.

Tips and Tricks for Perfect Squares
Even seasoned crocheters can benefit from a few tips and tricks to perfect their squares. Here are some pointers to ensure your Sunflower Granny Squares are flawless.
Consistent Tension Maintaining consistent tension throughout your work is crucial for uniform squares. Practice your stitches to ensure they are even and consistent. This will result in squares that are the same size and shape, making assembly easier.
Blocking Your Squares Blocking is the process of shaping your crochet pieces to ensure they lay flat and are uniform in size. To block your squares, dampen them and pin them to a blocking board or any flat surface, adjusting the shape as needed. Let them dry completely before assembling your project.
Experiment with Colors Don’t be afraid to experiment with different color combinations. While the traditional sunflower colors are yellow, brown, and green, you can create stunning variations with other hues. Play with contrasting or complementary colors to make your project unique and personal.
Creating a Sunflower Granny Square is a delightful way to enhance your crochet skills and add a touch of floral beauty to your projects. By following this detailed tutorial, you can craft beautiful squares and assemble them into a variety of items. Whether you’re a beginner or an experienced crocheter, the Sunflower Granny Square offers a satisfying and visually appealing pattern to enjoy.
Incorporate these squares into blankets, pillows, or even clothing accessories. The possibilities are endless when it comes to crochet patterns. Happy crocheting, and may your projects bloom with creativity!


