The Sunflower Granny Square Cap Crochet Pattern is a stunning, joyful, and beginner-friendly project that combines the beauty of sunflowers with the timeless charm of granny squares. If you’re looking for a fun and wearable crochet project, this one offers the perfect mix of creativity, color, and comfort. Whether you’re new to crochet or have years of experience, this cap will quickly become a favorite piece to create and wear.
This pattern is especially appealing because it blends classic motifs with fresh, modern aesthetics. The sunflower design brings warmth and personality to each square, while the granny square structure offers flexibility in terms of size and style. You can customize it to match your wardrobe or make it as a heartfelt handmade gift.
In this article, we’ll guide you through every essential aspect of the Sunflower Granny Square Cap Crochet Pattern. You’ll discover the materials you’ll need, techniques used, construction steps, and creative ideas to make your cap truly unique. Let’s dive in and bring sunshine into your crochet projects!
1. Materials and Tools for the Sunflower Granny Square Cap Crochet Pattern
To begin your Sunflower Granny Square Cap Crochet Pattern, you’ll first need to gather the right tools and materials. Choosing the correct yarn and hook size will help your sunflower motif bloom beautifully and ensure your cap fits comfortably.
Start by selecting worsted weight yarn in at least three colors: a bright yellow or gold for the sunflower petals, a rich brown for the flower center, and a contrasting color like green, cream, or black for the background. Cotton yarns work wonderfully, especially for summer wear, while acrylic yarns are great for cooler weather.
A 5.0 mm crochet hook is generally ideal for this type of pattern. Make sure your hook glides easily through the yarn without snagging. You’ll also need a yarn needle for weaving in ends and scissors for trimming.
Stitch markers may come in handy, especially when joining granny squares or shaping the crown of the cap. They help maintain consistency and reduce the chances of mistakes.
As always, have a measuring tape nearby. It helps you confirm your gauge and ensure that the finished cap will fit the intended head size.
And finally, don’t forget patience and creativity—two vital “tools” for any crochet project. This pattern may be easy to follow, but putting your own spin on it makes the process even more rewarding.
2. How to Crochet the Sunflower Granny Square
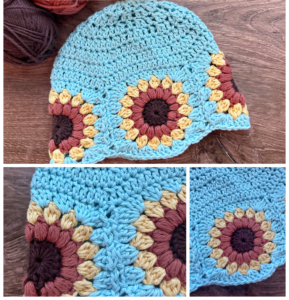
The heart of the Sunflower Granny Square Cap Crochet Pattern is, of course, the sunflower granny square itself. Learning to crochet this motif is both enjoyable and satisfying, especially when you see the sunflower take shape.
Begin by crocheting a small brown circle as the center of your sunflower. This usually involves working double crochets into a magic ring or chain loop, depending on your preference. This creates a nice, tight circle that mimics the look of a sunflower’s seed-filled center.
Next, switch to your yellow yarn and begin crafting the petals. These are often created using cluster stitches or puff stitches, giving the petals a three-dimensional effect. Arrange them evenly around the center to form a complete sunflower.
Once the petals are finished, you’ll switch to your background color. This is where the sunflower transforms into a square. Crochet several rounds in the standard granny square method—typically chains and double crochets worked in groups—to shape the piece.
Be sure to keep your corners even and your tension consistent. This ensures your squares are flat and can be easily joined together later.
Repeat this process until you’ve made enough squares for your cap. Most adult-size caps require 5 to 7 squares, but you can always adjust based on your desired size and fit.
Take time to block your finished granny squares. Blocking helps even out stitches and makes the sunflower motif stand out beautifully.
3. Joining the Squares and Shaping the Cap
Once your squares are complete, the next step in the Sunflower Granny Square Cap Crochet Pattern is joining them together. This is where your project really starts to take on its final form and come to life.
Start by laying out your sunflower granny squares in the pattern you want. A circular arrangement works best for caps, with the flower centers facing outward or upward depending on the style you’re aiming for.
Use your preferred joining method to assemble the squares. The whipstitch method is quick and nearly invisible when done neatly. Alternatively, a join-as-you-go crochet method can add a decorative border to your seams.
Once the sides are joined into a band, it’s time to shape the crown of the cap. This can be done using additional rounds of crochet directly onto the top of the assembled squares. Begin by evenly spacing stitches around the top edge and working in the round.
Gradually decrease your stitch count as you crochet upward to form a dome. This gives the cap a snug, comfortable fit on the head.
You may also choose to add a brim or ribbed edging at the base of the cap. This adds style and helps secure the cap in place when worn.
Check your work as you go to ensure symmetry and proper fit. Adjust tension or stitch count if necessary, especially around joins and decrease rows.
Remember, one of the joys of this project is how customizable it is. Whether you prefer a beanie-style fit or a looser slouch cap, small changes can make a big difference in the final result.
4. Styling and Customizing Your Sunflower Granny Square Cap
The beauty of the Sunflower Granny Square Cap Crochet Pattern lies in its adaptability and charm. Once your cap is complete, the fun of styling and customizing begins.
You can play with color schemes to suit different seasons. Pastels work well for springtime, while bold, rich colors make an eye-catching statement in autumn or winter.
For an added touch, sew on beads, buttons, or small appliqués to the center of the sunflowers. These little details give your cap a unique personality.
If you want more warmth, line your cap with soft fabric or fleece. Just ensure it remains breathable and not too bulky.
Consider adding earflaps or a pom-pom to transform the look completely. These changes can turn a simple granny square cap into a whimsical winter hat.
This cap is also a fantastic gift idea. You can make matching sets for family members or friends by customizing each with their favorite colors.
Lastly, don’t forget to share your creation with others! Many crocheters love seeing variations of the Sunflower Granny Square Cap Crochet Pattern, and your work can inspire new makers to try it themselves.
FAQ – Sunflower Granny Square Cap Crochet Pattern
Q1: Is this pattern beginner-friendly?
Yes! The Sunflower Granny Square Cap Crochet Pattern is great for beginners with basic crochet knowledge. If you can double crochet and follow simple rounds, you’ll do fine.
Q2: How many granny squares do I need for one cap?
Typically, 5 to 7 granny squares are enough for an adult-sized cap. However, you can adjust based on head size and desired fit.
Q3: Can I use different types of yarn?
Yes. Cotton yarn is great for warmer months, while acrylic or wool is ideal for colder weather. Just be sure to check your gauge.
Q4: How do I make the cap larger or smaller?
Adjust the number of granny squares or the stitch count when shaping the crown. You can also switch to a larger or smaller hook.
Q5: Do I need to block the granny squares?
Blocking is optional but highly recommended. It helps even out stitches and ensures a clean, professional look.
Q6: How do I care for the finished cap?
Hand wash in cold water and lay flat to dry to preserve shape and texture. Avoid harsh detergents or heat.
Q7: Can I sell items made from this pattern?
Absolutely! Handmade items based on the Sunflower Granny Square Cap Crochet Pattern can be sold, but always credit the design if using a published pattern.
Q8: What stitches are used in the sunflower motif?
Common stitches include double crochet, puff stitch, and chains. These give the petals a raised, dimensional look.
Q9: Can I use this motif for other projects?
Yes, the sunflower granny square can be used for blankets, bags, tops, and more. It’s a versatile design.
Q10: How long does it take to complete one cap?
Depending on your speed and experience, it can take anywhere from 4 to 8 hours to complete the entire cap.
The Sunflower Granny Square Cap Crochet Pattern is a delightful and creative crochet project that brings color and warmth to your wardrobe. It’s simple enough for beginners yet offers enough room for personalization and style for seasoned crocheters. From selecting the perfect yarn to joining squares and adding final touches, this project is a rewarding journey from start to finish.
We hope this guide helped you feel confident in starting or completing your sunflower granny square cap. If you’ve enjoyed this tutorial or have suggestions for future patterns, we’d love to hear from you. Please share your thoughts, feedback, and finished projects—we’re always inspired by your creativity!


