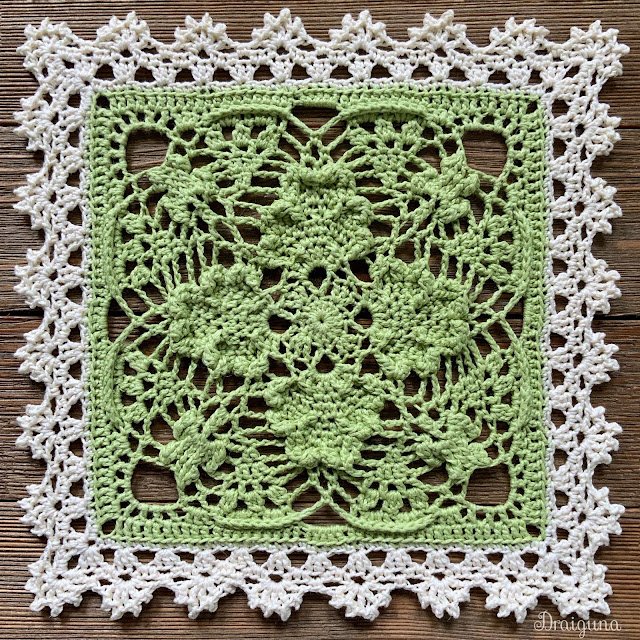
you’re on the hunt for a festive and beginner-friendly project, this Shamrock Square – Free Pattern is exactly what you need. Designed to celebrate the charm of St. Patrick’s Day, this motif brings a touch of Irish luck to any project. Whether you’re creating a seasonal table runner, a decorative pillow, or a cheerful blanket, this Shamrock Square – Free Pattern is versatile, fun to make, and beginner-friendly.
The combination of a four-leaf clover shape inside a square creates a bold design that stands out. The Shamrock Square – Free Pattern is worked in rounds, and you can use your favorite green yarn shades to emphasize the shamrock’s iconic shape. The simplicity of the stitches, combined with the visual impact, makes it a favorite among crocheters of all levels.
In this article, we’ll explore how to make the most of this Shamrock Square – Free Pattern, with detailed tips, inspiration for different uses, color ideas, and helpful FAQs. If you’re ready to infuse your crochet with a bit of Irish spirit, keep reading and let’s get creative with yarn!
1. Materials and Preparation
To begin your Shamrock Square – Free Pattern, you’ll need basic supplies commonly found in most crocheters’ toolkits. The project uses worsted-weight yarn, typically in varying shades of green and white or cream for contrast.
You’ll also need a size H (5.0 mm) crochet hook, though you can adjust the hook size depending on your tension or yarn thickness. Cotton yarn works wonderfully for this project, especially if you’re planning on using the squares for home decor items like coasters or potholders.
Prepare a pair of scissors, a yarn needle for weaving in ends, and a stitch marker if you’re someone who likes to keep track of rounds carefully. Most of the stitches used in the Shamrock Square – Free Pattern are beginner-level: chains, slip stitches, single crochets, and double crochets.
Before starting, consider creating a gauge swatch if you’re joining several squares. While gauge is not critical for decorative pieces, consistency helps when creating multi-block designs.
To prepare, decide how many squares you’d like to create and whether they will be part of a larger project. This will help you determine your yarn quantities ahead of time.
Lastly, have fun with the preparation stage. Choose yarns that excite you, and imagine the cozy or vibrant final result of your Shamrock Square – Free Pattern.
2. Step-by-Step: How to Crochet the Shamrock Square
The construction of the Shamrock Square – Free Pattern typically begins with the center of the shamrock, working outward in the round until the clover shape is formed.
Start with a magic ring or a chain-4 joined with a slip stitch to form a ring. This is the base for the clover’s center. Into this ring, you’ll crochet a sequence of petals, usually made with double crochets or puff stitches to add volume and texture.
Each petal of the shamrock usually consists of a small cluster of double crochets or treble crochets, separated by chain spaces. As you form each petal, make sure they sit evenly spaced within the center ring.
After completing the four shamrock petals, you’ll begin squaring the motif. This is typically done with a series of chains and corner stitches that transform the circular clover motif into a square frame.
As you add rounds to increase the size, alternate between chain spaces and solid stitches. This enhances the square shape while keeping the design airy and lacy.
Finish the square by fastening off and weaving in the ends with a yarn needle. You now have a beautifully crafted Shamrock Square – Free Pattern piece, ready for joining with others or using on its own.
3. Creative Ways to Use the Shamrock Square
Once you’ve mastered the Shamrock Square – Free Pattern, you’ll find endless opportunities to incorporate it into your craft projects. These squares are perfect for seasonal decor or gifts with a handmade touch.
Create a cozy blanket by joining multiple squares. Alternate between white and green squares to highlight the shamrock shape and add visual interest. This makes a lovely throw for March or as a year-round lucky charm.
Pillows made with the Shamrock Square – Free Pattern add charm to couches and chairs. Simply crochet front and back panels, sew them together, and stuff with a pillow form or fiberfill.
Table runners or placemats are easy to assemble with just a few squares lined up in rows. This project is ideal if you’re short on time but still want something festive for your dining space.
For small gifts, use the motif as the front panel for pouches, coin purses, or decorative trivets. Add a zipper or button closure, and your handmade item becomes a thoughtful, lucky keepsake.
You can also attach your Shamrock Square – Free Pattern to tote bags, sweaters, or even frame it as a piece of textile art. It’s a conversation starter and a cheerful addition to your home.
Get creative with color variations—try rainbow outlines, metallic threads, or multicolored shamrocks to make each square unique and expressive.
4. Tips for Success and Customization
The Shamrock Square – Free Pattern is adaptable to many skill levels, but there are a few expert tips to make the experience smoother and more enjoyable.
If your square curls or doesn’t lie flat, block it gently using steam or pins. This step ensures a polished and even finish, especially if you’re combining several squares in a larger project.
To adjust the size of your square, simply add extra rounds of single or double crochets around the final row. Keep your corners consistent by increasing evenly.
Change up your yarn textures for a modern twist. Use variegated yarn for an abstract look or add sparkle yarn for decorative items that shine.
If you want to turn your Shamrock Square – Free Pattern into a wall hanging, add a border and attach a dowel rod or stick for easy display.
Crocheters with more experience can add decorative edging or overlay stitches to further emphasize the shamrock motif. Embroidering around the shamrock is another fun way to enhance detail.
Finally, don’t be afraid to experiment. The pattern is meant to be joyful and festive, so let your personality shine through your stitches.
FAQ – Frequently Asked Questions
What skill level is required for the Shamrock Square – Free Pattern?
The pattern is beginner-friendly, using basic stitches like chain, slip stitch, single crochet, and double crochet. Some familiarity with working in rounds is helpful.
How long does it take to make one Shamrock Square?
Depending on your experience, each square can take between 30 to 60 minutes. Speed increases once you’re familiar with the pattern.
Can I use different yarn weights for this pattern?
Yes, but the final size of the square will change. Thicker yarns will yield larger squares, while thinner yarns produce more delicate results.
Is blocking necessary for these squares?
Blocking helps the square hold its shape and lie flat, especially if you’re combining multiple squares into a larger piece.
Can I sell items made using the Shamrock Square – Free Pattern?
Yes, as long as you’re not selling the written pattern itself. Handmade items made from the pattern can be sold at markets or online.
What are some good color combinations for this square?
Classic green and white is traditional for St. Patrick’s Day, but you can try gold and cream, rainbow outlines, or deep forest tones for year-round appeal.
The Shamrock Square – Free Pattern is a beautiful and versatile crochet project that celebrates creativity and festive spirit. From its charming clover center to its clean square edges, this design offers countless opportunities to personalize your work. Whether you’re making gifts, decorating your home, or simply enjoying a relaxing craft, this pattern is sure to bring joy.
We’ve explored how to gather your materials, crochet the square step by step, find creative uses for it, and make adjustments to suit your personal style. With the answers to the most common questions provided, you’re all set to start your next crochet adventure.
If you’ve tried this Shamrock Square – Free Pattern, we’d love to hear your thoughts! Share your honest opinion in the comments and let us know how you used your finished square. Your feedback helps inspire future tutorials and helps other makers too!


