Adding a touch of handcrafted charm to your holiday season is easier than ever with the Santa Claus Coaster. This delightful and functional piece of holiday décor is perfect for bringing festive cheer to your table, coffee corner, or holiday gift baskets. Whether you’re a beginner crafter or a seasoned DIY enthusiast, making your own Santa Claus Coaster is a rewarding and creative project that’s sure to become a favorite in your seasonal collection.
The magic of Christmas lies in the details, and handmade items like the Santa Claus Coaster elevate that festive feeling by combining creativity, warmth, and usefulness. Not only do these coasters protect your furniture from hot cocoa mugs or cider glasses, but they also bring smiles to guests of all ages. With simple materials and easy-to-follow techniques, this is a fun holiday craft that can be enjoyed solo, with kids, or as part of a Christmas crafting party.
In this article, we’ll explore everything you need to know about creating your own Santa Claus Coaster—from choosing the right materials to finishing your piece with festive flair. You’ll find inspiration for color choices, ideas for personalization, and answers to common questions to help ensure your project is a success. So grab your yarn, felt, or fabric, and let’s get started on this jolly holiday creation.
1. Choosing Materials and Gathering Tools
The first step in making a beautiful Santa Claus Coaster is selecting the right materials and tools. Choosing quality supplies ensures your coaster will last through many holiday seasons and bring lasting joy.
Begin with the base material. Most crafters prefer cotton yarn or felt fabric for coasters because they’re absorbent, easy to shape, and hold their form well. Red, white, black, and flesh-tone colors are ideal for creating a traditional Santa look.
You’ll also need a few essential tools. If you’re crocheting your Santa Claus Coaster, a 3.5 mm to 5 mm hook usually works best with worsted weight yarn. For felt or fabric versions, gather scissors, a glue gun or needle and thread, and paper for templates.
Consider adding embellishments such as tiny buttons for Santa’s coat, felt holly leaves, or embroidery for facial features. These details give your coaster personality and elevate the overall design.
If you’re planning to make multiple coasters—either as gifts or for a matching set—organize your supplies into kits. This makes the process more efficient and enjoyable, especially when working with children or friends.
Make sure to set up a clean, well-lit crafting area where you can lay out your materials and work comfortably. With everything in place, you’ll be ready to bring your Santa Claus Coaster to life.
2. Creating the Coaster Base and Santa’s Face
With your materials ready, it’s time to start building the base of your Santa Claus Coaster. Whether crocheted or sewn, this step is where the cozy magic begins.
Start by making the round base in red yarn or felt. This will represent Santa’s body or hat area. If you’re crocheting, work in the round to create a flat circle that’s about 4 to 5 inches in diameter. Felt versions can be cut using a simple cup or bowl as a tracing guide.
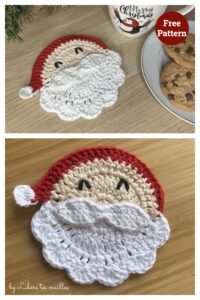
Add a cream or peach-colored circle near the top of the red base to represent Santa’s face. This can be appliquéd with felt or stitched in place, depending on your technique. Keep the shape proportional for a balanced look.
Next, cut or stitch a white semi-circle across the top for the hat’s brim. This fluffy detail is key in making the coaster instantly recognizable as jolly old Saint Nick.
Add tiny black eyes with buttons, embroidery floss, or black felt circles. For his nose, use a small circle of pink or red fabric placed right at the center of the face.
Don’t forget Santa’s classic white mustache and beard! Cut these pieces from felt and glue or sew them in place around the face area. You can also crochet puff stitches or loops for a 3D beard effect if using yarn.
Once the basic face is complete, admire how the personality of your Santa Claus Coaster comes to life with just a few well-placed details. It’s fun to see each coaster take on its own cheerful expression!
3. Adding Decorative Details and Personal Touches
Now that the face is complete, let’s add some charming finishing touches to your Santa Claus Coaster. These small enhancements will turn a simple coaster into a delightful holiday keepsake.
To give your coaster a polished look, consider edging it with a round of single crochet in a contrasting color like white or gold. This frames the coaster and reinforces the edges for durability.
For a whimsical touch, stitch or glue a tiny white pom-pom at the top of Santa’s red hat. This playful detail adds dimension and a classic Christmas feel to your design.
If making a set, try varying the expressions or accessories on each Santa Claus Coaster. One can have rosy cheeks, another a winking eye, and another might hold a mini candy cane. Personalization makes each one unique and fun.
Consider embroidering names or initials onto the back of the coaster for a more personal gift. This is especially charming if you plan to gift the coasters to friends, teachers, or family members.
Another idea is to use your coaster as a base for other crafts—such as attaching it to a card, using it as a tree ornament, or incorporating it into a festive garland. The possibilities are endless with a little imagination.
Take a step back and admire the character and holiday spirit your Santa Claus Coaster brings to life. With every detail added, your creation becomes more than just a coaster—it becomes a tiny work of Christmas joy.
4. Displaying, Using, and Gifting Your Santa Coaster
Once your Santa Claus Coaster is complete, it’s time to enjoy and share it. These little pieces of holiday cheer can be used in many festive ways around the home or given as thoughtful, handmade gifts.
Place a few coasters around your living room or dining table to instantly make your space more festive. They pair beautifully with mugs of hot chocolate, eggnog, or cinnamon tea during cozy winter evenings.
If you host a Christmas party, place one coaster at each setting as a favor for your guests. It’s a small but meaningful gesture that shows thought and effort. Kids especially love having their own personalized Santa coaster.
Use your Santa Claus Coaster as a stocking stuffer, teacher gift, or thank-you token. Wrapped in clear cellophane with a ribbon, it makes for a charming and inexpensive present.
These coasters can also become family keepsakes. Add the year to the back and create a tradition of making a new version each holiday season. Over time, you’ll have a collection of memories in handmade form.
Keep your coasters clean by gently hand-washing them if made of yarn, or wiping them with a damp cloth if made of felt. Store them flat between layers of tissue paper to maintain their shape for next year.
Don’t forget to take a photo of your finished Santa Claus Coaster and share it with fellow crafters, friends, or on social media. Sharing handmade holiday joy spreads cheer far beyond your home.
Santa Claus Coaster
What materials do I need to make a Santa Claus Coaster?
You’ll need red, white, black, and peach yarn or felt, scissors, a crochet hook or sewing tools, and optional embellishments like buttons or embroidery thread.
Can I make this coaster without crocheting?
Yes! You can create a Santa Claus Coaster using felt or fabric. Simply cut the shapes and glue or stitch them together for a no-crochet option.
What size should the coaster be?
A standard coaster is usually 4 to 5 inches in diameter, which is large enough to hold most cups and mugs comfortably.
Is this project suitable for kids?
Yes, with supervision. Kids can help cut shapes, glue pieces, or assist with layout. It’s a fun and safe holiday activity for families.
Can I wash the Santa Claus Coaster?
Hand wash with care, especially if made with yarn or delicate materials. Felt versions can be gently wiped clean with a damp cloth.
Can I sell the coasters I make?
Yes, handmade Santa Claus Coasters are great for craft fairs or holiday markets. Just make sure the design is your own or not under copyright if following a pattern.
Creating a Santa Claus Coaster is a heartwarming way to celebrate the joy of the holiday season with handmade charm. This fun and simple craft not only brings functionality to your home but also adds a touch of personalized magic to your Christmas décor.
From selecting the right materials to assembling Santa’s jolly face and adding finishing touches, this guide has walked you through the entire process. Along the way, we explored ideas for display, gifting, and personalization to make each Santa Claus Coaster truly special.
If this article inspired you, I’d love to hear your thoughts! Please leave your honest opinion and share any suggestions or variations you tried. What colors did you choose? Did you add your own twist? Let’s keep spreading holiday cheer one coaster at a time!


