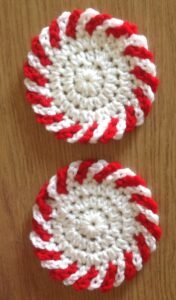
Looking to add a festive and handmade touch to your holiday décor? The Peppermint Coasters – Free Crochet Pattern is the perfect project to embrace the cozy, joyful spirit of the season. These adorable peppermint swirl designs not only protect your tables from warm drinks but also make beautiful accents for Christmas parties, gift sets, or cozy winter mornings. Whether you’re a beginner crocheter or an experienced maker, this pattern is both fun and functional.
The charm of the Peppermint Coasters – Free Crochet Pattern lies in its simplicity and versatility. Made with basic crochet stitches and festive yarn colors, each coaster can be completed quickly—making them a great last-minute handmade gift or a relaxing evening project. Using red and white yarn gives the coasters their iconic peppermint swirl look, but you can also customize the colors to match your holiday theme or personal preference.
In this article, you’ll learn how to crochet peppermint coasters step by step, including what materials to use, how to work in the round, and tips for shaping and finishing your project. The instructions are broken into four main sections so you can follow along easily. Let’s dive into the sweet world of the Peppermint Coasters – Free Crochet Pattern and start creating your festive set!
1. Gathering Your Supplies and Choosing Yarn
To begin the Peppermint Coasters – Free Crochet Pattern, you’ll need to gather a few basic materials. Fortunately, this project is budget-friendly and requires only a small amount of yarn, making it perfect for using up leftovers from other holiday projects.
Start by selecting your yarn. For the classic peppermint look, you’ll need red and white yarn in worsted weight (medium #4). Acrylic or cotton yarn both work well, but cotton is especially ideal for coasters as it’s absorbent and heat-resistant.
You’ll also need a crochet hook. A size H/8 (5.0 mm) hook is commonly used with worsted weight yarn, but feel free to adjust slightly depending on your tension and the final size you want. Using a smaller hook will give you a tighter stitch, which is helpful for sturdy coasters.
Other essential tools include a tapestry needle for weaving in ends, scissors for trimming excess yarn, and a stitch marker (optional) to help you keep track of rounds. Having these supplies ready will help you stay focused as you move through the pattern.
Take a moment to set up your workspace. A comfortable chair, good lighting, and a cozy beverage nearby can make the process even more enjoyable. Crochet is as much about the experience as the result.
Lastly, decide how many coasters you want to make. A typical set includes four to six pieces, but once you get the hang of the pattern, you might want to keep going and make extra for gifts or stocking stuffers.
2. Understanding the Pattern and Working in Rounds
The beauty of the Peppermint Coasters – Free Crochet Pattern is that it’s worked in the round, creating a smooth, spiral design that mimics a peppermint candy. If you’re new to working in rounds, this is a great place to start.
Begin with a magic ring or chain 4 and join to form a circle. This center point will anchor the entire coaster. You’ll build outward using double crochet stitches to form the swirl. Alternating colors every few stitches will give you that signature peppermint effect.
The swirl pattern is achieved by increasing evenly in each round and changing yarn colors at regular intervals. This creates the illusion of curved stripes. To keep your work clean and neat, always carry the unused yarn behind your work and crochet over it when possible.
Stitch counts are very important in this pattern. Each round typically increases the total number of stitches by a fixed increment—usually 6 or 12 depending on the pattern’s complexity. Count your stitches carefully at the end of each round to maintain a uniform shape.
Use a slip stitch to join rounds and a chain stitch to start the next. Some crocheters prefer working in continuous spirals to avoid seams, but this can make color changes trickier. Choose the method that works best for your skill level and visual preference.
To create clean color changes, drop the first color just before finishing the last stitch of that color and pull through the new color. This technique keeps the lines between sections smooth and crisp—essential for the visual impact of the Peppermint Coasters – Free Crochet Pattern.
3. Finishing Touches: Blocking, Weaving, and Shaping
Once your coaster is complete, it’s time to add finishing touches that will give it a polished and professional look. These small steps make a big difference in the final result of your Peppermint Coasters – Free Crochet Pattern.
Begin by weaving in all loose ends. Use your tapestry needle to carefully tuck each tail into the stitches on the back of the coaster. Try to follow the same color line so your ends blend in seamlessly and won’t pop out later.
Blocking your coasters helps even out the stitches and ensures a flat, round shape. To block, lightly dampen the coaster and pin it to a foam board or towel in the desired shape. Let it air dry completely before unpinning.
If your coasters tend to curl at the edges, consider adding a final round of single crochet in one color around the entire edge. This reinforces the coaster and helps keep it lying flat.
Some crafters like to stiffen their coasters slightly to help them maintain their shape. You can do this using a commercial fabric stiffener or by soaking the coaster in a mix of water and white glue, then blocking as usual.
Consider attaching a felt backing for extra stability. Cut circles of felt slightly smaller than the coasters and sew or glue them to the back. This gives your Peppermint Coasters – Free Crochet Pattern a luxurious finish and makes them more durable.
Store your finished coasters in a gift box or stack them with a ribbon for presentation. These handmade coasters are sure to delight friends and family during the holiday season.
4. Creative Variations and Gifting Ideas
Once you’ve mastered the Peppermint Coasters – Free Crochet Pattern, you can start exploring fun variations and ways to gift them. Handmade items add a personal touch to any celebration, and coasters are especially practical.
One easy variation is changing the color scheme. Try green and white for a minty twist, or red and green for a more traditional Christmas palette. You can also use sparkle yarn or variegated yarn for a unique look.
Add a hanging loop to turn your coasters into festive ornaments. Simply chain a loop and attach it to the edge before fastening off. These make charming tree decorations or stocking stuffers.
Use the pattern as a base for larger projects. By expanding the rounds and continuing the swirl pattern, you can create matching placemats, table runners, or hot pads. Coordinated sets make beautiful and useful handmade gifts.
If you enjoy embroidery, stitch initials or holiday motifs on the coasters after finishing them. Small snowflakes, holly leaves, or stars can be sewn with embroidery thread for a decorative touch.
Create a themed gift bundle with hot cocoa mix, a holiday mug, and a few coasters tied with twine. These DIY gift sets are perfect for teachers, neighbors, or coworkers.
Hosting a holiday party? Use your Peppermint Coasters – Free Crochet Pattern to create table settings. Guests will love the handmade charm, and you can even let them take the coasters home as party favors.
FAQ: Peppermint Coasters – Free Crochet Pattern
How long does it take to make one peppermint coaster?
On average, it takes about 30–45 minutes to complete one coaster, depending on your crochet speed and experience level.
What yarn is best for peppermint coasters?
Cotton yarn is ideal because it’s heat-resistant and absorbent, but acrylic yarn can also be used for decorative purposes.
Can beginners follow this pattern easily?
Yes, the Peppermint Coasters – Free Crochet Pattern uses basic stitches like double crochet and simple color changes, making it accessible for beginners.
How do I keep the coaster from curling at the edges?
Proper stitch count, blocking, and possibly adding a single crochet border can help your coaster stay flat.
Can I machine wash the coasters?
If you use cotton yarn, most coasters can be machine washed on a gentle cycle. Always follow the yarn care instructions for best results.
What size are the finished coasters?
Most finished peppermint coasters measure about 4 to 5 inches in diameter, depending on yarn and tension.
The Peppermint Coasters – Free Crochet Pattern is a delightful project that combines holiday cheer with handmade charm. From choosing your yarn and learning how to create the iconic swirl, to finishing your coasters with polish and style, this guide has walked you through every essential step of the process. Whether you’re making them for yourself, gifting them to loved ones, or decorating for a festive gathering, these coasters bring warmth and personality to every cup.
This pattern is not only quick and satisfying but also allows for endless creativity through color choices and personal touches. We hope you’ve enjoyed crafting these peppermint coasters as much as we’ve enjoyed sharing this guide with you.
Please leave your honest feedback and let us know how your Peppermint Coasters – Free Crochet Pattern turned out. Share your favorite color combos, creative uses, or gifting ideas. Your thoughts and suggestions help us keep the crochet community thriving with new inspiration!


