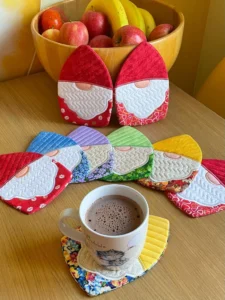
If you’re looking for a charming and functional craft project, an Insulated Gnome Coasters Quilted Pattern is the perfect choice. Combining whimsical design with practical use, these coasters not only protect your tables but also add a touch of personality to any space. In this article, you’ll learn everything about this fun quilting project — from the basics of making insulated gnome coasters to tips for designing your own unique quilted patterns. Whether you’re a beginner or an experienced quilter, this guide will help you create eye-catching and durable coasters you’ll be proud to display or gift.
Creating your own Insulated Gnome Coasters Quilted Pattern allows you to combine creativity with functionality. By incorporating insulation layers, you can make coasters that protect your furniture from hot or cold drinks while showcasing a delightful gnome motif. The process involves selecting the right materials, cutting precise pieces, and stitching them together to form a quilted pattern. With the right approach, even beginners can achieve a polished, professional result that looks store-bought but is uniquely handmade.
The popularity of Insulated Gnome Coasters Quilted Pattern projects has been growing among crafters who enjoy combining quilting techniques with small, manageable crafts. These projects are ideal for using up fabric scraps, experimenting with color combinations, and practicing quilting stitches on a smaller scale. Because they are quick to complete, they’re also excellent for gifts or seasonal décor. In the next sections, we’ll break down everything you need to know to make your own beautiful and practical quilted coasters.
Choosing the Right Materials for Insulated Gnome Coasters Quilted Pattern
When creating an Insulated Gnome Coasters Quilted Pattern, the materials you choose will directly impact the durability and appearance of your finished project. Start with high-quality cotton fabrics for both the top layer and backing. Cotton is easy to work with, holds its shape well, and comes in countless prints — including festive gnome designs perfect for your theme.
Another essential material is the insulation layer. This typically consists of a heat-resistant batting, such as Insul-Bright, which provides the protective barrier needed to shield your surfaces from hot or cold drinks. Using a good batting ensures that your coasters aren’t just decorative but also functional.
You’ll also need matching or contrasting thread, depending on the look you want. A quality thread ensures your stitches are secure and long-lasting. Don’t forget quilting essentials like sharp scissors or a rotary cutter, a cutting mat, and a reliable sewing machine. Even though these coasters are small, precision in cutting and stitching will make a noticeable difference in the final result.
For beginners, pre-cut fabric squares can simplify the process. You can purchase small bundles of coordinating fabrics or cut your own from larger pieces. Having your fabrics ready before starting saves time and allows you to focus on the fun part — designing and sewing.
Another tip is to pre-wash your fabrics before you begin. This prevents shrinkage and color bleeding later, especially important if your coasters will be washed frequently. It’s a small step that ensures your Insulated Gnome Coasters Quilted Pattern looks great for years.
Finally, consider embellishments. Buttons, embroidery, or even appliqué can enhance the gnome motif and make each coaster unique. Just be sure to keep embellishments flat so they don’t interfere with the coaster’s function.
Step-by-Step Guide to Creating an Insulated Gnome Coasters Quilted Pattern
Making an Insulated Gnome Coasters Quilted Pattern may seem complex at first, but breaking it down into steps makes it manageable. Begin by cutting your fabric into squares or circles, depending on your preferred shape. Standard coaster sizes range from 4×4 inches to 5×5 inches, but you can adjust to your liking.
Next, cut your insulation layer slightly smaller than your fabric pieces. This reduces bulk in the seam allowances and gives a cleaner edge. Layer your fabrics with the insulation in the middle — much like making a sandwich — and pin them in place to prevent shifting.
Sew around the edges, leaving a small opening to turn the coaster right side out. After turning, press the coaster flat with an iron. This step is crucial for crisp edges and a professional finish.
Once pressed, top-stitch around the perimeter to close the opening and secure the layers. You can also quilt across the coaster with decorative stitches, adding both beauty and stability. Popular quilting patterns include straight lines, crosshatch, or free-motion designs that mimic the whimsical look of a gnome’s hat or beard.
Don’t forget to add the gnome details! You can appliqué small gnome shapes onto the coaster before sewing the layers together, or embroider features like the nose and beard afterward. This customization is what makes your coasters stand out as true Insulated Gnome Coasters Quilted Patterns.
Repeat the process for each coaster in your set. By making several at once, you’ll develop a rhythm and see your skills improve with each piece.
Tips for Designing Unique Insulated Gnome Coasters Quilted Pattern
Designing a unique Insulated Gnome Coasters Quilted Pattern is where your creativity shines. Start by sketching a simple gnome motif. This can be as detailed or minimal as you like — a classic gnome hat with a pom-pom, a flowing beard, and maybe a tiny nose is enough to evoke the theme.
Choose fabrics that complement your gnome design. For example, bright red or green fabrics work well for hats, while neutral tones like white or beige are ideal for beards. Mixing prints, solids, and textures can add depth and interest to your coasters.
Experiment with different shapes. While square coasters are traditional, round or hexagonal shapes can give your project a fresh twist. You can even make gnome-shaped coasters for a playful look.
Think about seasonal themes. A Christmas gnome coaster might feature festive fabrics, while a spring gnome could incorporate floral prints. This versatility makes Insulated Gnome Coasters Quilted Pattern projects perfect for year-round crafting and gifting.
Consider coordinating your coasters with matching placemats, napkins, or a table runner. This creates a cohesive look for your dining area and elevates the impact of your handmade pieces.
Finally, don’t be afraid to mix techniques. Combine quilting with embroidery, appliqué, or even fabric painting to achieve the look you want. These small projects are a great opportunity to try new methods without the commitment of a large quilt.
Caring for and Using Your Insulated Gnome Coasters Quilted Pattern
Once you’ve made your Insulated Gnome Coasters Quilted Pattern, proper care ensures they last. Because these coasters are designed to be functional, they’ll inevitably encounter spills and stains. Machine wash them on a gentle cycle with mild detergent to keep them clean and fresh.
Air drying is recommended to preserve the shape and prevent shrinkage. If needed, lightly press the coasters with an iron to restore their crisp look. Avoid high heat, especially if your embellishments include delicate materials like buttons or embroidery.
Another tip for longevity is to rotate your coasters regularly. By using different sets, you can minimize wear and tear on any single group of coasters. This also gives you a chance to display different seasonal or themed designs.
These coasters make fantastic gifts. Package them in sets of four or six, tied with ribbon or placed in a decorative box. Include a note about how to care for them so recipients can enjoy them for years to come.
Using your coasters isn’t limited to drinks. They can also protect surfaces from plant pots, candles, or small kitchen tools. Their insulating layer makes them versatile for various household uses.
Finally, display your Insulated Gnome Coasters Quilted Pattern proudly. Whether stacked neatly on a coffee table or arranged in a decorative basket, they’ll add charm to your home and spark conversations with guests.
FAQ About Insulated Gnome Coasters Quilted Pattern
What is an Insulated Gnome Coasters Quilted Pattern?
It’s a small quilted project featuring a gnome motif and an insulation layer designed to protect surfaces from hot or cold items.
Do I need a sewing machine to make these coasters?
While a sewing machine speeds up the process, you can also make these coasters by hand using small, neat stitches.
What type of insulation works best?
Heat-resistant batting, such as Insul-Bright, is ideal for keeping your coasters functional and safe for hot drinks.
Can beginners make an Insulated Gnome Coasters Quilted Pattern?
Yes! This project is perfect for beginners because it’s small, manageable, and a great way to practice basic quilting techniques.
How many coasters should I make in a set?
Most people make sets of four or six, but you can adjust depending on your needs or the size of your household.
Can I personalize these coasters?
Absolutely. You can add names, initials, or custom gnome designs to make each coaster unique.
Pattern
Creating an Insulated Gnome Coasters Quilted Pattern is a rewarding and practical craft project that combines creativity, functionality, and charm. From choosing the right materials to designing and caring for your coasters, this guide has walked you through every step. Whether you’re making them for yourself or as gifts, these coasters will bring warmth and whimsy to any home.
We’d love to hear your thoughts! If you try making your own Insulated Gnome Coasters Quilted Pattern, please share your opinion and suggestions in the comments. Your feedback helps inspire others to explore their creativity and make beautiful, handmade pieces.
