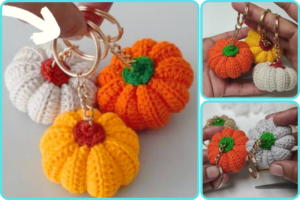
If you’ve ever wondered how to make a crochet pumpkin keychain, this article will guide you through every step of the process in a clear, beginner-friendly way. Whether you’re an experienced crocheter or just getting started, a crochet pumpkin keychain is a quick and charming project that makes a perfect autumn accessory, gift, or craft fair item. Plus, it’s a wonderful way to use up yarn scraps while adding a seasonal flair to your keys or bags.
The phrase how to make a crochet pumpkin keychain is more than just a question—it’s an invitation to get creative with texture, color, and shape. You’ll be surprised by how simple stitches come together to form a delightful mini pumpkin. With the right tools and a little patience, you’ll be stitching up a whole patch of pumpkins in no time.
This tutorial will walk you through the entire process: from materials and stitch basics to assembly and finishing. By the end, you’ll not only know how to make a crochet pumpkin keychain, but also how to personalize it in fun and festive ways.
1. Gathering the Materials You’ll Need
Before you begin, you’ll want to gather all the materials necessary to learn how to make a crochet pumpkin keychain. These items are affordable, easy to find, and may already be in your craft supplies.
Start with choosing a worsted weight yarn in traditional pumpkin colors like orange, rust, or mustard yellow. Acrylic yarn is a popular choice, but cotton yarn gives a more polished finish.
You’ll need a 3.5mm or 4mm crochet hook to create a tight, firm stitch. This helps the pumpkin hold its shape once stuffed.
Other essential tools include a yarn needle for sewing, scissors, and polyester stuffing (or cotton balls if you’re improvising). A little stuffing goes a long way in creating a plump pumpkin.
Don’t forget the keychain ring or lobster clasp. These can be found in most craft stores or online. You’ll attach this after completing the pumpkin body and stem.
To make the pumpkin more realistic, gather some brown yarn for the stem and green yarn for a decorative vine or leaf, if desired. This adds a playful touch to your finished piece.
Finally, consider using a stitch marker, especially if you’re a beginner, to keep track of your rounds. Learning how to make a crochet pumpkin keychain becomes easier when you keep your stitches organized.
2. Crocheting the Pumpkin Body
Now that your materials are ready, it’s time to start crocheting the main body—the round pumpkin shape. This is the central part of understanding how to make a crochet pumpkin keychain.
Begin by making a magic ring and working single crochets in the round. This technique allows you to build the pumpkin in a seamless, spiraling motion without visible joins.
Work your way up by increasing in each round. This means adding two single crochets into one stitch, which helps create a wider and rounder shape.
After reaching the desired width (usually between 18-24 stitches around), begin decreasing to close the shape. This mimics the natural plump look of a pumpkin.
Once the body is shaped, stuff it lightly with polyester filling. Avoid overstuffing, as it can distort the shape or make it too stiff.
To create the ridged effect that gives the pumpkin its signature look, use a yarn needle to wrap yarn vertically around the body several times, pulling slightly to create indentations.
Understanding how to make a crochet pumpkin keychain involves more than just stitching; shaping and texturing add a polished and realistic effect that makes your piece stand out.
3. Creating the Stem and Assembling the Keychain
The pumpkin stem is a small but important detail in your crochet pumpkin keychain project. It adds dimension and visual interest.
To make the stem, use brown yarn and create a simple chain with a few rounds of single crochet to form a short cylinder. You can also use a simple spiral or even just a knot for a more whimsical look.
Sew the stem securely to the top center of your pumpkin using a yarn needle. Be sure to weave in the ends neatly to prevent fraying.
For extra flair, use green yarn to crochet a tiny vine or leaf. This can be done by chaining a few stitches and slip stitching back, or using a leaf pattern with increases and decreases.
Once the pumpkin and stem are complete, it’s time to attach the keychain ring. Use a jump ring or a piece of yarn to securely fasten the keychain hardware through the top of the stem or the pumpkin’s center.
Make sure the keychain is tightly secured, especially if it will be used daily or given as a gift. Durability is key when learning how to make a crochet pumpkin keychain.
You can make multiple pumpkins and vary the colors, stem lengths, or add decorative beads to the ring for a more unique touch.
4. Customizing and Gifting Your Crochet Pumpkin Keychain
Once you’ve mastered the basic form, you can start customizing your crochet pumpkin keychain to match your personal style or seasonal themes.
Try experimenting with different yarn colors, such as white for a ghost pumpkin, or multicolored yarn for a funky twist. This adds variety and makes each keychain unique.
Add tiny faces with embroidery to create a Halloween jack-o’-lantern. This makes the keychain extra festive and suitable for fall celebrations.
Use glitter or metallic yarn to add sparkle, perfect for gifting during Thanksgiving or autumn-themed parties.
Create a matching set of mini keychains to give as favors at fall weddings, harvest festivals, or Thanksgiving dinners. They’re small, thoughtful, and handmade.
Another fun idea is to attach a small tag or label with a name or date, turning your keychain into a personalized keepsake.
The beauty of learning how to make a crochet pumpkin keychain lies in its adaptability. Once you know the basic pattern, you can modify it endlessly to suit different occasions and recipients.
FAQ – How to Make a Crochet Pumpkin Keychain
Q: What is the best yarn for making a crochet pumpkin keychain?
A: The best yarn is worsted weight cotton or acrylic. Cotton provides a clean finish while acrylic is budget-friendly and versatile.
Q: How long does it take to crochet one pumpkin keychain?
A: Most crafters can complete a single keychain in under one hour, especially after mastering the pattern.
Q: Can beginners make a crochet pumpkin keychain?
A: Yes! This is an excellent beginner project. It uses basic stitches like single crochet and simple shaping techniques.
Q: How do I make the pumpkin shape more defined?
A: Use a yarn needle and wrap yarn vertically around the body to create sections, mimicking the natural ridges of a pumpkin.
Q: Can I wash my crochet pumpkin keychain?
A: Hand washing is recommended. If using cotton yarn, it may be more washable than acrylic blends, which can fuzz over time.
Q: Where should I attach the keychain ring?
A: The best spot is at the top, near the stem, using a jump ring, split ring, or simply sewing it securely with matching yarn.
Now that you’ve learned how to make a crochet pumpkin keychain, you’re ready to create adorable, handmade accessories that capture the spirit of autumn. From gathering supplies to stitching and finishing, each step adds to the charm of your finished piece.
This small but rewarding project makes a wonderful gift, key accessory, or festive decor item. You can customize it with color, texture, and fun details, turning every keychain into a unique little work of art.
I’d love to hear your thoughts! If you tried this tutorial or added your own twist, please leave a sincere comment with your experience, suggestions, or creative ideas for future projects. Happy crocheting!


